Loading...
Loading...
Loading...
Loading...
Loading...
Loading...
Loading...
Loading...
Loading...
Loading...
Loading...
Loading...
Loading...
Loading...
Loading...
Loading...
Loading...
Loading...
Loading...
Loading...
Loading...
Loading...
Loading...
Loading...
Loading...
Loading...
Loading...
Loading...
Loading...
Loading...
Loading...
Loading...
Loading...
Loading...
Loading...
Setting up a dedicated service account for your CI/CD tool to access Duplocloud and the underlying cloud.
When using a dedicated security account for pipeline access, you must make it available to the pipelines.
To call the DuploCloud API from a job, obtain an API token. A good naming convention is to name it after the brand, so for Github just name the service account github or gitlab for Gitlab.
Create a Service Account user in DuploCloud. Service Account users are usernames that are not an email address, such as github-bot or my-api-user. These users do not log in, but their account owns the API token.
Give the DuploCloud user access to the desired Tenant. See adding Tenant access for a user. You could give admin permissions as well.
Create an API token for that user. See creating API Tokens.
Add a the following repository variables/secrets to the CI/CD environment.
DUPLO_HOST The full url to the duplocloud portal
DUPLO_TOKEN The API token from step 3
Duplocloud will use the AWS STS to provide credentials during a CI/CD workflow. No extra steps needed. The running job will assume the IAM role associated to the tenant using the duplocloud credentials.
Select the project.
In your CI/CD tool, you will save the following two variables. Navigate to the
Create a Secret named CLOUD_CREDENTIALS with the contents pasted from the JSON credentials you downloaded from the Service Account.
Create a Variable named CLOUD_ACCOUNT with the Project ID or Name from GCP.
The JSON Credentials file you download has the following content:
{
  "type": "service_account",
  "project_id": "<project-id>",
  "private_key_id": "<private-key-id>",
  "private_key": "<private-key>",
  "client_email": "<client-email>",
  "client_id": "<client-id>",
  "auth_uri": "https://accounts.google.com/o/oauth2/auth",
  "token_uri": "https://accounts.google.com/o/oauth2/token",
  "auth_provider_x509_cert_url": "https://www.googleapis.com/oauth2/v1/certs",
  "client_x509_cert_url": "<client-x509-cert-url>"
}Create an Azure Security Account with needed permissions in Azure Entra ID.
The JSON Credential file has the following content:
{
  "clientId": "<client-id>",
  "clientSecret": "<client-secret>",
  "subscriptionId": "<subscription-id>",
  "tenantId": "<tenant-id>"
}
Within your CI/CD tool create the following variables.
Create a Secret named CLOUD_CREDENTIALS with the contents pasted from the json credentials you downloaded from the service account
Create a Variable named CLOUD_ACCOUNT with the directory name for Azure.
Configure the variables mentioned in the steps above for your specific vendor. Foo Bar.
Ensuring continuous integration, delivery, and deployment of your Cloud applications
DuploCloud supports all available CI/CD platforms, including some of the most popular such as GitHub Actions, CircleCI, and GitLab. Duplocloud has a brand agnostic view of CI/CD which revolves around having great support for our client tools and integrating them into the popular brands for a native and intuitive feel no matter the tool you choose.
In addition to third-party CI/CD products, DuploCloud provides , a built-in CI/CD platform that allows you to build, test, and deploy your application from GitHub commits and pull requests. Katkit is an arbitrary code execution engine that allows you to run any code before and after deployment. Conforming to DuploCloud's architecture, Katkit uses , tying together CI and CD.
No matter the brand of tool you use, they all need secure access to your Duplocloud Portal using some credentials attached to a service account.
DuploCloud’s CI/CD integrations are crucial in orchestrating cloud code deployments by seamlessly connecting your existing CI/CD platforms with the DuploCloud Platform. Here’s how it works:
CI/CD systems like GitHub Actions, GitLab, and Azure DevOps can leverage DuploCloud’s prepackaged libraries and modules to invoke DuploCloud functionality directly from their pipelines. This allows you to automate the deployment of your cloud infrastructure and applications, ensuring continuous integration, delivery, and deployment.
Some key integration points between CI/CD systems and DuploCloud include:
Cloud Access for Hosted Runners: DuploCloud provides just-in-time (JIT) access scoped to Tenants for CI/CD build pipelines. Users can create a "CICD" user in the DuploCloud portal with limited access to the desired Tenants, and a token is generated for the user to be added to the CI/CD pipelines.
Deploying Self-Hosted Runners within the Tenant: DuploCloud allows you to deploy a set of build containers within the same Tenant as the application, enabling the build to seamlessly access the Tenant's resources like Docker registries, internal APIs, object stores, SQL, etc.
AWS SecurityHub and Azure Defender Integration: DuploCloud integrates natively with cloud provider-native security solutions like AWS Security Hub and Azure Defender, handling the setup, management, and operations.
Once you have a service account properly set up for your cloud, you can configure those credentials with the tool. Some of the CI/CD integrations that are directly supported by DuploCloud include:
CI/CD using CircleCI
is a popular Continuous Integration and Deployment (CI/CD) platform for implementing rapid development and deployment of DevOps functions.
To ensure that you use CircleCI securely, consult the and keep up to date on the latest security alerts in the section.
CI/CD using GitLab
DuploCloud uses cURL commands to support Continuous Integration and Deployment (CI/CD) in
Documentation guides for getting started using CI/CD with GitHub Actions
Documentation guides for getting started using CI/CD with CircleCI
Documentation guides for getting started using CI/CD with GitLab CI/CD
Documentation guides for getting started with BitBucket Pipelines
Documentation guides for getting started with Azure DevOps
Documentation guides for getting started using CI/CD with Katkit
CI/CD using Bitbucket Pipelines
Bitbucket Pipelines is a continuous integration and delivery (CI/CD) service built into Bitbucket, Atlassian's Git-based version control system. Pipelines allow developers to automatically build, test, and deploy their code every time they push changes to a Bitbucket repository.
Here are some key features of Bitbucket Pipelines:
Easy setup: Pipelines are built into Bitbucket, so it's easy to get started with no additional setup.
Flexible configuration: Pipelines can be configured using YAML files, allowing for high customization.
Docker support: Pipelines uses Docker containers to provide a consistent and isolated environment for running builds and tests.
Parallel builds: Pipelines can run multiple builds in parallel, which can help speed up the overall build process.
Deployment options: Pipelines can deploy your code to various platforms, including AWS, Google Cloud, and Azure.
Building images with Bitbucket Pipelines
When building Docker images, use pipelines as much as possible. This example assumes that you are using the default Atlassian builder image in this example.
To publish a new image to AWS Elastic Container Registry (ECR), for example, use the following sample code to publish a new image when the repo is tagged:
pipelines:
  tags:
    '**':
    - step:
        name: Publish New Image
        # oidc: true indicates that OIDC authentication has been enabled.
        oidc: true
        script:
        - docker build . -t $BITBUCKET_REPO_SLUG
        - pipe: atlassian/aws-ecr-push-image:1.6.2
          variables:
            AWS_DEFAULT_REGION: us-east-1
            AWS_OIDC_ROLE_ARN: $AWS_OIDC_ROLE_ARN
            IMAGE_NAME: $BITBUCKET_REPO_SLUG
TAGS: "latest $BITBUCKET_TAG" By default, all tenant CI/CD runs are executed in a docker image specified by the administrator. This image would typically have the most common packages for your organization. But a user can bring his own builder image and specify the same. The image should have the Katkit agent that can be copied from the default builder image.
By default, Katkit will run the builder containers in a separate set of hosts, but the user can also choose to run the build container in the same tenant hosts which is being tested.
Documentation guides for getting started with BitBucket Pipelines
Documentation guides for getting started with Azure DevOps
Documentation guides for getting started with ArgoCD integrations
Once the above steps have been performed, you can link your GitHub Repository to your tenant. In addition to the repository name, you also need to specify the “Home Branch” which is the branch for which the PRs will be monitored by Katkit for the user to run deployments. Same repository and branch combination can be linked in several tenants. If your repository has several services for different tenants, then each service can be represented by a separate folder at the root. This is Folder Path field. Katkit looks for service description file under /servicedescription/servicedescription.js Same repository but different folders can also be used in different tenant. Same tenant can also have different repositories.
CI/CD using GitHub Actions
While DuploCloud uses cURL commands to support Continuous Integration and Deployment (CI/CD) in , GitHub predefined actions are implemented to perform CI/CD tasks.
Use Duplo to update a Service container from Github Actions
The goal of this section is to show how you can update the docker image for a Kubernetes service, after you have built that image. This task can be achieved using the action.
This example makes some assumptions:
Your workflow already has a build job - we created one in the previous section
Your build job declares an output named image - also done in the previous section
To use it you will need to ensure your GHA Environment has the following:
DUPLO_HOST env var
DUPLO_TENANT env var
DUPLO_TOKEN env var
You need to change the service name below from my-service to the name of your actual service.
This section discusses how you can configure Gitlab to integrate with Duplo
To interact with your Duplocloud Portal from GitLab CI/CD, you need to follow these steps.
First you need a service account in your portal which has the needed permissions.
Now we can save the information about the service account within the Gitlab CI/CD Environment variables. You mainly need to set DUPLO_HOST and DUPLO_TOKEN variables.
Gitlab does have the option to set these variables at a variety of level scopes; organization, group, project. For example, you can set variables at the organization level and then all projects would be able to interact with your portal.
Gitlab has a unique feature to scope variables into tiers as well. This is very useful when you have many instances of an app within some tiers like dev, stage, prod. With this you can scope a variable like this dev/* which means any with that prefix will inherit this variable. This means you can make all dev environments share the DUPLO_HOST variable. This can group tenants under namespace as well, so you can rename your dev01 tenant to be a dev/dev01 to be an environment under a tier in Gitlab CI. This is particularly useful with multiple Duplocloud Portals.
The rest of this documentation will assume all the variables needed for service account access are set.
Use Duplo to update a service's container from Gitlab CI/CD
The goal of this section is to show how you can update the docker image for a service, after you have built that image.
This example makes some assumptions:
Your workflow already has a build job - we created one in the previous section
Duplocloud Services
Sometimes on Windows based agents will fail to login to ECR due to missing dependency of ECR credentials helper. Basically all aws api calls require certain headers. Dockers api for registries don't require these headers. Therefore ECR is not exactly a normal docker registry. This credentials helper just hooks into docker and adds those required aws headers to any request to ECR.
If the ECR login step of your pipeline has a failure that looks like:
Error response from daemon: login attempt to https://******.dkr.ecr.us-east-1.amazonaws.com/v2/ failed with status: 400 Bad Request
You can add a step to install the ECR Credenteials hellper, for example:
More details on the ECR Credentials helper located
name: Update Service

on:
  workflow_dispatch:
    inputs:
      environment:
        description: The environment to deploy to
        type: environment
        default: dev
        required: true
      image:
        description: The full image
        type: string
        required: true

jobs:
  update_service:
    name: Update Service
    runs-on: ubuntu-latest
    environment:
      name: ${{ inputs.environment }}
    env:
      DUPLO_TOKEN: ${{ secrets.DUPLO_TOKEN }}
      DUPLO_HOST: ${{ vars.DUPLO_HOST  }}
      DUPLO_TENANT: ${{ vars.DUPLO_TENANT }}
    steps:

    # install and login to the cloud
    - name: Duplo Setup
      uses: duplocloud/[email protected]
      # only required on gcp and azure
      with:
        account-id: ${{ vars.CLOUD_ACCOUNT }}
        credentials: ${{ secrets.CLOUD_CREDENTIALS }}

    # uses duploctl from above
    - name: Update Service
      uses: duplocloud/actions/[email protected]
      with:
        name: my-service
        image: ${{ inputs.image }}
type: servicedeploy:
stage: deploy
image:
name: duplocloud/duploctl:v0.2.27
entrypoint: [""]
# this will have DUPLO_HOST and DUPLO_TOKEN
environment:
name: $TIER/$DUPLO_TENANT
url: ${MYAPPS_URL}
rules:
# run when a new tag is pushed
- if: $CI_COMMIT_TAG && $CI_PIPELINE_SOURCE == "pipeline"
when: always
variables:
# build your image here
CI_IMAGE: ${IMAGE_REGISTRY}/${CI_PROJECT_NAMESPACE}/${CI_PROJECT_NAME}:${CI_COMMIT_TAG}
GIT_STRATEGY: none # no need to pull the repo
needs:
- job: publish_image
optional: true
before_script:
- echo "Updating service ${CI_PROJECT_NAME} with image ${CI_IMAGE}"
script: duploctl service update_image $CI_PROJECT_NAME $CI_IMAGEgo install github.com/awslabs/amazon-ecr-credential-helper/ecr-login/cli/docker-credential-ecr-login@latestUse Duplo to update a Service container from Github Actions
The goal of this section is to show how you can update the docker image for an ECS service, after you have built that image. This task can be achieved using the duplocloud/actions/update-image action.
This example makes some assumptions:
Your workflow already has a build job - we created one in the previous section
Your build job declares an output named image - also done in the previous section
To use it you will need to ensure your GHA Environment has the following:
DUPLO_HOST env var
DUPLO_TENANT env var
DUPLO_TOKEN env var
You need to change the service name below from my-service to the name of your actual service.
name: Update Service

on:
  workflow_dispatch:
    inputs:
      environment:
        description: The environment to deploy to
        type: environment
        default: dev
        required: true
      image:
        description: The full image
        type: string
        required: true

jobs:
  update_service:
    name: Update Service
    runs-on: ubuntu-latest
    environment:
      name: ${{ inputs.environment }}
    env:
      DUPLO_TOKEN: ${{ secrets.DUPLO_TOKEN }}
      DUPLO_HOST: ${{ vars.DUPLO_HOST  }}
      DUPLO_TENANT: ${{ vars.DUPLO_TENANT }}
    steps:

    # install and login to the cloud
    - name: Duplo Setup
      uses: duplocloud/[email protected]
      # only required on gcp and azure
      with:
        account-id: ${{ vars.CLOUD_ACCOUNT }}
        credentials: ${{ secrets.CLOUD_CREDENTIALS }}

    # uses duploctl from above
    - name: Update Service
      uses: duplocloud/actions/[email protected]
      with:
        name: my-service
        image: ${{ inputs.image }}
type: ecsCI/CD using Azure Pipelines
Azure Pipelines is a continuous integration and delivery (CI/CD) service built into Azure DevOps, Microsoft's successor to Team Foundation Server. Pipelines allow developers to automatically build, test, and deploy their code every time they push changes to an Azure Repos repository.
Key features of Azure Pipelines include:
Easy setup: Pipelines are built into Azure DevOps, so it's easy to get started with no additional setup.
Flexible configuration: Pipelines can be configured using YAML files, allowing for high customization.
Docker support: Pipelines uses Docker containers to provide a consistent and isolated environment for running builds and tests.
Parallel builds: Pipelines can run multiple builds in parallel, which can help speed up the overall build process.
Deployment options: Pipelines can deploy your code to various platforms, including AWS, Google Cloud, and Azure.
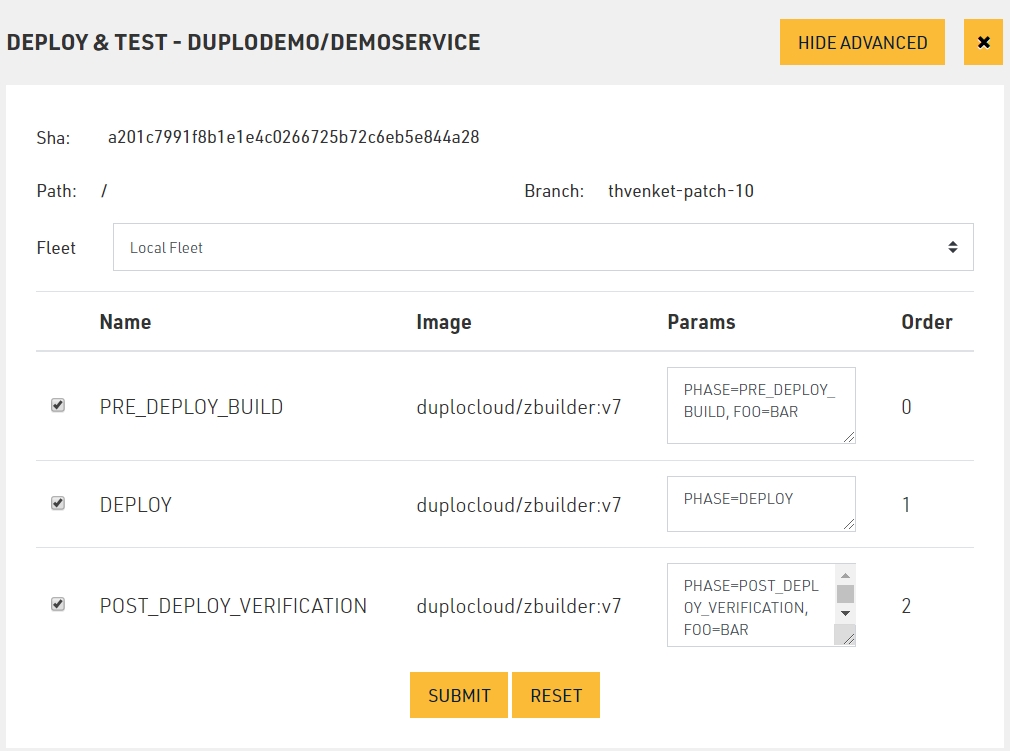
The above configuration customizations like Phases, ENV, etc. can be saved in the repository in a config file called katkitconfig.js Following is an example of one such file
[
    {
        "EnvName": "default",
        "LocalFleet": "true",
        "WorkFlow": [
            {
                "Name": "PRE_DEPLOY_BUILD",
                "PhaseType": 4,
                "BuildParams": "PHASE=PRE_DEPLOY_BUILD, FOO=BAR",
                "Order": 0,
                "Parallelism": 1,
                "ContainerImage": "duplocloud/zbuilder:v7"
            },
            {
                "Name": "DEPLOY",
                "PhaseType": 1,
                "BuildParams": "PHASE=DEPLOY",
                "Order": 1,
                "Parallelism": 1,
                "ContainerImage": null
            }
        ]
    }
]CI/CD using Katkit
DuploCloud provides a CI/CD framework that allows you to build, test and deploy your application from GitHub commits and PRs. We call it Katkit. Katkit is a arbitrary code execution engine which allows the user to run arbitrary code before and after deployment. Katkit follows the same notion of a “Tenant” or environment. Thus, tying together CI and CD. In other words, the tests are run against the application in same underlying AWS topology where one’s code is running as against running them in a separate fleet of servers which does not capture the interactions of the application with the AWS infrastructure like IAM, Security groups ELB etc.
At a high level, Katkit functions as follows:
A repository is linked to a Tenant.
User chooses a Git commit to run test and deploy
Katkit deploys a service in the same tenant with the docker image provided by DuploCloud, which is essentially like a jenkins worker and has the Katkit agent in it.
Katkit agent in the CI container checks out the code at that commit inside the container. It then executes ci.sh from the checked-out code. Essentially each build is a short-lived service that is removed once the ci.sh execution is over.
User can put any arbitrary code in ci.sh
Katkit allows, for a given run of a commit, the user to execute code in “phases” where in each phase Katkit repeats the above steps with a difference in the ENV variables that are set in each phase. The code inside ci.sh is to read the env variables and perform different actions corresponding to each phase
Katkit has a special phase called “deployment” where it does not run ci.sh but it looks for the servicdescription.js file (details below), replaces the docker image tag and replaces it with the git commit sha. It is assumed that the user, before invoking the deployment phase, has gone through a prior phase where they build a docker image which was tagged with the git commit sha. The sha is available as an ENV variable in every phase.
To use CircleCI CI/CD, you need to deploy the application with DuploCloud as a Service and test that it works as expected.
In order to call a DuploCloud API from CircleCI, you need to obtain and configure an API token.
API tokens(Recommended) Create a "service account" user in DuploCloud to own the API token.
Give the DuploCloud user access to the desired Tenant. See adding Tenants to a user.
Create an API token for that user. See creating API Tokens.
Add a CircleCI Environment Variables in the Context created for the organization, to allow CircleCI pipelines to communicate with the DuploCloud Portal.
Login to the CircleCI portal and select your organization.
Click on Organization Settings in the left-hand sidebar.
Click on Create Context button and create context by providing a name.
Click on the newly created context and scroll to Environment Variables section.
Click Add Environment Variable.
Set an Environment Variable name and value forDUPLO_HOST(the value is the DuploCloud Portal URL).
Set an Environment Variable name and value for DUPLO_TOKEN (the value of the token created for the above service account).
After adding the environment variables you should see them displayed in the Organization Settings section below.
The rest of this procedure assumes that you have added the above two environment variables.
This section discusses how you can configure Github to integrate with Duplo
Follow these steps to interact with your Duplocloud Portal from GitHub Actions.
First you need a service account in your portal with the permissions.
To get fully set up with Duplocloud and the underlying cloud provider you use, you get everything you need set up with . This action will install the CLI for duplocloud and the CLI for the underlying cloud. Finally, it will perform a safe login so subsequent steps can freely interact with DuploCloud or the cloud it manages.
Here is the most basic setup for any pipeline to get started.
are how you define different deployment environments for your workflows and how they differ from one another. Here, you define environment-specific variables and secrets. This allows you to parameterize and secure your workflows. We highly recommend using this feature, however it is paid and therefore optional since you may not have it.
The most common use case with Duplocloud is to match up one Tenant to one Environment. Imagine we have a tenant named dev01, then you make a new environment in every repo, which will deploy to it named dev01. Often, you may not even need to add any secrets or variables because we have already added the DUPLO_HOST and DUPLO_TOKEN at the repo level earlier, and you only need the name of the environment as the value for the DUPLO_TENANT.
This shows how to configure a job to use an environment using an input and match it up to the tenant.
The input type is environment which only works on workflow_dispatch because it provides a UI with a drop-down selector for choosing from the list of configured Github Environments. On any other event type, the environment input would be a type string, and you pass in a name.
Retrieve the Duplo Tenant ID from the duplocloud_tenant in the Terraform data source using the syntax: `duplocloud_tenant.tenant1.id`.
From inside a GitHub Actions workflow, use the DuploCloud Python client (duploctl) to pull the Tenant ID. For more information, see the . To ensure the client is installed in the pipeline, you can use the command: pip install duplocloud-client.
The rest of this documentation will assume that you named the GitHub repository secret. DUPLO_TOKEN.
Use DuploCloud to build and push a Docker image from GitHub Actions
This section aims to show you how to build a Docker image and push it to ECR.
It does three things:
Logs in to AWS ECR (using just-in-time AWS credentials from DuploCloud)
Builds and tags your Docker image, with the tags based on the Git commit SHA and ref.
Pushes your Docker image
Here is an example of a GitHub workflow that builds and pushes a Docker image to ECR.
To use it, ensure the following are configured correctly:
DUPLO_HOST environment variable
DUPLO_TOKEN environment variable
Use DuploCloud to update your CloudFront from Github Actions
The goal of this section is to show how you can upload to an S3 bucket and update a CloudFront distribution from Github Actions.
This process is done in four basic steps:
Logs in to AWS ECR using Just-In-Time (JIT) AWS credentials from DuploCloud
Build your website content
Upload your website content to S3
Inform AWS CloudFront that the website content has changed
IMPORTANT: Steps to build website content are application specific and outside of the scope of this document. Please replace the example step in the workflow with the steps needed by your application's website.
To use it you will need to change the following:
The steps used to build your website content
duplo_host env var
CLOUDFRONT_ID env var
TENANT_NAME env var
BUCKET_NAME env var
You also likely will need to change the paths and AWS CLI arguments used to upload your website content.
The goal of this section is to show how you can build a docker image and push it to ECR.
It does three basic things:
Logs in to AWS ECR using just-in-time (JIT) AWS credentials from Duplo
Builds and tags your docker image, with the tag based on the git commit SHA.
Pushes your docker image
Here is an example CircleCI workflow that builds a docker image and pushes it to ECR.
To use it you will need to change following environment variables:
DOCKER_REPO
DOCKER_IMAGE_NAME
DUPLO_SERVICE_NAME
DOCKER_REPO
ECR_REGION
Above example of CircleCI requires DuploCloud utility shell script file which has to be checked in with your CircleCI file. This utility file can be found here:
name: Publish Image
on:
  # Triggers the workflow on push to matching branches
  push:
    branches:
    - main
  # (Optional) Allows users to trigger the workflow manually from the GitHub UI
  workflow_dispatch: {}
  # (Optional) Allow other workflows to use this workflow and its outputs
  workflow_call:
    outputs:
      image:
        description: The URI of the image
        value: ${{ jobs.build_image.outputs.image }}
    secrets:
      DUPLO_TOKEN:
        description: The token to use for DuploCloud API calls
        required: true

env:
  DUPLO_HOST: ${{ vars.DUPLO_HOST }}
  DUPLO_TOKEN: ${{ secrets.DUPLO_TOKEN }}
  # Images are usually stored in a dedicated tenant, so the name doesn't change
  DUPLO_TENANT: devops

jobs:
  build_image:
    name: Build and Push Image
    runs-on: ubuntu-latest
    outputs:
      image: ${{ steps.build_image.outputs.uri }}
    steps:

    - name: Checkout code
      uses: actions/checkout@v4

    # Configures DuploCloud and the host cloud, for example, AWS
    - name: Cloud CI Setup
      uses: duplocloud/[email protected]

    # logs into the registry, configures Docker, builds the image, and lastly pushes
    - name: Build and Push Docker Image
      id: build_image
      uses: duplocloud/actions/build-image@v0.0.5
      with:
        platforms: linux/amd64,linux/arm64
        push: true # false for dry runs
        build-args: >
          foo=bar
          ice_cream=chocolate
name=${{ github.repository }}name: Build and Deploy
on:
# Triggers the workflow on push to matching branches
push:
branches:
- master
env:
duplo_host: https://mysystem.duplocloud.net # CHANGE ME!
duplo_token: "${{ secrets.DUPLO_TOKEN }}"
CLOUDFRONT_ID: mycloudfront # CHANGE ME!
TENANT_NAME: mytenant # CHANGE ME!
BUCKET_NAME: duploservices-mytenant-website-1234 # CHANGE ME!
# A workflow run is made up of one or more jobs that can run sequentially or in parallel
jobs:
build_and_deploy:
runs-on: ubuntu-latest
needs:
- build
steps:
- name: Checkout
uses: actions/checkout@v4
# Build the website. CHANGE ME!
- name: CHANGE ME - Replace with your actual build logic
run: exit 1
# Deploy the website
- name: Get AWS credentials
uses: duplocloud/ghactions-aws-jit@master
with:
tenant: "${{ env.TENANT_NAME }}"
- name: Sync files to S3
run: |-
# Sync files to S3 from a local directory named "build"
aws s3 sync build/ "s3://$BUCKET_NAME/" --cache-control max-age=120,must-revalidate
- name: Invalidate Cloudfront
uses: chetan/invalidate-cloudfront-action@v2
env:
DISTRIBUTION: "${{ env.CLOUDFRONT_ID }}"
PATHS: "/*"version: 2.1
parameters:
create_image:
type: boolean
default: false
orbs:
vpn: titel-media/[email protected]
newman: postman/[email protected]
dynamo-lock: gastfreund/[email protected]
defaults: &defaults
working_directory: ~/repo
docker:
- image: cimg/node:17.5.0
environment:
TENANT_NAME: dev01
DOCKER_REPO: public.ecr.aws/p9c8y2k3
DOCKER_IMAGE_NAME: demo-npm-service
DUPLO_SERVICE_NAME: nginx
ECR_REGION: us-west-2
jobs:
BuildAndTest:
<<: *defaults
steps:
- checkout
- restore_cache:
keys:
- v1-dependencies-{{ checksum "package.json" }}
- v1-dependencies-
- run: npm install
- save_cache:
paths:
- node_modules
key: v1-dependencies-{{ checksum "package.json" }}
- persist_to_workspace:
root: ~/repo
paths: .
PublishDockerContainerRC:
<<: *defaults
steps:
- attach_workspace:
at: ~/repo
- setup_remote_docker:
version: 19.03.13
- run:
name: Install Dependencies
command: |
source ./.circleci/duplo_utils.sh && install_dependencies
- run:
name: Create and Push Docker container
command: |
source ./.circleci/duplo_utils.sh
tag=$(node -p "require('./package.json').version")
docker_tag=$(get_docker_tag_rc $tag)
echo "Starting build for container: $docker_tag"
docker build -t $docker_tag .
push_container_rc $tag
Use GitHub Actions to deploy a Lambda Image or S3 bucket update
Instead of deploying your Lambda code in the same pipeline as your infrastructure, you can use CI/CD and GitHub Actions pipelines. With DuploCloud's GitHub Actions integration, you can build and deploy Lambda functions in your AWS account by deploying a Lambda image or by a package uploaded to an S3 bucket.
Use the following code as a template to update a Lambda container image with GitHub Actions. In this example, the Lambda container image in the dev01 The tenant is updated and redeployed.
You must ensure the following are configured in your environment and your specific situation.
The name of lambda is set on the action to your actual lambda
Duplocloud context configured correctly
name: Update Lambda

on:
  workflow_dispatch:
    inputs:
      environment:
        description: The environment to deploy to
        type: environment
        default: dev01
      image:
        description: The full image
        type: string
        required: true

jobs:
  update_service:
    name: Update Lambda
    runs-on: ubuntu-latest
    environment:
      name: ${{ inputs.environment }}
    env:
      DUPLO_TOKEN: ${{ secrets.DUPLO_TOKEN }}
      DUPLO_HOST: ${{ vars.DUPLO_HOST  }}
      DUPLO_TENANT: ${{ inputs.environment }}
    steps:

    # configures duplocloud and aws
    - name: Cloud CI Setup
      uses: duplocloud/[email protected]

    # uses duploctl from above
    - name: Update Lambda
      uses: duplocloud/actions/[email protected]
      with:
        type: lambda
        name: mylambda
image: ${{ inputs.image }}Use the following code as a template to deploy your Lambda functions to an S3 bucket with GitHub Actions. In this example, the Lambda in the dev01 The tenant is updated using an S3 bucket that contains mylambda-v1.zip
You must ensure the following are configured in your environment and your specific situation.
Duplocloud context configured correctly
S3KEY
S3BUCKET
LAMBDA_NAME
name: Update Lambda

on:
  workflow_dispatch:
    inputs:
      environment:
        description: The environment to deploy to
        type: environment
        default: dev01
      s3key:
        description: The key name in the s3 bucket with the version to deploy.
        type: string
        required: false
        default: mylambda-v1.zip

jobs:
  update_service:
    name: Update Lambda
    runs-on: ubuntu-latest
    environment:
      name: ${{ inputs.environment }}
    env:
      DUPLO_TOKEN: ${{ secrets.DUPLO_TOKEN }}
      DUPLO_HOST: ${{ vars.DUPLO_HOST  }}
      DUPLO_TENANT: ${{ inputs.environment }}
    steps:

    # configures duplocloud and aws
    - name: Cloud CI Setup
      uses: duplocloud/actions/[email protected]

    # we can build the bucket name using context from setup
    - name: Discover True Bucket Name
      env:
        S3BUCKET: mybucket
      run: echo "S3BUCKET=duploservices-${DUPLO_TENANT}-${S3BUCKET}-${AWS_ACCOUNT_ID}" >> $GITHUB_ENV

    # uses duploctl from above to run update lambda function
    - name: Update Lambda from S3
      env:
        LAMBDA_NAME: mylambda
        S3KEY: ${{ inputs.s3key }}
run: duploctl lambda update_s3 $LAMBDA_NAME $S3BUCKET $S3KEYUpdate the container image used by a DuploCloud Service
Use DuploCloud service account authentication from Azure DevOps to update the container image used by a service.
Update a DuploCloud service from an Azure DevOps pipeline using a pipeline script.
Here is an example Azure DevOps pipeline that updates a Docker container image used by a DuploCloud Service.
DUPLO_TOKEN, DUPLO_HOST, and ECR_BASE need to be pre-configured in the Azure DevOps variable group named duplocloud-secrets
The ECR must have the same name as the Azure DevOps repo being built. Modify the name of the ECR, if needed.
Ensure that the DuploCloud Service has the same name as the Azure DevOps repo being built.
These prerequisites can be customized to fit existing pipelines and conventions for passing YAML attribute values. Note that the resources section triggers the deployment when the ecr-publish pipeline command finishes executing. env_names can be a list of comma-separated values for multi-deployments. Default values in early non-production environments are suitable for continuous deployment when used with the pipeline resource trigger.
parameters:
- name: tag_choice
  displayName: Tag (Build ID or short commit hash or branch name) or this-commit or this-branch
  type: string
  default: this-commit
- name: env_names
  displayName: DuploCloud environment/tenant names
  type: string
  default: dev01,staging01

variables:
  - group: duplocloud-secrets

trigger: none

resources:
  pipelines:
  - pipeline: ecr-publish
    source: \api\api-ecr-publish
    trigger:
      branches:
        include:
          - develop

steps:
  - script: |
      export tag_choice=${{ parameters.tag_choice }}
      export env_names=${{ parameters.env_names }}
      export service_name=$(Build.Repository.Name)
      echo $tag_choice
      if [ $tag_choice = 'this-commit' ]; then
        export tag_choice=${BUILD_SOURCEVERSION:0:8}
      fi
      if [ $tag_choice = 'this-branch' ]; then
        export tag_choice=$(Build.SourceBranchName)
      fi
      echo $tag_choice
      export token=$(DUPLO_TOKEN)
      export host=$(DUPLO_HOST)
      export ecr_base=$(ECR_BASE)
      echo $tenant
      pip install duplocloud-client
      export IFS=","
      for env_name in $env_names; do
        echo "Updating service in tenant $env_name"
        duploctl --host=$host --token=$token --tenant=$env_name service update_image $service_name $ecr_base/$(Build.Repository.Name):$tag_choice
      done
displayName: Update service imageIn DuploCloud a standard practice is to have a separate tenant for a given logical application for each deployment environment. For example, say an application called taskrunner would be created as three tenants called d-taskrunner, b-taskrunner and p-taskrunner to represent dev, beta and prod environment. In each tenant one can specify an arbitrary name for the env say “DEV” in the menu Dashboard–>ENV. This string will be set by Katkit as an ENV variable when it runs the tests during CI/CD and thus your test code can use this value to determine what tests should be run in each env or for that matter take any other action.
To use KatKit CI/CD, you need to:
Deploy the application with DuploCloud as a Service and test that it works as expected.
Service Description represents the topology of a service. It is a JSON file that is used by Katkit to upgrade the running service. Go to Deployment > Services > Export. This will give a json file. Save this as servicedescription.js under the /servicedescription folder that must exist at the root of your repository. In this file search for "DockerImage": and here change the image tag to the word <hubtag> for example change "DockerImage": "nginx:latest" to "DockerImage": "nginx:<hubtag>". Remove the ExtraConfig and Replicas field from the file. These have env variables and replicas which would vary from one environment to other. Hence during deployment Katkit will retain what is already present in the current running service.
Update images with DuploCloud's BitBucket Deploy Pipe
When your pipeline has updated an image, you'll push it to your deployed service. DuploCloud's custom Bitbucket Pipe does this, updating any service with the latest image.
For example, to update a Service (myservice) for a Tenant (sometenant) when a new Git tag is published (myimage:${BITBUCKET_TAG}), use this code:
pipelines:
  tags:
    '**':
    - step:
        name: Update Service
        script:
        - pipe: docker://duplocloud/bitbucket-deploy-pipe:0.1.0
          variables:
            DUPLO_TOKEN: $DUPLO_TOKEN
            DUPLO_HOST: https://example.duplocloud.net/
            TENANT: sometenant
            SERVICE: myservice
            IMAGE: myimage:${BITBUCKET_TAG}
Learn more about BitBucket Deploy Pipe on GitHub.
jobs:
  build:
    runs-on: ubuntu-latest
    env:
      DUPLO_TOKEN: ${{ secrets.DUPLO_TOKEN }}
      DUPLO_HOST: ${{ vars.DUPLO_HOST  }}
      DUPLO_TENANT: ${{ vars.DUPLO_TENANT }}
    steps:
    - name: Duplo Setup
      uses: duplocloud/[email protected].12
      with: # These are only needed for GCP and Azure
        account-id: ${{ vars.CLOUD_ACCOUNT }}
credentials: ${{ secrets.CLOUD_CREDENTIALS }}name: My Workflow
on:
workflow_dispatch:
inputs:
environment:
description: The environment to deploy to
type: environment
default: dev01
jobs:
build:
runs-on: ubuntu-latest
environment:
name: ${{ inputs.environment }}
env:
DUPLO_TOKEN: ${{ secrets.DUPLO_TOKEN }}
DUPLO_HOST: ${{ vars.DUPLO_HOST }}
DUPLO_TENANT: ${{ inputs.environment }}
steps:
- name: Duplo Setup
uses: duplocloud/[email protected].12
with: # These are only needed for GCP and Azure
account-id: ${{ vars.CLOUD_ACCOUNT }}
credentials: ${{ secrets.CLOUD_CREDENTIALS }}

This section discusses how you can configure Azure DevOps to integrate with DuploCloud.
In the DuploCloud portal, navigate to Administrator -> Users. The Users page displays.
Click Add.
In the Username field, enter a non-email address username, such as cicd. The username cannot be a valid email address, as DuploCloud designates it as a service account.
From the Roles list box, select Admin for the fastest setup. If you select User, you must give Tenant access to that user.
Click Submit. Your service account is set up and can be viewed or modified from the Users page.
Create a permanent token for the service account that you created, using a token name that describes the CI/CD platform, such as azure-devops.
In the Azure DevOps Portal, save the token that you created in DuploCloud to the Azure DevOps Pipelines Variable Group.
duplocloud-secrets Azure Pipelines Variable Group in the Azure DevOps PortalIn an Azure DevOps project, navigate to Pipelines -> Library.
Create a new variable group named duplocloud-secrets.
Add a DUPLO_TOKEN variable; select Lock (next to the Value field), and paste in the permanent token as the Value.
Add a DUPLO_HOST variable. The Value is your DuploCloud portal URL, as in the example above.
Add a ECR_BASE variable based on the domain name of your ECR registry, as in the example above.
Use DuploCloud to upload to S3 from Github Actions
The goal of this section is to show how you can upload to an S3 bucket from Github Actions.
This process is done in two basic steps:
Logs in to AWS ECR using Just-In-Time (JIT) AWS credentials from DuploCloud
Upload your website content to S3
To use any of the below examples you will need to change:
The local path to upload from, if it is not build
duplo_host env var
TENANT_NAME env var
BUCKET_NAME env var
The following example uploads a single directory to S3.
It does not show more advanced things like the following items:
Setting cache control directives
Making the uploaded content public
Making AWS delete older content
This example uploads multiple directories to S3.
It assumes that the following is true:
There is a subfolder named static, whose contents can be cached for one year.
The rest of the contents can change at any time, so the cache uses must-revalidate.
How to setup and apply Terraform stacks with GitHub Actions.
Using Terraform, GitHub Actions, and DuploCloud together is very straightforward. DuploCloud has created a dedicated provider for Terraform and custom GitHub Actions to orchestrate the flow. It is is surprisingly easy and quick to get setup.
There are four main actions to run to get a module properly installed and running.
Just like all of the other actions, we always start with getting DuploCloud and the underlying cloud all setup and authenticated.
Initializes Terraform and optionally TFLint. Also configures caching.
Runs init as well as a variety of quality assurance checks including testing.
Finally you can choose a workspace and a module and exute the action you desire.
Here is a fully working and reusable GitHub Action Workflow. Simply copy this into your workflows.
The workflow_dispatch is for running the job manually. The workflow_call is for running the job in another workflow. This is useful to run a series of modules for one module in order. In this workflow we will reuse the single module three times to orchestrate our environment.
The goal of this section is to show how you can update the docker image for a service, after you have built that image.
This example makes some assumptions:
Your workflow already has a build job - we created one in the previous section
Your build job declares an output named image - also done in the previous section
To use it you will need to change:
DOCKER_REPO
DOCKER_IMAGE_NAME
DUPLO_SERVICE_NAME
DOCKER_REPO
ECR_REGION
Deploy Argo CD in a DuploCloud-managed Infrastructure
is a declarative, GitOps-based continuous delivery (CD) tool for Kubernetes. It enables you to manage Kubernetes resources using Git repositories as the source of truth, allowing you to automate and track application deployments with version control and auditing.
DuploCloud integrates with Argo CD, allowing you to deploy and manage applications declaratively within your Duplo-managed infrastructure. This integration streamlines continuous delivery workflows, reduces manual configuration, and helps enforce consistent deployments across environments.
Navigate to Administrator → Tenants and click Add to create a dedicated Tenant for hosting Argo CD, for example, argocd01.
Install Argo CD into your argocd01 Tenant using the official . This will deploy all necessary Argo CD components, including the API server, UI, and controllers, into the Kubernetes namespace for the Tenant.
Optionally, you can use DuploCloud’s if it's available in your environment.
Expose the Argo CD UI via an Ingress controller:
Ensure that a DNS name points to the ALB created by the Helm chart.
You can configure this manually or use if available.
To allow DuploCloud to authenticate with Argo CD:
Locate the argocd-cm ConfigMap.
Add the following entry:
This enables API key support for the admin account. No restart is required because Argo CD picks this up automatically.
Log into the Argo CD UI using the DNS name from above.
The default username is admin.
The initial password is in the Kubernetes secret named argocd-initial-admin-secret.
Navigate to Settings -> Accounts -> admin and generate a new token.
To enable DuploCloud to integrate with Argo CD, you'll need to add two custom system settings.
Navigate to Administrator → Settings → System Settings.
Click Add, The Add Config pane displays.
In the Config Type list box, select Other.
In the Other Config Type field, enter AppConfig/argocd.
In the Key field, enter the key (including INFRA_NAME):
For the endpoint: argocd/INFRA_NAME/endpoint.
For the token: argocd/INFRA_NAME/admin_token.
In the Value field, enter the corresponding value:
For the endpoint: https://DNS_NAME_FROM_STEP_4/.
For the token: Bearer TOKEN_FROM_STEP_5. Make sure the token value begins with Bearer. This prefix is required and not included in the token generated by Argo CD.
Go to CI/CD -> Argo CD in any Tenant within the INFRA_NAME infrastructure.
If everything is configured correctly, you will see synced applications.
If the token or endpoint are incorrect, you may see a "session" error.
To troubleshoot or interact directly:
You can list accounts:
name: Build and Deploy
on:
  # Triggers the workflow on push to matching branches
  push:
    branches:
      - master
env:
  duplo_host: https://mysystem.duplocloud.net  # CHANGE ME!
  duplo_token: "${{ secrets.DUPLO_TOKEN }}"
  TENANT_NAME: mytenant                        # CHANGE ME!
  BUCKET_NAME: duploservices-mytenant-website-1234  # CHANGE ME!

# A workflow run is made up of one or more jobs that can run sequentially or in parallel
jobs:
  build_and_deploy:
    runs-on: ubuntu-latest
    needs:
      - build
    steps:
      - name: Checkout
        uses: actions/checkout@v2

      # Upload to S3
      - name: Get AWS credentials
        uses: duplocloud/ghactions-aws-jit@master
        with:
           tenant: "${{ env.TENANT_NAME }}"
       # How to sync an entire folder
      - name: Sync build folder to S3
        run: aws s3 sync build/ "s3://$BUCKET_NAME/"
      # How to copy an individual file
      - name: Copy individual file to S3
run: aws s3 cp my-archive.zip "s3://$BUCKET_NAME/"name: Build and Deploy
on:
# Triggers the workflow on push to matching branches
push:
branches:
- master
env:
duplo_host: https://mysystem.duplocloud.net # CHANGE ME!
duplo_token: "${{ secrets.DUPLO_TOKEN }}"
TENANT_NAME: mytenant # CHANGE ME!
BUCKET_NAME: duploservices-mytenant-website-1234 # CHANGE ME!
# A workflow run is made up of one or more jobs that can run sequentially or in parallel
jobs:
build_and_deploy:
runs-on: ubuntu-latest
needs:
- build
steps:
- name: Checkout
uses: actions/checkout@v2
# Upload to S3
- name: Get AWS credentials
uses: duplocloud/ghactions-aws-jit@master
with:
tenant: "${{ env.TENANT_NAME }}"
- name: Sync files to S3
run: |-
# First, upload the "static/" subdirectory - it can be cached for one year
aws s3 sync build/static/ "s3://$BUCKET_NAME/static/" --cache-control 31536000,public
# Then, upload the rest. It can change at any time - so it uses "must-revalidate"
aws s3 sync build/ "s3://$BUCKET_NAME/" --exclude static --cache-control max-age=120,must-revalidateversion: 2.1
parameters:
create_image:
type: boolean
default: false
orbs:
vpn: titel-media/[email protected]
newman: postman/[email protected]
dynamo-lock: gastfreund/[email protected]
defaults: &defaults
working_directory: ~/repo
docker:
- image: cimg/node:17.5.0
environment:
TENANT_NAME: dev01
DOCKER_REPO: public.ecr.aws/p9c8y2k3
DOCKER_IMAGE_NAME: demo-npm-service
DUPLO_SERVICE_NAME: nginx
ECR_REGION: us-west-2
jobs:
BuildAndTest:
<<: *defaults
steps:
- checkout
- restore_cache:
keys:
- v1-dependencies-{{ checksum "package.json" }}
- v1-dependencies-
- run: npm install
- save_cache:
paths:
- node_modules
key: v1-dependencies-{{ checksum "package.json" }}
- persist_to_workspace:
root: ~/repo
paths: .
PublishDockerContainerRC:
<<: *defaults
steps:
- attach_workspace:
at: ~/repo
- setup_remote_docker:
version: 19.03.13
- run:
name: Install Dependencies
command: |
source ./.circleci/duplo_utils.sh && install_dependencies
- run:
name: Create and Push Docker container
command: |
source ./.circleci/duplo_utils.sh
tag=$(node -p "require('./package.json').version")
docker_tag=$(get_docker_tag_rc $tag)
echo "Starting build for container: $docker_tag"
docker build -t $docker_tag .
push_container_rc $tag
DeployToDev:
<<: *defaults
steps:
- attach_workspace:
at: ~/repo
- run:
name: Update Dev Environment
command: |
source ./.circleci/duplo_utils.sh
tag=$(node -p "require('./package.json').version")
update_service_rc $TENANT_NAME $tag
- run:
name: Verify Dev Environment
command: |
echo "Verifying Dev environment"
- run:
name: Rollback Dev
command: |
source ./.circleci/duplo_utils.sh
echo "Rollback dev environment requested"
rollback_dev
when: on_failname: Single TF Module
on:
workflow_dispatch:
inputs:
cmd:
description: Command to run
type: choice
default: plan
options:
- plan
- apply
- destroy
environment:
description: Environment to deploy to
type: environment
default: dev01
module:
description: Module to run
type: choice
default: tenant
options:
- tenant
- services
- app
workflow_call:
inputs:
cmd:
description: Command to run
type: string
default: plan
environment:
description: Environment to deploy to
type: string
default: dev01
module:
description: Module to run
type: string
default: tenant
secrets:
DUPLO_TOKEN:
description: Duplo Token
required: true
jobs:
module:
name: ${{ inputs.cmd }} ${{ inputs.environment }} ${{ inputs.module }}
runs-on: ubuntu-latest
environment:
name: ${{ inputs.environment }}
url: ${{ vars.DUPLO_HOST }}
env:
DUPLO_TOKEN: ${{ secrets.DUPLO_TOKEN }}
DUPLO_HOST: ${{ vars.DUPLO_HOST }}
DUPLO_TENANT: ${{ inputs.environment }}
# add any global tf args here
TF_CLI_ARGS_apply: -parallelism=1
steps:
- name: Checkout source code
uses: actions/checkout@v4
- name: Duplo and AWS Setup
uses: duplocloud/actions@main
with:
admin: true
- name: Terraform Setup
uses: duplocloud/actions/setup-terraform@main
- name: TF Validate Module
uses: duplocloud/actions/terraform-module@main
with:
module: modules/${{ inputs.module }}
test: false
- name: TF Execute Module
uses: duplocloud/actions/terraform-exec@main
with:
module: modules/${{ inputs.module }}
workspace: ${{ inputs.environment }}
command: ${{ inputs.cmd }}
name: Apply My Stack
on:
  workflow_dispatch:
    inputs:
      environment:
        description: Environment to deploy to
        type: environment
        default: dev01
jobs:
  tenant:
    # Name is the same b/c it nests the jobs correctly in the ui
    name: My Stack
    # run the single module job
    uses: ./.github/workflows/module.tf
    secrets: inherit
    with:
      cmd: apply
      environment: ${{ inputs.environment }}
      module: tenant
  services:
    name: My Stack
    uses: ./.github/workflows/module.tf
    secrets: inherit
    needs: tenant
    with:
      cmd: apply
      environment: ${{ inputs.environment }}
      module: services
  app:
    name: My Stack
    uses: ./.github/workflows/module.tf
    secrets: inherit
    needs: services
    with:
      cmd: apply
      environment: ${{ inputs.environment }}
module: apphelm install argocd argo/argo-cd -n argocd01accounts.admin: apiKeykubectl exec -it deploy/argocd-server -n argocd01 -- bash
argocd <ARGOCD_DNS_NAME>:443 --username adminargocd account list
Use Duplo to build and push a docker image from Gitlab CI/CD
The goal of this section is to show how you can build a docker image and push it to DockerHub.
It does three basic things:
Logs in to DockerHub
Builds and tags your docker image, with the tag based on the git commit SHA.
Pushes your docker image
Here is an example gitlab workflow that builds a docker image and pushes it to DockerHub.
To use it you will need to change:
DOCKERHUB_USERNAMEvariable
DOCKERHUB_REPOvariable
DUPLO_HOSTvariable
DUPLO_SERVICE_NAMEvariable
TENANT_NAMEvariable
variables:
  DOCKERHUB_USERNAME: duplocloud               # CHANGE ME!
  DOCKERHUB_REPO: mydockerhubid/myrepo         # CHANGE ME!
  DUPLO_HOST: https://mysystem.duplocloud.net  # CHANGE ME!
  DUPLO_SERVICE_NAME: myservice                # CHANGE ME!
  TENANT_NAME: mytenant                        # CHANGE ME!

docker-build:
  # Use the official docker image.
  image: docker:latest
  stage: build
  services:
    - docker:dind
  before_script:
    - docker login -u "$DOCKERHUB_USERNAME" -p "$DOCKERHUB_PASSWORD"
  script:
    - |
      tag=":$CI_COMMIT_SHA"
      echo "Running on branch '$CI_COMMIT_BRANCH': tag = $tag"
    - docker build --pull -t "$DOCKERHUB_REPO${tag}" .
    - docker push "$DOCKERHUB_REPO${tag}"
  # Run this job in a branch where a Dockerfile exists
  rules:
    - if: $CI_COMMIT_BRANCH
      exists:
- DockerfileThe goal of this section is to show how you can build a docker image and push it to Amazon ECR.
It does three basic things:
Logs in to Amazon ECR
Builds and tags your docker image, with the tag based on the GitLab CI Pipeline execution id.
Pushes your docker image to ECR
Prerequisite - A repository in ECR must have been created before proceeding with the next steps.
This process uses DuploCloud API Token (refer DuploCloud API Token) to gain access to AWS ECR.
Go to GitLab > Settings > CI CD > Variables > Expand and ensure that DUPLO_TOKEN variable is set and has correct value. Check the Protect Variable and Masked options for security purposes. You can refer to Configuring GitLab for the steps to setup a service account and to create a token for the newly configured account. The service account must have admin role.
The script uses amazon/aws-cli image as the base running image and uses Docker-in-Docker (docker/dind) to run the Docker commands. It uses duplo_utils.sh script from DuploCloud to get configuration from the DuploCloud instance.
Here is an example gitlab workflow that builds a docker image and pushes it to DockerHub.
To use it you will need to change:
DOCKER_REGISTRYvariable
DOCKER_REPO variable
DUPLO_HOST variable
DUPLO_SERVICE_NAME variable
TENANT_NAME variable
AWS_DEFAULT_REGIONvariable
APP_NAMEvariable
variables:
  DOCKER_REGISTRY: <xxxxxxxxxxx>.dkr.ecr.<ecr repo region>.amazonaws.com
  DOCKER_REPO: <xxxxxxxxxxx>.dkr.ecr.<ecr repo region>.amazonaws.com/xxx-yyy
  AWS_DEFAULT_REGION: <duplo master aws region>
  AWS_ECR_REGION: <ECR region>
  APP_NAME: <repo name>
  DUPLO_HOST: https://<instance>.duplocloud.net
  DUPLO_SERVICE_NAME: <duplo service name>
  TENANT_NAME: <Tenant Name>
  DOCKER_HOST: tcp://docker:2375

stages:
  - build
  - deploy

build-and-push-job:
  stage: build
  image:
    name: amazon/aws-cli
    entrypoint: [""]
  services:
    - docker:dind
  before_script:
    - yum install -y wget jq
    - amazon-linux-extras install docker
    - wget https://raw.githubusercontent.com/duplocloud/demo-npm-service/master/.circleci/duplo_utils.sh
    - chmod +x duplo_utils.sh
    - source duplo_utils.sh
    - with_aws>tmp.txt  #Get secrets using with_aws script from source duplo_utils.sh
    - cat tmp.txt
    - cat tmp.txt|grep -i AWS_>tmp1.txt
    - cat tmp1.txt
    - source tmp1.txt
    - export $(cut -d= -f1 tmp1.txt)
    - aws ecr get-login-password --region $AWS_ECR_REGION | docker login --username AWS --password-stdin $DOCKER_REGISTRY
    - rm tmp.txt tmp1.txt   #remove the secrets from the runner
  script:
    - |
      tag="$CI_PIPELINE_IID"
      echo "Running on branch '$CI_COMMIT_BRANCH': tag = $tag"
    - docker build -t "$DOCKER_REGISTRY/$APP_NAME:${tag}" ./nginx/
    - docker push "$DOCKER_REGISTRY/$APP_NAME:${tag}"
    - docker logout #For security
Build and push a Docker image from Azure DevOps to the AWS Elastic Container Registry (ECR)
Use DuploCloud service account authentication to build and push a Docker image from Azure DevOps to the AWS Elastic Container Registry (ECR). You can use ECR regardless of where your app is hosted.
To build a Docker image and push it to the ECR, use a pipeline script. The script:
Logs you into AWS ECR, using Just-In-Time credentials from DuploCloud.
Builds and tags the Docker image. The tag name is based on the git commit SHA (Simple Hashing Algorithm).
Pushes the Docker image to the ECR.
Here is an example Azure DevOps pipeline that builds a Docker image and pushes it to ECR.
Test and code coverage steps are commented to aid in getting started quickly with .NET apps. you can remove them for clarity.
DUPLO_TOKEN, DUPLO_HOST, and ECR_BASE need to be pre-configured in the Azure DevOps variable group named duplocloud-secrets.
The ECR must have the same name as the Azure DevOps repo being built. Modify the name of the ECR, if needed.
A Dockerfilemust exist for the application in your src folder
These prerequisites can be customized to fit existing pipelines and conventions for passing YAML attribute values. Test and code coverage steps are included for illustration purposes. They are not required to publish an image to an ECR.
trigger:
  batch: true
  branches:
    include:
    - develop

pool:
  vmImage: 'ubuntu-22.04'

variables:
  - group: duplocloud-secrets
  - name: solution
    value: '**/*.sln'
  - name: buildPlatform
    value: 'Any CPU'
  - name: buildConfiguration
    value: 'Release'

steps:
  - task: DotNetCoreCLI@2
    displayName: 'dotnet test'
    inputs:
      command: 'test'
      arguments: '--configuration $(buildConfiguration) --collect:"XPlat Code Coverage" -- DataCollectionRunSettings.DataCollectors.DataCollector.Configuration.Format=cobertura'
      publishTestResults: true
      projects: '**/*Tests.csproj'
  - task: PublishCodeCoverageResults@1
    displayName: 'Publish code coverage report'
    inputs:
      codeCoverageTool: 'Cobertura'
      summaryFileLocation: '$(Agent.TempDirectory)/**/coverage.cobertura.xml'
  - script: |
      export token=$(DUPLO_TOKEN)
      export host=$(DUPLO_HOST)
      export ecr_base=$(ECR_BASE)
      pip install duplocloud-client
      duploctl --host=$host --token=$(DUPLO_TOKEN) jit aws -q "{AWS_ACCESS_KEY_ID: AccessKeyId, AWS_SECRET_ACCESS_KEY: SecretAccessKey, AWS_SESSION_TOKEN: SessionToken, AWS_REGION: Region}"  -o env > duplo.env
      export $(xargs <duplo.env)
      aws ecr get-login-password --region us-east-1 | docker login --username AWS --password-stdin $ecr_base
    displayName: Authenticate to ECR
  - script: |
      cd src
      docker build -t $(Build.Repository.Name) .
      export shortHash=${BUILD_SOURCEVERSION:0:8}
      export ecr_base=$(ECR_BASE)
      docker tag $(Build.Repository.Name):latest $ecr_base/$(Build.Repository.Name):$(Build.BuildId)
      docker tag $(Build.Repository.Name):latest $ecr_base/$(Build.Repository.Name):$(Build.SourceBranchName)
      docker tag $(Build.Repository.Name):latest $ecr_base/$(Build.Repository.Name):$shortHash
      docker push $ecr_base/$(Build.Repository.Name):$(Build.BuildId)
      docker push $ecr_base/$(Build.Repository.Name):$(Build.SourceBranchName)
      docker push $ecr_base/$(Build.Repository.Name):$shortHash
    displayName: Build and Push
Each CI/CD run comprises of one or more phases. There are two types of phases – execution and deployment. In execution phase Katkit will invoke ci.sh file from the repository. The difference between two execution phases is in ENV variables based on which user code in ci.sh can operate differently. There can be only one deployment phase in each run. Katkit does not run ci.sh in deployment phase but it looks for the servicdescription.js file (details below), replaces the docker image tag <hubtag> and replaces it with the git commit sha. It is assumed that the user, before invoking the deployment phase, has gone through a prior phase where they build a docker image which was tagged with the git commit sha. The sha is available as an ENV variable in every phase.
Setup Bitbucket Pipelines for use with DuploCloud.
To use Pipelines, you need to:
Create a bitbucket-pipelines.yml file in your repository's root directory. This file contains the configuration for your builds and deployments.
Deploy the application with DuploCloud as a Service and test that it works as expected.
Configure BitBucket Pipelines for use with DuploCloud:
Create a repository variable for the DUPLO_TOKEN. Set the variable at the project or workspace level or even in a deployment. Create service account users in DuploCloud by assigning a user name, such as bitbucket. Ensure the user name is not an email to avoid confusion.
Retrieve a token for the user (bitbucket) that you set up.
Use OpenID Connect (OIDC) by setting up an OpenID login with Bitbucket Pipelines.
After configuring the OIDC provider by using AWS IAM, the IAM role needs an associated trust relationship. For example:
{
    "Version": "2012-10-17",
    "Statement": [
        {
            "Sid": "BitbucketWorkspace",
            "Effect": "Allow",
            "Principal": {
                "Federated": "arn:aws:iam::{account id}:oidc-provider/api.bitbucket.org/2.0/workspaces/{workspace}/pipelines-config/identity/oidc"
            },
            "Action": "sts:AssumeRoleWithWebIdentity",
            "Condition": {
                "StringEquals": {
                    "api.bitbucket.org/2.0/workspaces/{workspace}/pipelines-config/identity/oidc:aud": "ari:cloud:bitbucket::workspace/{workspace id}"
                }
            }
        }
    ]
}