Loading...
Loading...
Loading...
Loading...
Loading...
Loading...
Loading...
Loading...
Loading...
Loading...
Loading...
Loading...
Loading...
Loading...
Loading...
Loading...
Loading...
Loading...
Loading...
Loading...
Loading...
Loading...
Loading...
Loading...
Loading...
Loading...
Loading...
Loading...
Loading...
Loading...
Loading...
Loading...
Loading...
Loading...
Loading...
Loading...
Loading...
Loading...
Loading...
Loading...
Loading...
Loading...
Loading...
Loading...
Loading...
Loading...
Loading...
Loading...
Loading...
Loading...
Loading...
Loading...
Loading...
Loading...
Loading...
Loading...
Loading...
Loading...
Loading...
Loading...
Loading...
Loading...
Loading...
Loading...
Loading...
Loading...
Loading...
Loading...
Loading...
Loading...
Loading...
Loading...
Loading...
Loading...
Loading...
Loading...
Loading...
Loading...
Loading...
Loading...
Loading...
Loading...
Loading...
Loading...
Loading...
Loading...
Loading...
Loading...
Loading...
Loading...
Loading...
Loading...
Loading...
Loading...
Loading...
Loading...
Loading...
Loading...
Loading...
Loading...
Initial steps for AWS DuploCloud users
The DuploCloud platform installs in an EC2 instance within your AWS account. It can be accessed using a web interface, API, or Terraform provider.
You can log in to the DuploCloud portal, using single sign-on (SSO), with your GSuite or O365 login.
Before getting started, complete the following steps:
Read the DuploCloud Platform Overview and learn about DuploCloud terms like Infrastructure, Plan, and Tenant
Set up the DuploCloud Portal
Read the Access Control section and ensure at least one person has administrator access
Connect to the DuploCloud Slack channel for support from the DuploCloud team
Tasks to perform before you use AWS with DuploCloud
For Kubernetes prerequisites, see the DuploCloud Kubernetes User Guide.
Create an AWS Certificate Manager certificate
The DuploCloud Platform needs a wild character AWS Certificate Manager (ACM) certificate corresponding to the domain for the Route 53 Hosted Zone.
For example, if the Route 53 Hosted Zone created is apps.acme.com, the ACM certificate specifies *.apps.acme.com. You can add additional domains to this certificate (for example, *.acme.com).
The ACM certificate is used with AWS Elastic Load Balancers (ELBs) created during DuploCloud application deployment. Follow this AWS guide to issue an ACM certificate.
Once the certificate is issued, add the Amazon Resource Name (ARN) of the certificate to the DuploCloud Plan (starting with the DEFAULT Plan) so that it is available to subsequent configurations
In the DuploCloud Platform, navigate to Administrator -> Plans. The Plans page displays.
Select the default Plan from the NAME column.
Click the Certificates tab.
Click Add.
In the Name field, enter a certificate name.
In the Certificate ARN field, enter the ARN.
Click Create. The ACM Certificate with ARN is created.
Note that the ARN Certificate must be set for every new Plan created in a DuploCloud Infrastructure.
Configure DuploCloud to automatically generate Amazon Certificate Manager (ACM) certificates for your Plan's DNS.
From the DuploCloud portal, navigate to Administrator -> Systems Settings.
Select the System Config tab, and click Add. The Add Config pane displays.
From the Config Type list box, select Flags.
From the Key list box, select Other.
In the Key field that displays, enter enabledefaultdomaincert.
In the Value list box, select True.
Click Submit. DuploCloud automatically generates Amazon Certificate Manager (ACM) certificates for your Plan's DNS.
Get up and running with DuploCloud inside an AWS cloud environment; harness the power of generating application infrastructures.
This Quick Start tutorial shows you how to set up an end-to-end cloud deployment. You will create DuploCloud Infrastructure and Tenants and, by the end of this tutorial, you can view a deployed sample web application.
Estimated time to complete tutorial: 75-95 minutes.
When you complete the AWS Quick Start Tutorial, you have three options or paths, as shown in the table below.
EKS (Elastic Kubernetes Service): Create a Service in DuploCloud using AWS Elastic Kubernetes Service and expose it using a Load Balancer within DuploCloud.
ECS (AWS Elastic Container Service): Create an app and Service in DuploCloud using AWS Elastic Container Service.
Native Docker: Create a Service in Docker and expose it using a Load Balancer within DuploCloud.
Optional steps in each tutorial path are marked with an asterisk in the table below. While these steps are not required to complete the tutorials, you may want to perform or read through them, as they are normally completed when you create production-ready services.
For information about the differences between these methods and to help you choose which method best suits your needs, skills, and environments, see this AWS blog and Docker documentation.
1
Create Infrastructure and Plan
Create Infrastructure and Plan
Create Infrastructure and Plan
2
Create Tenant
Create Tenant
Create Tenant
3
Create RDS *
Create RDS *
Create RDS *
4
Create Host
Create a Task Definition for an application
Create Host
5
Create Service
Create the ECS Service and Load Balancer
Create app
6
Create Load Balancer
Test the app
Create Load Balancer
7
Enable Load Balancer Options *
Test the App
8
Create Custom DNS Name *
9
Test the App
* Optional
Click the card below to watch DuploCloud video demos.
Creating a Host that acts as an EKS Worker node
Creating an AWS EKS Service uses technologies from AWS and the Kubernetes open-source container orchestration system.
Kubernetes uses worker nodes to distribute workloads within a cluster. The cluster automatically distributes the workload among its nodes, enabling seamless scaling as required system resources expand to support your applications.
Estimated time to complete Step 4: 5 minutes.
Before creating a Host (essentially a Virtual Machine), verify that you completed the previous tutorial steps. Using the DuploCloud Portal, confirm that:
An Infrastructure and Plan exist, both named NONPROD.
The NONPROD infrastructure has EKS Enabled.
A Tenant named dev01 has been created.
In the Tenant list box, select the dev01 Tenant that you created.
In the DuploCloud Portal, navigate to Cloud Services -> Hosts. The Hosts page displays.
In the EC2 tab, click Add. The Add Host page displays.
In the Friendly Name field, enter host01.
In the Instance Type list box, select 2 CPU 4 GB - t3a.medium.
Select the Advanced Options checkbox to display advanced configuration fields.
From the Agent Platform list box, select EKS Linux.
From the Image ID list box, select any Image ID with an EKS prefix (for example, EKS-Oregon-1.23).
Click Add. The Host is created, initialized, and started. In a few minutes, when the Status displays Running, the Host is available for use.
The EKS Image ID is the image published by AWS specifically for an EKS worker in the version of Kubernetes deployed at Infrastructure creation time. For this tutorial, the region is us-west-2, where the NONPROD Infrastructure was created.
If there is no Image ID with an EKS prefix, copy the AMI ID for the desired EKS version following this AWS documentation. Select Other from the Image ID list box and paste the AMI ID in the Other Image ID field. Contact the DuploCloud Support team via your Slack channel if you have questions or issues.
In the DuploCloud Portal, navigate to Cloud Services -> Hosts.
Select the EC2 tab.
Verify that the Host status is Running.
Create a Route 53 Hosted Zone to program DNS entries
The DuploCloud Platform needs a unique Route 53 hosted zone to create DNS entries for Services that you deploy. The domain must be created out-of-band and set in DuploCloud. The zone is a subdomain such as apps.[MY-COMPANY].com.
Never use this subdomain for anything else, as DuploCloud owns all CNAME entries in this domain and removes all entries it has no record of.
Log in to AWS Console.
Navigate to Route 53 and Hosted Zones.
Create a new Route53 Hosted Zone with the desired domain name, for example, apps.acme.com.
Access the Hosted Zone and note the name server names.
Go to your root domain provider's site (e.g., acme.com), and create an NS record that references the domain name of the Hosted Zone you created (apps.acme.com). Add the zone name to the name servers that you noted above.
Once this is complete, provision the Route53 domain in every DuploCloud Plan, starting with the DEFAULT Plan. Add the Route53 Hosted Zone ID and domain name, preceded with a dot (.).
Do not forget the dot (.) at the beginning of the DNS suffix, in the form as shown below.
Note that this domain must be set in each new Plan you create in your DuploCloud Infrastructure.
Set up central logging for the DuploCloud Default Tenant
The Default Tenant in DuploCloud is the central management space for platform-wide resources and configurations, including monitoring and logging. Enabling logging in the Default Tenant deploys comprehensive Control Plane monitoring. This deployment uses OpenSearch and Kibana to retrieve and display log data. Once logging is enabled for the Default Tenant, you can enable logging for non-Default Tenants and configure logging per Tenant.
Central logging is typically set up during DuploCloud onboarding. Contact DuploCloud Support if you have questions about this process.
If needed, make changes to the Control Plane Configuration. You cannot modify the Control Plane Configuration after you set up logging.
If needed, customize Elastic Filebeat logging. Docker applications use stdout to write log files, collect logs, place them in the Host directory, mount them into Filebeat containers, and send them to AWS Elasticsearch. If you need to customize log collection using folders other than stdout, follow this procedure. Log collection cannot be customized after logging is set up.
From the Tenant list box at the top of the DuploCloud Portal, select the Default Tenant.
In the DuploCloud Portal, navigate to Administrator -> Observability -> Basic -> Settings, and select the Logging tab.
Click the Enable Logging link. The Enable Logging page displays.
In the Select Tenant list box, select Default.
In the Cert ARN field, enter the ARN certificate for the Default Tenant.
Find the ARN certificate by selecting the Default Tenant from the Tenant list box at the top of the DuploCloud Portal, navigating to Administrator -> Plans, selecting the Plan that matches your Infrastructure Name, clicking the Certificates tab, and copying the ARN from the Certificate ARN column.
Enter the number of days to retain logs in the Log Retention in Index (Days) field.
Click Submit. Data gathering takes about fifteen (15) minutes. When data gathering is complete, graphical logging data is displayed on the Logging tab.
When you enable logging for a Tenant, an Elastic Filebeat Service starts and begins log collection. The Elastic Filebeat Service must be running for log collection to occur.
To view the Filebeat Service, navigate to Kubernetes -> Services. To view the Filebeat containers, navigate to Kubernetes -> Containers. In the row of the container, click on the menu icon and select Logs.
Once logging is enabled for the Default Tenant, you can enable logging for other Tenants.
When you perform the steps above to configure logging, DuploCloud does the following:
An EC2 Host is added in the default Tenant, for example, duploservices-default-oc-diagnostics.
Services are added in the default Tenant, one for OpenSearch and one for Kibana. Both services are pinned to the EC2 host using allocation tags. Kibana is set up to point to ElasticSearch and exposed using an internal load balancer.
Security rules from within the internal network to port 443 are added in the default Tenant to allow log collectors that run on Tenant hosts to send logs to ElasticSearch.
A Filebeat service (filebeat-duploinfrasvc) is deployed for each Tenant where central logging is enabled.
The /var/lib/docker/Containers are mounted from the Host into the Filebeat container. The Filebeat container references ElasticSearch, which runs in the Default Tenant. Inside the container, Filebeat is configured so that every log line is added with metadata information consisting of the Tenant name, Service names, Container ID, and Hostname, enabling ease of search using these parameters with ElasticSearch.
Accept OpenVPN, provision the VPN, and add VPN users
DuploCloud integrates with OpenVPN by provisioning VPN users that you add to the DuploCloud Portal. OpenVPN setup is a comprehensive process that includes accepting OpenVPN, provisioning the VPN, adding users, and managing connection limits to accommodate a growing team.
Accept OpenVPN Free Tier (Bring Your Own License) in the AWS Marketplace:
Log into your AWS account. In the console, navigate to: https://aws.amazon.com/marketplace/pp?sku=f2ew2wrz425a1jagnifd02u5t.
Accept the agreement. Other than the regular EC2 instance cost, no additional license costs are added.
In the DuploCloud Portal, navigate to Administrator -> System Settings.
Select the VPN tab.
Click Provision VPN.
After the OpenVPN is provisioned, it is ready to use. DuploCloud automates the setup by launching a CloudFormation script to provision the OpenVPN.
The OpenVPN admin password can be found in the CloudFormation stack in your AWS console.
To support a growing team, you may need to increase the number of VPN connections. This can be achieved by purchasing a larger license from your VPN provider. Once acquired, update the license key in the VPN's web user interface through the DuploCloud team's assistance. Ensure the user count settings in the VPN reflect the new limit and verify team access to manage these changes efficiently.
For instructions to add or delete a VPN user, refer to the DuploCloud User Administration documentation.
To enable users connected to the VPN to access various services, including databases and ElastiCache, specific ports must be opened:
In the DuploCloud Portal, navigate to Administrator -> Tenants.
Select the Tenant from the NAME column.
Click the Security tab.
Click Add. The Add Tenant Security pane displays.
From the Source Type list box, select IP Address.
From the IP CIDR list box, select your IP CIDR.
Click Add.
This comprehensive guide ensures your VPN setup is not only up and running but also scalable to meet the needs of your growing team.
Access the shell for your Native Docker, EKS, and ECS containers
Enable and access shells for your DuploCloud Docker, EKS, and ECS containers directly through the DuploCloud Portal. This provides quick and easy access for managing and troubleshooting your containerized environments.
In the DuploCloud Portal, navigate to Docker -> Services.
From the Docker list box, select Enable Docker Shell. The Start Shell Service pane displays.
In the Platform list box, select Docker Native.
From the Certificate list box, select your certificate.
From the Visibility list box, select Public or Internal.
Click Update. DuploCloud provisions the dockerservices-shell Service, enabling you to access your Docker container shell.
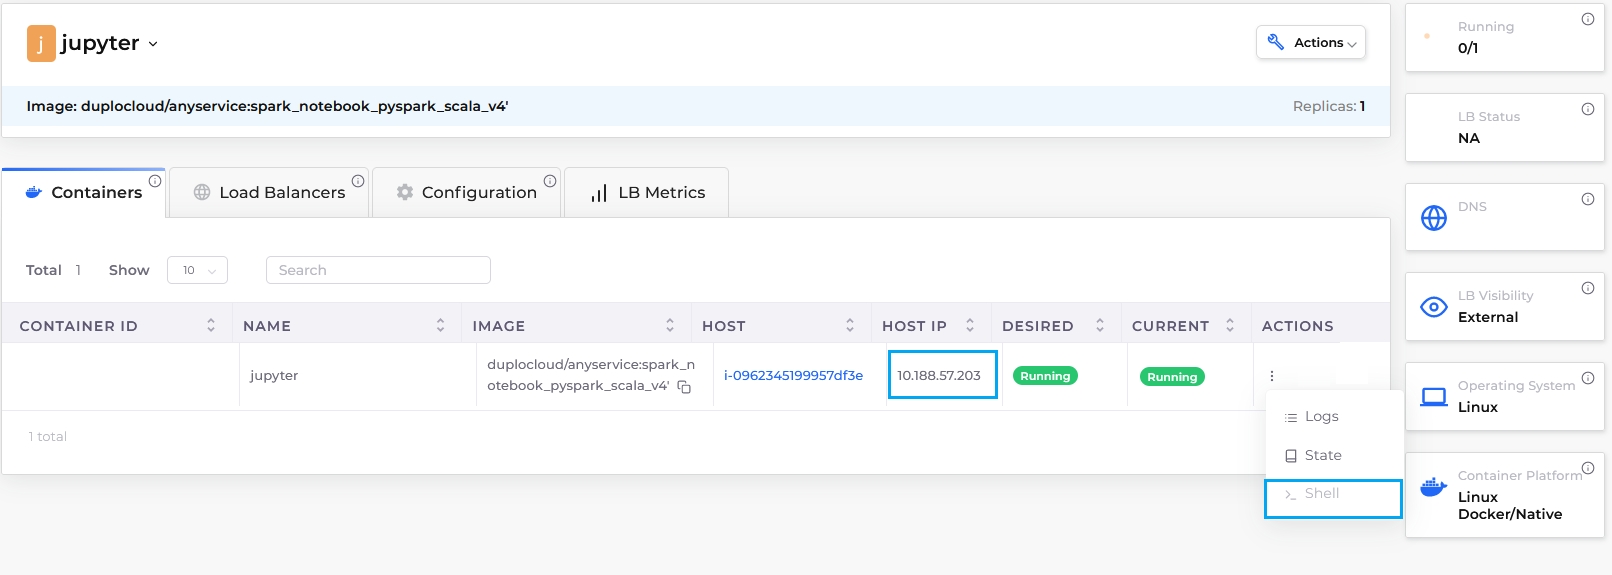
From the DuploCloud portal, navigate to Docker -> Containers.
Select Container Shell. A shell session launches directly into the running container.
In the Tenant list box, select the Default Tenant.
In the DuploCloud Portal, navigate to Docker -> Services.
Click the Docker button, and select Enable Docker Shell. The Start Shell Service pane displays.
In the Platform list box, select Kubernetes.
In the Certificate list box, select your certificate.
In the Visibility list box, select Public or Internal.
Click Update. DuploCloud provisions the dockerservices-shell Service, enabling you to access your Kubernetes container shell.
From the DuploCloud Portal, navigate to Kubernetes -> Services.
Click the KubeCtl Shell button. The Kubernetes shell launches in your browser.
From the DuploCloud Portal, navigate to Cloud Services -> ECS. The ECS Task Definition page displays.
Select the name from the TASK DEFINITION FAMILY NAME column.
Select the Tasks tab.
In the row of the task you want to access, click the actions icon (>_).
Select the Task Shell option. The ECS task shell launches in your browser.
Creating an RDS database to integrate with your DuploCloud Service
Creating an RDS database is not essential to running a DuploCloud Service. However, as most services also incorporate an RDS, this step is included to demonstrate the ease of creating a database in DuploCloud. To skip this step, proceed to creating an EKS or ECS Service.
An AWS RDS is a managed Relational Database Service that is easy to set up and maintain in DuploCloud for AWS public cloud environments. RDSs support many databases including MySQL, PostgreSQL, MariaDB, Oracle BYOL, or SQL Server.
See the DuploCloud AWS Database documentation for more information.
Estimated time to complete Step 3: 5 minutes.
Before creating an RDS, verify that you accomplished the tasks in the previous tutorial steps. Using the DuploCloud Portal, confirm that:
An Infrastructure and Plan exist, both with the name NONPROD.
The NONPROD infrastructure has Kubernetes (EKS or ECS) Enabled.
A Tenant with the name dev01 has been created.
In the Tenant list box, select the dev01 Tenant that you created.
Navigate to Cloud Services -> Database.
Select the RDS tab, and click Add. The Create a RDS page displays.
From the table below, enter the values that correspond to the fields on the Create a RDS page. Accept default values for fields not specified.
Click Create. The database displays with a status of Submitted in the RDS tab. Database creation takes approximately ten (10) minutes.
DuploCloud prepends DUPLO to the name of your RDS database instance.
RDS Name
docs
User Name
YOUR_DUPLOCLOUD_ADMIN_USER_NAME
User password
YOUR_DUPLOCLOUD_ADMIN_PASSWORD
RDS Engine
MySQL
RDS Engine Version
LATEST_AVAILABLE_VERSION
RDS Instance Size
db.t3.medium
Storage size in GB
30
You can monitor the status of database creation using the RDS tab and the Status column.
When the database status reads Available on the RDS tab on the Database page, the database's endpoint is ready for connection to a DuploCloud Service, which you create and start in the next step.
Invalid passwords - Passwords cannot have special characters like quotes, @, commas, etc. Use a combination of uppercase and lowercase letters and numbers.
Invalid encryption - Encryption is not supported for small database instances (micro, small, or medium).
In the RDS tab, select the DUPLODOCS database you created.
Note the database endpoint, the name, and credentials. For security, the database is automatically placed in a private subnet to prevent access from the internet. Access to the database is automatically set up for all resources (EC2 instances, containers, Lambdas, etc.) in the DuploCloud dev01 Tenant. You need the endpoint to connect to the database from an application running in the EC2 instance.
When you place a DuploCloud Service in a live production environment, consider passing the database endpoint, name, and credentials to a DuploCloud Service using AWS Secrets Manager, or Kubernetes Configs and Secrets.
When your database is available and you have verified the endpoint, choose one of these three paths to create a DuploCloud Service and continue this tutorial.
Creating an AWS EKS Service in DuploCloud running Docker containers
Creating an AWS ECS Service in DuploCloud running Docker containers
Not sure what kind of Duplcloud Service you want to create? Consider the following:
AWS EKS is a managed Kubernetes service. AWS ECS is a fully managed container orchestration service using AWS technology. For a full discussion of the benefits of EKS vs. ECS, consult this AWS blog.
Docker Containers are ideal for lightweight deployments and run on any platform, using GitHub and other open-source tools.
In the row of the container you want to access, click the options menu icon ( ).
Faults can be viewed in the DuploCloud Portal by clicking the Fault/Alert ( ) Icon. Common database faults that may cause database creation to fail include:

Creating a DuploCloud Tenant that segregates your workloads
Now that the Infrastructure and Plan exist and a Kubernetes EKS or ECS cluster has been enabled, create one or more Tenants that use the configuration DuploCloud created.
Tenants in DuploCloud are similar to projects or workspaces and have a subordinate relationship to the Infrastructure. Think of the Infrastructure as a virtual "house" (cloud), with Tenants conceptually "residing" in the Infrastructure performing specific workloads that you define. As Infrastructure is an abstraction of a Virtual Private Cloud, Tenants abstract the segregation created by a Kubernetes Namespace, although Kubernetes Namespaces are only one component that Tenants can contain.
In AWS, cloud features such as IAM Roles, security groups, and KMS keys are exposed in Tenants, which reference these feature configurations.
Estimated time to complete Step 2: 10 minutes.
DuploCloud customers often create at least two Tenants for their production and non-production cloud environments (Infrastructures).
For example:
Production Infrastructure
Pre-production Tenant - for preparing or reviewing production code
Production Tenant - for deploying tested code
Non-production Infrastructure
Development Tenant - for writing and reviewing code
Quality Assurance Tenant - for automated testing
In larger organizations, some customers create Tenants based on application environments, such as one Tenant for Data Science applications, another for web applications, and so on.
Tenants are sometimes created to isolate a single customer workload, allowing more granular performance monitoring, scaling flexibility, or tighter security. This is referred to as a single-Tenant setup.
Before creating a Tenant, verify that you accomplished the tasks in the previous tutorial steps. Using the DuploCloud Portal, confirm that:
An Infrastructure and Plan exist, both with the name NONPROD.
The NONPROD infrastructure has Kubernetes (EKS or ECS) Enabled.
Create a Tenant for your Infrastructure and Plan:
In the DuploCloud Portal, navigate to Administrator -> Tenants.
Click Add. The Create a Tenant pane displays.
Enter dev01 in the Name field.
Select the Plan that you created in the previous step (NONPROD).
Click Create.
Navigate to Administrator -> Tenants and verify that the dev01 Tenant displays in the list.
Navigate to Administrator -> Infrastructure and select dev01 from the Tenant list box. Ensure that the NONPROD Infrastructure appears in the list of Infrastructures with a status of Complete.
Add a security layer and enable other Load Balancer options
This step is optional and unneeded for the example application in this tutorial; however, production cloud apps require an elevated level of protection.
To set up a Web Application Firewall (WAF) for a production application, follow the steps in the Web Application Firewall procedure.
In this tutorial step, for the Application Load Balancer (ALB) you created in Step 6, you will:
Enable access logging to monitor HTTP message details and record incoming traffic data. Access logs are crucial for analyzing traffic patterns and identifying potential threats, but they are not enabled by default. You must manually activate them in the Load Balancer settings.
Protect against requests that contain invalid headers.
Estimated time to complete Step 7: 5 minutes.
Before securing a Load Balancer, verify that you accomplished the tasks in the previous tutorial steps. Using the DuploCloud Portal, confirm that:
An Infrastructure and Plan exist, both named NONPROD.
The NONPROD infrastructure has EKS Enabled.
A Tenant named dev01 has been created.
A Host named host01 has been created.
A Service named demo-service has been created.
An Load Balancer has been created.
In the Tenant list box, select the dev01 Tenant.
In the DuploCloud Portal, navigate to Kubernetes -> Services.
From the NAME column, select the Service (demo-service).
Click the Load Balancers tab.
In the Other Settings card, click Edit. The Other Load Balancer Settings pane displays.
In the Web ACL list box, select None, because you are not connecting a Web Application Firewall.
Select the Enable Access Logs and Drop Invalid Headers options.
Accept the Idle Timeout default setting and click Save. The Other Settings card in the Load Balancers tab is updated with your selections.
Verify that the Other Settings card contains the selections you made above for:
Web ACL - None
HTTP to HTTPS Redirect - False
Enable Access Logs - True
Drop Invalid Headers - True
Enabling access logs enhances the security and monitoring capabilities of your Load Balancer and provides insights into the traffic accessing your application, for a more robust security posture.
Create a DuploCloud Infrastructure and Plan
Each DuploCloud Infrastructure is a connection to a unique Virtual Private Cloud (VPC) network that resides in a region that can host Kubernetes clusters, EKS or ECS clusters, or a combination of these, depending on your public cloud provider.
After you supply a few basic inputs, DuploCloud creates an Infrastructure within AWS and DuploCloud. Behind the scenes, DuploCloud does a lot with what little you supply, generating the VPC, subnets, NAT Gateway, routes, and EKS or ECS clusters.
With the Infrastructure as your foundation, you can customize an extensible, versatile platform engineering development environment by adding Tenants, Hosts, Services, and more.
Estimated time to complete Step 1: 40 minutes. Much of this time is consumed by DuploCloud's creation of the Infrastructure and enabling your EKS cluster with Kubernetes.
Before starting this tutorial:
Learn more about DuploCloud Infrastructures, Plans, and Tenants.
Reference the Access Control documentation to create User IDs with the Administrator role. To perform the tasks in this tutorial, you must have Administrator privileges.
In the DuploCloud Portal, navigate to Administrator -> Infrastructure.
Click Add. The Add Infrastructure page displays.
Enter the values from the table below in the corresponding fields on the Add Infrastructure page. Accept default values for fields not specified.
Select either the Enable EKS or Enable ECS Cluster option. You will follow different paths in the tutorial for creating Services with EKS, ECS, or DuploCloud Docker.
Click Create to create the Infrastructure. It may take up to half an hour to create the Infrastructure. While the Infrastructure is being created, a Pending status is displayed in the Infrastructure page Status column, often with additional information about what part of the Infrastructure DuploCloud is currently creating. When creation completes, a status of Complete displays.
DuploCloud begins creating and configuring your Infrastructure and EKS/ECS clusters using Kubernetes.
Name
nonprod
Region
YOUR_GEOGRAPHIC_REGION
VPC CIDR
10.221.0.0/16
Subnet CIDR Bits
24
It may take up to forty-five (45) minutes for your Infrastructure to be created and Kubernetes (EKS/ECS) enablement to be complete. Use the Kubernetes card in the Infrastructure screen to monitor the status, which should display Enabled when complete. You can also monitor progress using the Kubernetes tab, as DuploCloud generates your Cluster Name, Default VM Size, Server Endpoint, and Token.
Every DuploCloud Infrastructure generates a Plan. Plans are sets of templates that are used to configure the Tenants or workspaces, in your Infrastructure. You will set up Tenants in the next tutorial step.
Before proceeding, confirm that a Plan exists that corresponds to your newly created Infrastructure.
In the DuploCloud Portal, navigate to Administrator -> Plans. The Plans page displays.
Verify that a Plan exists with the name NONPROD: the name of the Infrastructure you created.
You previously verified that your Infrastructure and Plan were created. Now verify that Kubernetes is enabled before proceeding to create a Tenant.
In the DuploCloud Portal, navigate to Administrator -> Infrastructure. The Infrastructure page displays.
From the Name column, select the NONPROD Infrastructure.
Select the EKS or ECS tab. When Kubernetes has been Enabled for EKS or ECS, details are listed in the respective tab. For EKS, Enabled is displayed on the Kubernetes card. For ECS, the cluster name is listed in the ECS tab.
Finish the Quick Start Tutorial by creating an EKS Service
So far in this DuploCloud AWS tutorial, you created a VPC network with configuration templates (Infrastructure and Plan), an isolated workspace (Tenant), and an RDS database instance (optionally).
Now you need to create a DuploCloud Service on top of your Infrastructure and configure it to run and deploy your application. In this tutorial path, we'll deploy an application using Docker containers and leveraging AWS Elastic Kubernetes Service (EKS).
Alternatively, you can finish this tutorial by:
Creating an AWS ECS Service in DuploCloud running Docker containers
For a deeper comparison of EKS and ECS, consult this AWS blog.
Estimated time to complete remaining tutorial steps: 30-40 minutes
For the remaining steps in this tutorial, you will:
Create a Host (EC2 Instance) to serve as an AWS EKS worker node.
Create a Service and application using the premade Docker image: duplocloud/nodejs-hello:latest.
Expose the Service by creating and sharing a Load Balancer and DNS name.
Test the application.
Obtain access to the container shell and kubectl for debugging.
The topology that DuploCloud creates behind the scenes resembles this low-level configuration in AWS.
Creating a Service to run a Docker-containerized application
DuploCloud supports three container orchestration technologies to deploy Docker-container applications in AWS:
Native EKS
Native ECS Fargate
Built-in container orchestration in DuploCloud using EKS/ECS
You don't need experience with Kubernetes to deploy an application in the DuploCloud Portal. However, it is helpful to be familiar with the Docker platform. Docker runs on any platform and provides an easy-to-use UI for creating, running, and managing containers.
To deploy your own applications with DuploCloud, you’ll choose a public image or provide credentials for your private repository and configure your Docker Registry credentials in DuploCloud.
This tutorial will guide you through deploying a simple Hello World NodeJS web app using DuploCloud's built-in container orchestration with EKS. We’ll use a pre-built Docker container and access Docker images from a preconfigured Docker Hub.
Estimated time to complete Step 5: 10 minutes.
Before creating a Service, verify that you completed the tasks in the previous tutorial steps. Using the DuploCloud Portal, confirm that:
An Infrastructure and Plan exist, both named NONPROD.
The NONPROD infrastructure has EKS Enabled.
A Tenant named dev01 has been created.
A host named host01 has been created.
In the Tenant list box, select the dev01 Tenant.
In the DuploCloud Portal, navigate to Kubernetes -> Services.
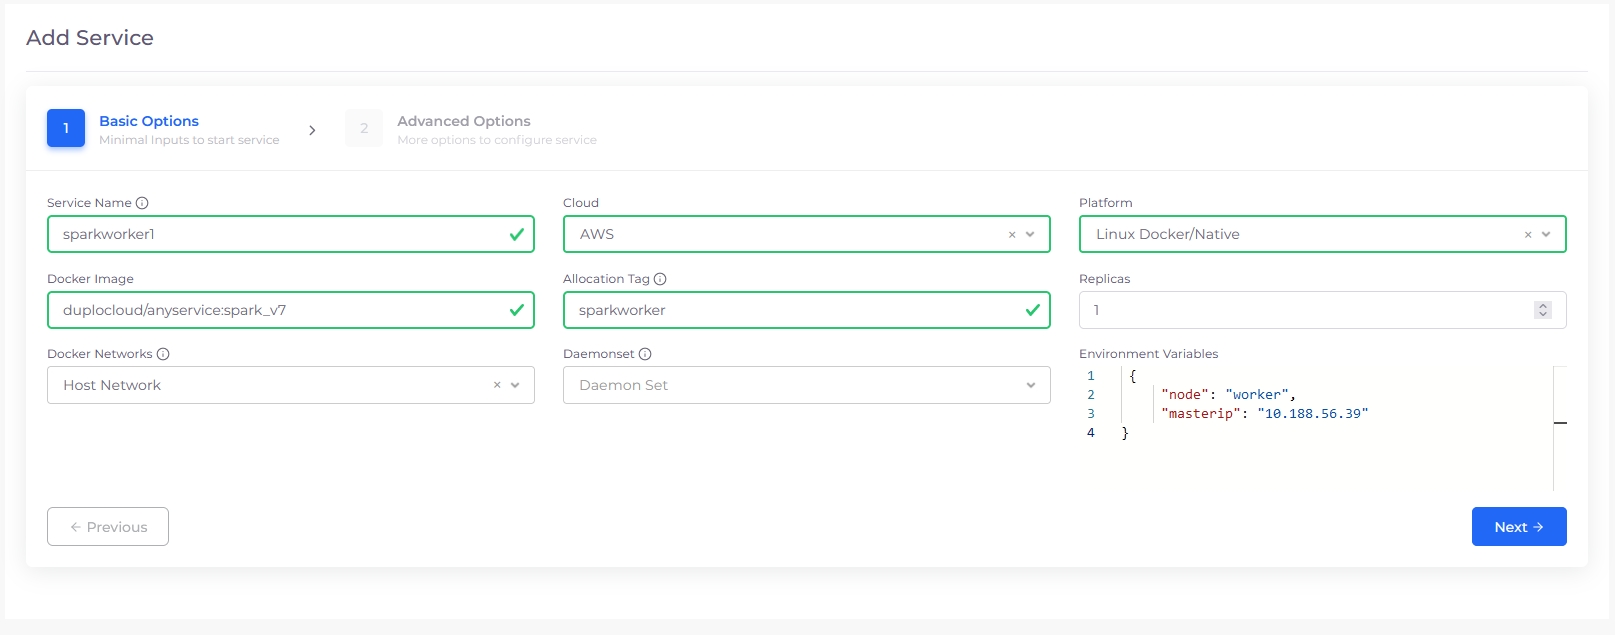
Click Add. The Add Service page displays.
From the table below, enter the values that correspond to the fields on the Add Service page. Accept all other default values for fields not specified.
Click Next. The Advanced Options page is displayed.
At the bottom of the Advanced Options page, click Create. In about five (5) minutes, the Service will be created and initialized, displaying a status of Running in the Containers tab.
Service Name
demo-service
Docker Image
duplocloud/nodejs-hello:latest
Use the Containers tab to monitor the Service creation status, between Desired (Running) and Current.
Follow the steps in Creating Services using Autoscaling Groups. In the Add Service page, Basic Options, Select Tolerate spot instances.
Verify that your DuploCloud Service, demo-service, has a status of Running.
In the Tenant list box, select the dev01 Tenant.
In the DuploCloud Portal, navigate to Kubernetes -> Services.
Click on the Service name (demo-service).
On the Containers tab, verify that the current status is Running.
Changing the DNS Name for ease of use
After you create a Load Balancer Listener you can modify the DNS Name for ease of use and reference by your applications. It isn't necessary to run your application or complete this tutorial.
To skip this step, proceed to test your application and complete this tutorial.
Once the Load Balancer is created, DuploCloud programs an autogenerated DNS Name registered to demo-service in the Route 53 domain. Before you create production deployments, you must create the Route 53 Hosted Zone domain (if DuploCloud has not already created one for you). For this tutorial, it is not necessary to create a domain.
Estimated time to complete Step 8: 5 minutes.
Before securing a Load Balancer, verify that you completed the tasks in the previous tutorial steps. Using the DuploCloud Portal, confirm that:
An Infrastructure and Plan exist, both named NONPROD.
The NONPROD infrastructure has EKS Enabled.
A Tenant named dev01 has been created.
A Host named host01 has been created.
A Service named demo-service has been created.
An HTTPS ALB Load Balancer has been created.
In the Tenant list box, select the dev01 Tenant.
Navigate to Kubernetes -> Services. The Services page displays.
From the Name column, select demo-service.
Click the Load Balancers tab. The ALB Load Balancer configuration is displayed.
In the DNS Name card, click Edit. The prefix in the DNS Name is editable.
Edit the DNS Name and select a meaningful DNS Name prefix.
Click Save. A success message briefly displays at the top center of the DuploCloud Portal.
An entry for your new DNS name is now registered with demo-service.
Navigate to Kubernetes -> Services.
From the Name column, select demo-service.
Select the Load Balancers tab and verify that the DNS Name card displays your modified DNS Name.
Obtain VPN credentials and connect to the VPN
DuploCloud integrates natively with OpenVPN by provisioning VPN users in the Duplocloud Portal. As a DuploCloud user, you can access resources in the private network by connecting to the VPN with the OpenVPN client.
The OpenVPN Access Server only forwards traffic destined for resources in the DuploCloud-managed private networks. Traffic accessing other resources on the internet does not pass through the tunnel.
You can find your VPN credentials on your user profile page in the DuploCloud Portal. It can be accessed by clicking Profile in the user menu on the upper right of the page or through the User menu option on the left.
Click on the VPN URL link in the VPN Details section of your user profile. Modern browsers will call the link unsafe since it uses a self-signed certificate. Make the necessary selections to proceed.
Log into the OpenVPN Access Server user portal using the username and password from the VPN Details section of your DuploCloud user profile page.
Click on the OpenVPN Connect Recommended for your device icon to install the OpenVPN Connect app for your local machine.
Navigate to your downloads folder, open the OpenVPN Connect file you downloaded in the previous step, and follow the prompts to finish the installation.
In the OpenVPN access server dialog box, click on the blue Yourself (user-locked profile) link to download your OpenVPN user profile.
Navigate to your Downloads folder and click on the .ovpn file downloaded in the previous step. The Onboarding Tour dialog box displays.
In the Onboarding Tour dialog box, click the > button twice. Click Agree and OK as needed to proceed to the Import .ovpn profile dialog box, and click OK.
Click OK, and select Connect after import. Click Add in the upper right. If prompted to enter a password, use the password in the VPN Profile area of your user profile page in the DuploCloud Portal. You are now connected to the VPN.
Test the application to ensure you get the results you expect
You can test your application directly from the Services page using the DNS status card.
Estimated time to complete Step 9 and finish tutorial: 10 minutes.
Before testing your application, verify that you accomplished the tasks in the previous tutorial steps. Using the DuploCloud Portal, confirm that:
An Infrastructure and Plan exist, both named NONPROD.
The NONPROD infrastructure has EKS Enabled.
A Tenant named dev01 has been created.
A Host named host01 has been created.
A Service named demo-service has been created.
An HTTPS Application Load Balancer has been created.
Note that if you skipped Step 7 and/or Step 8, the configuration in the Other Settings and DNS cards appears slightly different from the configuration depicted in the screenshot below. These changes do not impact you in testing your application, as these steps are optional. You can proceed to test your app with no visible change in the output of the deployable application.
In the Tenant list box, select the dev01 Tenant.
In the DuploCloud Portal, navigate to Kubernetes -> Services. The Services page displays.
From the Name column, select demo-service.
Click the Load Balancers tab.
In the DNS status card, click the Copy Icon ( ) to copy the DNS address displayed to your clipboard.
Open a browser instance and Paste the DNS in the URL field of your browser.
Press ENTER. A web page with the text Hello World! is displayed, from the JavaScript program residing in your Docker Container running in demo-service, which is exposed to the web by your Load Balancer.
It can take from five to fifteen (5-15) minutes for the DNS Name to become active once you launch your browser instance to test your application.
Congratulations! You have just launched your first web service on DuploCloud!
In this tutorial, your objective was to create a cloud environment to deploy an application for testing purposes, and to understand how the various components of DuploCloud work together.
The application rendered a simple web page with text, coded in JavaScript, from software application code residing in a Docker container. You can use this same procedure to deploy much more complex cloud applications.
In the previous steps, you:
Created a DuploCloud Infrastructure named NONPROD: a Virtual Private Cloud instance backed by an EKS-enabled Kubernetes cluster.
Created a Tenant named dev01 in Infrastructure NONPROD. While generating the Infrastructure, DuploCloud created a set of templates (Plan) to configure multiple AWS and Kubernetes components needed for your environment.
Created an EC2 host named host01, providing the application with storage resources.
Created a Service named demo-service to connect the Docker containers and associated images housing your application code to the DuploCloud Tenant environment.
Created an ALB Load Balancer Listener to expose your application via ports and backend network configurations.
Verified that your web page rendered as expected by testing the DNS Name exposed by the Load Balancer Listener.
In this tutorial, you created many artifacts for testing purposes. Now that you are finished, clean them up so others can run this tutorial using the same names for Infrastructure and Tenant.
To delete the dev01 tenant follow these instructions, then return to this page. As you learned, the Tenant segregates all work in one isolated environment, so deleting the Tenant you created cleans up most of your artifacts.
The NONPROD Infrastructure is deleted and you have completed the clean-up of your test environment.
Thanks for completing this tutorial and proceed to the next section to learn more about using DuploCloud with AWS.
Creating a Load Balancer to configure network ports to access the application
Now that your DuploCloud Service is running, you have a mechanism to expose the containers and images in which your application resides. However, since your containers are inside a private network, you need a Load Balancer listening on the correct ports to access the application.
In this step, we add a Load Balancer Listener to complete the network configuration.
Estimated time to complete Step 6: 10 minutes.
Before creating a Load Balancer, verify that you completed the tasks in the previous tutorial steps. Using the DuploCloud Portal, confirm that:
An Infrastructure and Plan exist, both named NONPROD.
The NONPROD infrastructure has EKS Enabled.
A Tenant named dev01 has been created.
A Host named host01 has been created.
A Service named demo-service has been created.
In the Tenant list box, select the dev01 Tenant.
In the DuploCloud Portal, navigate to Kubernetes -> Services.
From the NAME column, select demo-service.
Click the Load Balancers tab.
Click the Configure Load Balancer link. The Add Load Balancer Listener pane displays.
From the Type list box, select Application LB.
In the Container Port field, enter 3000. This is the configured port on which the application inside the Docker Container Image duplocloud/nodejs-hello:latest is running.
In the External Port field, enter 80. This is the port through which users will access the web application.
From the Visibility list box, select Public.
From the Application Mode list box, select Docker Mode.
Type / (forward-slash) in the Health Check field to indicate that the cluster we want Kubernetes to perform Health Checks on is located at the root level.
In the Backend Protocol list box, select HTTP.
Click Add. The Load Balancer is created and initialized. Monitor the LB Status card on the Services page. The LB Status card displays Ready when the Load Balancer is ready for use.
In the Tenant list box, select the dev01 Tenant.
In the DuploCloud Portal, navigate to Kubernetes -> Services.
From the NAME column, select demo-service.
Verify that the LB Status card displays a status of Ready.
Note the DNS Name of the Load Balancer that you created.
In the LB Listeners area of the Services page, note the configuration details of the Load Balancer's HTTP protocol, which you specified, when you added it above.
Create an EC2 Host in DuploCloud
Before you create your application and service using native Docker, create an EC2 Host for storage in DuploCloud.
Estimated time to complete Step 4: 5 minutes.
Before creating a Host (essentially a ), verify that you completed the tasks in the previous tutorial steps. Using the DuploCloud Portal, confirm that:
An exist, both named NONPROD.
A Tenant named .
In the Tenant list box, select dev01.
In the DuploCloud Portal, navigate to Cloud Services -> Hosts. The Hosts page displays.
In the EC2 tab, click Add. The Add Host page displays.
In the Friendly Name field, enter host01.
From the Instance Type list box, select 2 CPU 4 GB - t3a.medium.
Select the Advanced Options checkbox to display advanced configuration fields.
From the Agent Platform list box, select Linux/Docker Native.
From the Image ID list box, select any Docker-Duplo or Ubuntu image.
Click Add. The Host is created, initialized, and started. In a few minutes, when the Status displays Running, the Host is available for use.
Verify that host01 has a Status of Running.
Create a native Docker Service in the DuploCloud Portal
You can use the DuploCloud Portal to create a native Docker service without leaving the DuploCloud interface.
Estimated time to complete Step 5: 10 minutes.
Before creating a Service, verify that you completed the tasks in the previous tutorial steps. Using the DuploCloud Portal, confirm that:
An exist, both named NONPROD.
A Tenant named .
An EC2 Host named .
In the Tenant list box, select dev01.
Navigate to Docker -> Services.
Click Add. The Add Service Basic Options page displays.
In the Service Name field, enter demo-service-d01.
From the Platform list box, select Linux/Docker Native.
In the Docker Image field, enter duplocloud/nodejs-hello:latest.
From the Docker Networks list box, select Docker Default.
Click Next. The Advanced Options page displays.
Click Create.
In the Tenant list box, select dev01.
Navigate to Docker -> Services.
In the NAME column, select demo-service-d01.
Check the Current column to verify that demo-service-d01 has a status of Running.
Create an ECS Service from Task Definition and expose it with a Load Balancer
Now that you've created a Task Definition, create a Service, which creates a Task (from the definition) to run your application. A Task is the instantiation of a Task Definition within a cluster. After you create a task definition for your application within Amazon ECS, you can specify multiple tasks to run on your cluster, based on your performance and availability requirements.
Once a Service is created, you must create a Load Balancer to expose the Service on the network. An Amazon ECS service runs and maintains the desired number of tasks simultaneously in an Amazon ECS cluster. If any of your tasks fail or stop, the Amazon ECS service scheduler launches another instance based on parameters specified in your Task Definition. It does so in order to maintain the desired number of tasks created.
Estimated time to complete Step 5: 10 minutes.
Before creating the ECS Service and Load Balancer, verify that you accomplished the tasks in the previous tutorial steps. Using the DuploCloud Portal, confirm that:
An exist, both named NONPROD.
The NONPROD infrastructure has .
A Tenant named .
A has been created.
In the DuploCloud Portal's Tenant list box, select dev01.
Navigate to Cloud Services -> ECS.
In the Task Definitions tab, select the Task Definition Family Name, DUPLOSERVICES-DEV01-SAMPLE-TASK-DEF. This is the prepended by a unique identifier, which includes your Tenant name (DEV01) and part of your Infrastructure name (ECS-TEST).
In the Service Details tab, click the Configure ECS Service link. The Add ECS Service page displays.
In the Name field, enter sample-httpd-app as the Service name.
In the LB Listeners area, click Add. The Add Load Balancer Listener pane displays.
From the Select Type list box, select Application LB.
In the Container Port field, enter 3000.
In the External Port field, enter 80.
From the Visibility list box, select Public.
In the Heath Check field, enter /, specifying root, the location of Kubernetes Health Check logs.
From the Backend Protocol list box, select HTTP.
From the Protocol Policy list box, select HTTP1.
Select other options as needed and click Add.
On the Add ECS Service page, click Submit.
In the Service Details tab, information about the Service and Load Balancer you created is displayed. Verify that the Service and Load Balancer configuration details in the Service Details tab are correct.
Finish the Quick Start Tutorial by running a native Docker Service
This section of the tutorial shows you how to deploy a web application with a DuploCloud Docker Service, by leveraging DuploCloud platform in-built container management capability.
Instead of creating a DuploCloud Docker Service, you can alternatively finish the tutorial by:
running Docker containers.
running Docker containers.
Instead of creating a DuploCloud Service using EKS or ECS, you can deploy your application with native Docker containers and services.
To deploy your app with a DuploCloud Docker Service in this tutorial, you:
Create an EC2 host instance in DuploCloud.
Create a native Docker application and Service.
Expose the app to the web with an Application Load Balancer in DuploCloud.
Complete the tutorial by testing your application.
Estimated time to complete remaining tutorial steps: 30-40 minutes
Behind the scenes, the topology that DuploCloud creates resembles this low-level configuration in AWS.
Finish the Quick Start Tutorial by creating an ECS Service
This section of the tutorial shows you how to deploy a web application with .
For a full discussion of the benefits of using EKS vs. ECS, consult.
Instead of creating a DuploCloud Service with AWS ECS, you can alternatively finish the tutorial by:
running Docker containers or
.
Unlike AWS EKS, creating and deploying services and apps with ECS requires creating a , a blueprint for your application. Once you create a Task Definition, you can run it as a Task or as a Service. In this tutorial, we run the Task Definition as a Service.
To deploy your app with AWS ECS in this ECS tutorial, you:
Create a Task Definition using ECS.
Create a DuploCloud Service named webapp, backed by a Docker image.
Expose the app to the web with a Load Balancer.
Complete the tutorial by testing your application.
Estimated time to complete remaining tutorial steps: 30-40 minutes
Behind the scenes, the topology that DuploCloud creates resembles this low-level configuration in AWS.
Create a Task Definition for your application in AWS ECS
You enabled ECS cluster creation when you created the . In order to create a Service using ECS, you first need to create a that serves as a blueprint for your application.
Once you create a Task Definition, you can run it as a Task or as a Service. In this tutorial, we run the Task Definition as a Service.
Estimated time to complete Step 4: 10 minutes.
Before creating an RDS, verify that you completed the tasks in the previous tutorial steps. Using the DuploCloud Portal, confirm that:
An exist, both named NONPROD.
The NONPROD infrastructure has .
A Tenant named .
In the Tenant list box, select the dev01 Tenant.
Navigate to Cloud Services -> ECS.
In the Task Definition tab, click Add. The Add Task Definition page displays.
In the Name field, enter sample-task-def.
In the Container - 1 section, in the Container Name field, enter sample-task-def-c1. Container names are required for Docker images in AWS ECS.
In the Image field, enter duplocloud/nodejs-hello:latest.
From the vCPU list box, select 0.50 vCPU.
From the Memory list box, select 1 GB.
In the Port Mappings section, in the Port field, enter 3000. Port mappings allow containers to access ports for the host container instance to send or receive traffic.
Click Submit.
Test the application to ensure you get the results you expect
You can test your application using the DNS Name from the Services page.
Estimated time to complete Step 6 and finish tutorial: 5 minutes.
Before testing your application, verify that you accomplished the tasks in the previous tutorial steps. Using the DuploCloud Portal, confirm that:
An exist, both with the name NONPROD.
The NONPROD infrastructure has .
A Tenant named .
A named sample-task-def has been created.
The sample-httpd-app) and Load Balancer have been created.
In the Tenant list box, select the dev01 Tenant that you created.
Navigate to Cloud Services -> ECS.
Click the Service Details tab.
In the DNS Name card, click the Copy Icon ( ) to copy the DNS address to your clipboard.
Open a browser and paste the DNS address in the URL field of your browser.
Press ENTER. A web page with the text It works! displays, from the JavaScript program residing in your Docker Container that is running in sample-httpd-app, which is exposed to the web by your Application Load Balancer.
It can take from five to fifteen (5-15) minutes for the Domain Name to become active once you launch your browser instance to test your application.
Congratulations! You have just launched your first web service on DuploCloud!
In this tutorial, your objective was to create a cloud environment to deploy an application for testing purposes, and to understand how the various components of DuploCloud work together.
The application rendered a simple web page with text, coded in JavaScript, from software application code residing in a Docker container. You can use this same procedure to deploy much more complex cloud applications.
In the previous steps, you:
In this tutorial, you created many artifacts. When you are ready, clean them up so others can run this tutorial using the same names for Infrastructure and Tenant.
The NONPROD Infrastructure is deleted and you have completed the clean-up of your test environment.
Finish by deleting the NONPROD Infrastructure. In the DuploCloud Portal, navigate to Administrator -> Infrastructure. Click the Action menu icon () for the NONPROD row and select Delete.
On the Add Service page, you can also specify optional Environment Variables (EVs) such as databases, Hosts, ports, etc. You can also pass using EVs for testing purposes.
Once the Service is Running, you can check the logs for additional information. On the Services page, select the Containers tab, click the menu icon ( ) to the left of the container name, and select the Logs option.
named NONPROD, a Virtual Private Cloud instance, backed by an ECS-enabled Kubernetes cluster.
named dev01 in Infrastructure NONPROD. While generating the Infrastructure, DuploCloud created a set of templates () to configure multiple AWS and Kubernetes components needed for your environment.
named sample-task-def, used to create a service to run your application.
named sample-httpd-app to connect the Docker containers and associated images, in which your application code resides, to the DuploCloud Tenant environment. In the same step, you c to expose your application via ports and backend network configurations.
as expected by testing the DNS Name exposed by the Load Balancer Listener.
To delete the dev01 tenant , and then return to this page. As you learned, the Tenant segregates all work in one isolated environment, so deleting the Tenant cleans up most of your artifacts.
Finish by deleting the NONPROD Infrastructure. In the DuploCloud Portal, navigate to Administrator -> Infrastructure. Click the Action menu icon () for the NONPROD row and select Delete.
Thanks for completing this tutorial and proceed to the next section to learn more about .
Use Cases supported for DuploCloud AWS
This section details common use cases for DuploCloud AWS.
Topics in this section are covered in the order of typical usage. Use cases that are foundational to DuploCloud such as Infrastructure, Tenant, and Hosts are listed at the beginning of this section; while supporting use cases such as Cost management for billing, JIT Access, Resource Quotas, and Custom Resource tags appear near the end.
AWS Console link
Create a Load Balancer to expose the native Docker Service
Now that your DuploCloud Service is running, you have a mechanism to expose the containers and images in which your application resides. Since your containers are in a private network, you need a Load Balancer to make the application accessible.
In this step, we add a Load Balancer Listener to complete this network configuration.
Estimated time to complete Step 6: 15 minutes.
Before creating a Load Balancer, verify that you completed the tasks in the previous tutorial steps. Using the DuploCloud Portal, confirm that:
An Infrastructure and Plan exist, both named NONPROD.
A Tenant named dev01 has been created.
An EC2 Host named host01 has been created.
A Service named demo-service-d01 has been created.
In the Tenant list box, select dev01.
Navigate to Docker -> Services.
Select the Service demo-service-d01 that you created.
Click the Load Balancers tab.
Click the Configure Load Balancer link. The Add Load Balancer Listener pane displays.
From the Select Type list box, select Application LB.
In the Container Port field, enter 3000: the port on which the application running inside the container image (duplocloud/nodejs-hello:latest) is running.
In the External Port field, enter 80.
From the Visibility list box, select Public.
From the Application list box, select Docker Mode.
In the Health Check field, enter /, indicating that you want the Kubernetes Health Check logs written to the root directory.
From the Backend Protocol list box, select HTTP.
Click Add.
When the LB Status card displays Ready, your Load Balancer is running and ready for use.
If you want to secure the load balancer created, you can follow the steps specified here.
You can modify the DNS name by clicking Edit in the DNS Name card in the Load Balancers tab. For additional information see this page.
Enable Elastic Kubernetes Service (EKS) for AWS by creating a DuploCloud Infrastructure
In the DuploCloud platform, a Kubernetes Cluster maps to a DuploCloud Infrastructure.
Start by creating a new Infrastructure in DuploCloud. When prompted to provide details for the new Infrastructure, select Enable EKS. In the EKS Version field, select the desired release.
Optionally, enable logging and custom EKS endpoints.
The worker nodes and remaining workload setup are described in the Tenant topic.
Up to one instance (0 or 1) of an EKS is supported for each DuploCloud Infrastructure.
Creating an Infrastructure with EKS can take some time. See the Infrastructure section for details about other elements on the Add Infrastructure form.
When the Infrastructure is in the ready state, as indicated by a Complete status, navigate to Kubernetes -> Services and select the Infrastructure from the NAME column to view the Kubernetes configuration details, including the token and configuration for kubectl.
When you create Tenants in an Infrastructure, a namespace is created in the Kubernetes cluster with the name duploservices-TENANT_NAME
Use the DuploCloud Portal to create an AWS Infrastructure and associated Plan
From the DuploCloud Portal, navigate to Administrator -> Infrastructure.
Click Add.
Define the Infrastructure by completing the fields on the Add Infrastructure form.
Select Enable EKS to enable EKS for the Infrastructure, or select Enable ECS Cluster to enable an ECS Cluster during Infrastructure creation.
Optionally, select Advanced Options to specify additional configurations (such as Public and Private CIDR Endpoints).
Click Create. The Infrastructure is created and listed on the Infrastructure page. DuploCloud automatically creates a Plan (with the same Infrastructure name) with the Infrastructure configuration.
Cloud providers limit the number of Infrastructures that can run in each region. Refer to your cloud provider for further guidelines on how many Infrastructures you can create.
In the DuploCloud Portal, navigate to Administrator -> Infrastructure. The Infrastructure page displays.
From the Name column, select the Infrastructure containing settings that you want to view.
Click the Settings tab. The Infrastructure settings display.
Up to one instance (0 or 1) of an EKS or ECS is supported for each DuploCloud Infrastructure.
You can customize your EKS configuration:
Enable EKS endpoints, logs, Cluster Autoscaler, and more. For information about configuration options, see these EKS Setup topics.
You can customize your ECS configuration. See the ECS Setup topic for information about configuration options.
Test the application to ensure you get the results you expect.
Estimated time to complete Step 7 and finish tutorial: 5 minutes.
Before testing your application, verify that you completed the tasks in the previous tutorial steps. Using the DuploCloud Portal, confirm that:
An Infrastructure and Plan exist, both named NONPROD.
A Tenant named dev01 has been created.
An EC2 Host named host01 has been created.
A Service named demo-service-d01 has been created.
A Load Balancer has been created.
In the Tenant list box, select dev01.
Navigate to Docker -> Services. The Services page displays.
From the Name column, select demo-service-d01.
Click the Load Balancers tab. The Application Load Balancer configuration is displayed.
In the DNS status card on the right side of the Portal, click the Copy Icon ( ) to copy the DNS address displayed to your clipboard.
Open a browser instance and paste the DNS in the URL field of your browser.
Press ENTER. A web page with the text Hello World! is displayed, from the JavaScript program residing in your Docker Container running in demo-service-d01, which is exposed to the web by your Load Balancer.
It can take from five to fifteen (5-15) minutes for the DNS Name to become active once you launch your browser instance to test your application.
Congratulations! You have just launched your first web service on DuploCloud!
In this tutorial, your objective was to create a cloud environment to deploy an application for testing purposes, and to understand how the various components of DuploCloud work together.
The application rendered a simple web page with text, coded in JavaScript, from software application code residing in a Docker container. You can use this same procedure to deploy much more complex cloud applications.
In the previous steps, you:
Created a DuploCloud Infrastructure named NONPROD, a Virtual Private Cloud instance, backed by an AKS-enabled Kubernetes cluster.
Created a Tenant named dev01 in Infrastructure NONPROD. While generating the Infrastructure, DuploCloud created a set of templates (Plan) to configure multiple Azure and Kubernetes components needed for your environment.
Created an EC2 host named host01, so your application has storage resources.
Created a Service named demo-service-d01 to connect the Docker containers and associated images, in which your application code resides, to the DuploCloud Tenant environment.
Created an ALB Load Balancer Listener to expose your application via ports and backend network configurations.
Verified that your web page rendered as expected by testing the DNS Name exposed by the Load Balancer Listener.
In this tutorial, you created many artifacts for testing purposes. Clean them up so others can run this tutorial using the same names for Infrastructure and Tenant.
To delete the dev01 tenant follow these instructions, then return to this page. As you learned, the Tenant segregates all work in one isolated environment, so deleting the Tenant that you created cleans up most of your artifacts.
The NONPROD Infrastructure is deleted and you have completed the clean-up of your test environment.
Thanks for completing this tutorial and proceed to the next section to learn more about using DuploCloud with AWS.
Enable Cluster Autoscaler for a Kubernetes cluster
The Cluster AutoScaler automatically adjusts the number of nodes in your cluster when Pods fail or are rescheduled onto other nodes.
In the DuploCloud Portal, navigate to Administrator -> Infrastructure. The Infrastructure page displays.
From the NAME column, select the Infrastructure with which you want to use Cluster AutoScaler.
Click the Settings tab.
Click Add. The Add Infra - Set Custom Data pane displays.
From the Setting Name list box, select Cluster Autoscaler.
Select Enable to enable EKS.
Click Set. Your configuration is displayed in the Settings tab.
Specify EKS endpoints for an Infrastructure
AWS SDKs and the AWS Command Line Interface (AWS CLI) automatically use the default public endpoint for each service in an AWS Region. However, when you create an Infrastructure in DuploCloud, you can specify a custom Private endpoint, a custom Public endpoint, or Both public and private custom endpoints. If you specify no endpoints, the default Public endpoint is used.
For more information about AWS Endpoints, see the .
Follow the steps in the section . Before clicking Create, specify EKS Endpoint Visibility.
From the EKS Endpoint Visibility list box, select Public, Private, or Both public and private. If you select private or Both public and private, the Allow VPN Access to the EKS Cluster option is enabled.
Click Advanced Options.
Using the Private Subnet CIDR and Public Subnet CIDR fields, specify CIDRs for alternate public and private endpoints.
Click Create.
In the DuploCloud Portal, navigate to Administrator -> Infrastructure. The Infrastructure page displays.
From the NAME column, select the Infrastructure.
Click the Settings tab.
From the Setting Name list box, select Enable VPN Access to EKS Cluster.
Select Enable to enable VPN.
Modifying endpoints can incur an outage of up to thirty (30) minutes in your EKS cluster. Plan your update accordingly to minimize disruption for your users.
To modify the visibility for EKS endpoints you have already created:
In the DuploCloud Portal, navigate to Administrator -> Infrastructure. The Infrastructure page displays.
From the Name column, select the Infrastructure for which you want to modify EKS endpoints.
Click the Settings tab.
From the Setting Value list box, select the desired type of visibility for endpoints (private, public, or both).
Click Set.
Enable Elastic Container Service (ECS) for AWS when creating a DuploCloud Infrastructure
Setting up an Infrastructure that uses ECS is similar to creating an , except that during creation, instead of selecting Enable EKS, you select Enable ECS Cluster.
For more information about ECS Services, see the documentation.
Up to one instance (0 or 1) of an ECS is supported for each DuploCloud Infrastructure.
Enable logging functionality for EKS
Follow the steps in the section . In the EKS Logging list box, select one or more ControlPlane Log types.
Enable EKS logging for an Infrastructure that you have already created.
In the DuploCloud Portal, navigate to Administrator -> Infrastructure.
From the NAME column, select the Infrastructure for which you want to enable EKS logging.
Click the Settings tab.
Click Add. The Infra - Set Custom Data pane displays.
From the Setting Name list box, select EKS ControlPlane Logs.
In the Setting Value field, enter: api;audit;authenticator;controllerManager;scheduler
Click Set. The EKS ControlPlane Logs setting is displayed in the Settings tab.
Securely access AWS Services using VPC endpoints
An AWS creates a private connection to supported AWS services and VPC endpoint services powered by AWS PrivateLink. Amazon VPC instances do not require public IP addresses to communicate with the resources of the service. Traffic between an Amazon VPC and a service does not leave the Amazon network.
VPC endpoints are virtual devices. They are horizontally scaled, redundant, and highly available Amazon VPC components that allow communication between instances in an Amazon VPC and services without imposing availability risks or bandwidth constraints on network traffic. There are two types of VPC endpoints, , and .
DuploCloud allows you to specify predefined AWS endpoints for your Infrastructure in the DuploCloud Portal.
In the DuploCloud Portal, navigate to Administrator -> Infrastructure. The Infrastructure page displays.
Select the Infrastructure to which you want to add VPC endpoints.
Click the Endpoints tab.
Click Add. The Infra - Create VPC Endpoints pane displays.
From the VPC Endpoint Service list box, select the endpoint service you want to add.
Click Create. In the Endpoints tab, the VPC Endpoint ID of your selected service displays.
Enable ECS Elasticsearch logging for containers at the Tenant level
To generate logs for AWS ECS clusters, you must first create an Elasticsearch logging container. Once auditing is enabled, your container logging data can be captured for analysis.
Define at least one .
Enable the feature.
In the DuploCloud Portal, navigate to Administrator -> Tenant. The Tenant page displays.
From the Name column, select the Tenant that is running the container for which you want to enable logging.
Click the Settings tab.
Click Add. The Add Tenant Feature pane displays.
From the Select Feature list box, select Other. The Configuration field displays.
In the Configuration field, enter Enable ECS ElasticSearch Logging.
In the field below the Configuration field, enter True.
Click Add. In the Settings tab, Enable ECS ElasticSearch Logging displays a Value of True.
You can verify that ECS logging is enabled for a specific container.
In the DuploCloud Portal, navigate to Cloud Services -> ECS.
In the Task Definitions tab, select the Task Definition Family Name in which your container is defined.
Click the Task Definitions tab.
In the Container - 1 area, in the Container Other Config field, your LogConfiguration is displayed.
In the Container-2 area, another container is created by DuploCloud with the name log_router.
Finish by deleting the NONPROD Infrastructure. In the DuploCloud Portal, navigate to Administrator -> Infrastructure. Click the Action menu icon () for the NONPROD row and select Delete.
To change VPN visibility from public to private after you have , follow these steps.
In the EKS Endpoint Visibility row, in the Actions column, click the ( ) icon and select Update Setting. The Infra - Set Custom Data pane displays.
Click Set. When you , the Allow VPN Access to the EKS Cluster option will be enabled.
In the EKS Endpoint Visibility row, in the Actions column, click the ( ) icon and select Update Setting. The Infra - Set Custom Data pane displays.
Creating an Infrastructure with ECS can take some time. See the section for details about other elements on the Add Infrastructure form.
Menu icon ( ) in the row of the task definition and select Edit Task Definition. The Edit Task Definition page displays your defined Containers.
Adding EC2 hosts in DuploCloud AWS
Once you have the Infrastructure (Networking, Kubernetes cluster, and other standard configurations) and an environment (Tenant) set up, the next step is to launch EC2 virtual machines (VMs). You create VMs to be:
EKS Worker Nodes
Worker Nodes (Docker Host), if the built-in container orchestration is used.
DuploCloud AWS requires at least one Host (VM) to be defined per AWS account.
You also create VMs if Regular nodes are not part of any container orchestration. For example, a user manually connects and installs apps, as when using Microsoft SQL Server in a VM, Running an IIS application, or such custom use cases.
While all the lower-level details like IAM roles, Security groups, and others are abstracted away from the user (as they are derived from the Tenant), standard application-centric inputs must be provided. This includes a Name, Instance size, Availability Zone choice, Disk size, Image ID, etc. Most of these are optional, and some are published as a list of user-friendly choices by the admin in the plan (Image or AMI ID is one such example). Other than these AWS-centric parameters, there are two DuploCloud platform-specific values to be provided:
Agent Platform: This is applicable if the VM is going to be used as a host for container orchestration by the platform. The choices are:
EKS Linux: If this is to be added to the EKS cluster. For example, EKS is the chosen approach for container orchestration
Linux Docker: If this is to be used for hosting Linux containers using the Built-in Container orchestration
Docker Windows: If this is to be used for hosting Windows containers using the Built-in Container orchestration
None: If the VM is going to be used for non-Container Orchestration purposes and contents inside the VM will be self-managed by the user
Allocation Tags (Optional): If the VM is being used for containers, you can set a label on it. This label can then be specified during docker app deployment to ensure the application containers are pinned to a specific set of nodes. Thus, you can further split a tenant into separate server pools and deploy applications.
If a VM is being used for container orchestration, ensure that the Image ID corresponds to an Image for that container orchestration. This is set up for you. The list box will have self-descriptive Image IDs. Examples are EKS Worker, Duplo-Docker, Windows Docker, and so on. Anything that starts with Duplo would be an image for the Built-in container orchestration.
Upgrade the Elastic Kubernetes Service (EKS) version for AWS
AWS frequently updates the EKS version based on new features that are available in the Kubernetes platform. DuploCloud automates this upgrade in the DuploCloud Portal.
IMPORTANT: An EKS version upgrade can cause downtime to your application depending on the number of replicas you have configured for your services. Schedule this upgrade outside of your business hours to minimize disruption.
DuploCloud notifies users when an upgrade is planned. The upgrade process follows these steps:
A new EKS version is released.
DuploCloud adds support for the new EKS version.
DuploCloud tests all changes and new features thoroughly.
DuploCloud rolls out support for the new EKS version in a platform release.
The user updates the EKS version.
Updating the EKS version:
Updates the EKS Control Plane to the latest version.
Updates all add-ons and components.
Relaunches all Hosts to deploy the latest version on all nodes.
After the upgrade process completes successfully, you can assign allocation tags to Hosts.
Click Administrator -> Infrastructure.
Select the Infrastructure that you want to upgrade to the latest EKS version.
Select the EKS tab. If an upgrade is available for the Infrastructure, an Upgrade link appears in the Value column.
Click the Upgrade link. The Upgrade EKS Cluster pane displays.
From the Target Version list box, select the version to which you want to upgrade.
From the Host Upgrade Action, select the method by which you want to upgrade hosts.
Click Start. The upgrade process begins.
Click Administrator -> Infrastructure.
Select the Infrastructure with components you want to upgrade.
Select the EKS tab. If an upgrade is available for the Infrastructure components, an Upgrade Components link appears in the Value column.
Click the Upgrade link. The Upgrade EKS Cluster Components pane displays.
From the Host Upgrade Action, select the method by which you want to upgrade hosts.
Click Start. The upgrade process begins.
The EKS Upgrade Details page displays that the upgrade is In Progress.
Find more details about the upgrade by selecting your Infrastructure from the Infrastructure page. Click the EKS tab, and then click Show Details.
When you click Show Details, the EKS Upgrade Details page displays the progress of updates for all versions and Hosts. Green checkmarks indicate successful completion in the Status list. Red Xs indicate Actions you must take to complete the upgrade process.
If any of your Hosts use allocation tags, you must assign allocation tags to the Hosts:
After your Hosts are online and available, navigate to Cloud Services -> Hosts.
Select the host group tab (EC2, ASG, etc.) on the Hosts screen.
Click the Add button.
Name the Host and provide other configuration details on the Add Host form.
Select Advanced Options.
Edit the Allocation Tag field.
Click Create and define your allocation tags.
Click Add to assign the allocation tags to the Host.
For additional information about the EKS version upgrade process with DuploCloud, see the AWS FAQs section on EKS version upgrades.
Add rules to custom configure your AWS Security Groups in the DuploCloud Portal
In the DuploCloud Portal, navigate to Administrator -> Infrastructure. The Infrastructure page displays.
Select the Infrastructure for which you want to add or view Security Group rules from the Name column.
Click the Security Group Rules tab.
Click Add. The Add Infrastructure Security pane displays.
From the Source Type list box, select Tenant or IP Address.
From the Tenant list box, select the Tenant for which you want to set up the Security Rule.
Select the protocol from the Protocol list box.
In the Port Range field, specify the range of ports for access (for example, 1-65535).
Optionally, add a Description of the rule you are adding.
Click Add.
In the DuploCloud Portal, navigate to Administrator -> Infrastructure.
Select the Infrastructure from the Name column.
Click the Security Group Rules tab. Security Rules are displayed.
In the DuploCloud Portal, navigate to Administrator -> Infrastructure.
Select the Infrastructure from the Name column.
Click the Security Group Rules tab. Security Rules are displayed in rows.
Configure settings for all new Tenants under a Plan
You can configure settings to apply to all new Tenants under a Plan using the Config tab. Tenant Config settings will not apply to Tenants created under the Plan before the settings were configured.
From the DuploCloud portal, navigate to Administrator -> Plan.
Click on the Plan you want to configure settings under in the NAME column.
Select the Config tab.
Click Add. The Add Config pane displays.
From the Config Type field, select TenantConfig.
In the Name field, enter the setting that you would like to apply to new Tenants under this Plan. (In the example, the enable_alerting setting is entered.)
In the Value field, enter True.
Click Submit. The setting entered in the Name field (enable alerting in the example) will apply to all new Tenants added under the Plan.
You can check that the Tenant Config settings are enabled for new Tenants on the Tenants details page, under the Settings tab.
From the DuploCloud portal, navigate to Administrator -> Tenants.
From the NAME column, select a Tenant that was added after the Tenant Config setting was enabled.
Click on the Settings tab.
Check that the configured setting is listed in the NAME column. (Enable Alerting in the example.)
Using DuploCloud Tenants for AWS
In AWS, cloud features such as AWS resource groups, AWS IAM, AWS security groups, KMS keys, as well as Kubernetes Namespaces, are exposed in Tenants which reference their configurations.
For more information about DuploCloud Tenants, see the Tenants topic in the DuploCloud Common Components documentation.
Navigate to Administrator -> Tenant in the DuploCloud Portal and click Add. The Create a Tenant pane displays.
In the Name field, enter a name for the Tenant. Choose unique names that are not substrings of one another, for example, if you have a Tenant named dev, you cannot create another named dev2. We recommend using distinct numerical suffixes like dev01 and dev02.
In the Plan list box, select the Plan to associate the Tenant with.
Click Create. The Tenant is created.
For information about granting Cross-Tenant access to resources, see this section in the User Administration section.
Manage Tenant expiry settings in the DuploCloud Portal
In the DuploCloud Portal, configure an expiration time for a Tenant. At the set expiration time, the Tenant and associated resources are deleted.
In the DuploCloud Portal, navigate to Administrator -> Tenants. The Tenants page displays.
From the Name column, select the Tenant for which you want to configure an expiration time.
From the Actions list box, select Set Tenant Expiration. The Tenant - Set Tenant Expiration pane displays.
Select the date and time (using your local time zone) when you want the Tenant to expire.
Click Set. At the configured day and time, the Tenant and associated resources will be deleted.
The Set Tenant Expiration option is not available for Default or Compliance Tenants.
Manage Tenant session duration settings in the DuploCloud Portal
In the DuploCloud Portal, configure the session duration time for all Tenants or a single Tenant. At the end of a session, the Tenants or Tenant ceases to be active for a particular user, application, or Service.
For more information about IAM roles and session times in relation to a user, application, or Service, see the AWS Documentation.
In the DuploCloud Portal, navigate to Administrator -> System Settings. The System Settings page displays.
Click the System Config tab.
Click Add. The App Config pane displays.
From the Config Type list box, select AppConfig.
From the Key list box, select AWS Role Max Session Duration.
From the Select Duration Hour list box, select the maximum session time in hours or set a Custom Duration in seconds.
Click Submit. The AWS Role Max Session Duration and Value are displayed in the System Config tab. Note that the Value you set for maximum session time in hours is displayed in seconds. You can Delete or Update the setting in the row's Actions menu.
In the DuploCloud Portal, navigate to Administrator -> Tenants. The Tenants page displays.
From the Name column, select the Tenant for which you want to configure session duration time.
Click the Settings tab.
Click Add. The Add Tenant Feature pane displays.
From the Select Feature list box, select AWS Role Max Session Duration.
From the Select Duration Hour list box, select the maximum session time in hours or set a Custom Duration in seconds.
Click Add. The AWS Role Max Session Duration and Value are displayed in the Settings tab. Note that the Value you set for maximum session time in hours is displayed in seconds. You can Delete or Update the setting in the row's Actions menu.
Deploy Hosts in one Tenant that can be accessed by Kubernetes (K8s) Pods in a separate Tenant.
You can enable shared Hosts in the DuploCloud Portal. First, configure one Tenant to allow K8s Pods from other Tenants to run on its Host(s). Then, configure another Tenant to run its K8s Pods on Hosts in other Tenants. This allows you to break Tenant boundaries for greater flexibility.
In the DuploCloud Portal, navigate to Administrator -> Tenant.
From the Tenant list, select the name of the Tenant to which the Host is defined.
Click the Settings tab.
Click Add. The Add Tenant Feature pane displays.
From the Select Feature item list, select Allow hosts to run K8S pods from other tenants.
Select Enable.
Click Add. This Tenant's hosts can now run Pods from other Tenants.
In the DuploCloud Portal, navigate to Administrator -> Tenant.
From the Tenant list, select the name of the Tenant that will access the other Tenant's Host (the Tenant not associated with a Host).
Click the Settings tab.
Click Add. The Add Tenant Feature pane displays.
From the Select Feature item list, select Enable option to run K8S pods on any host.
Select Enable.
Click Add. This Tenant can now run Pods on other Tenant's Hosts.
From the Tenant list box at the top of the DuploCloud Portal, select the name of the Tenant that will run K8s Pods on the shared Host.
In the DuploCloud Portal, navigate to Kubernetes -> Services.
In the Services tab, click Add. The Add Service window displays.
Fill in the Service Name, Cloud, Platform, and Docker Image fields. Click Next.
In the Advanced Options window, from the Run on Any Host item list, select Yes.
Click Create. A Service running the shared Host is created.
Connect an EC2 instance with SSH by Session ID or by downloading a key
Once an EC2 Instance is created, you connect it with SSH either by using Session ID or by downloading a key.
In the DuploCloud Portal, navigate to Cloud Services -> Hosts and select the host to which you want to connect.
After you select the Host, on the Host's page click the Actions menu and select SSH. A new browser tab opens and you can connect your Host using SSH with by session ID. Connection to the host launches in a new browser tab.
After you select the Host, on the Host's page click the Actions menu and select Connect -> Connection Details. The Connection Info for Host window opens. Follow the instructions to connect to the server.
Click Download Key.
If you don't want to display the Download Key button, disable the button's visibility.
In the DuploCloud Portal, navigate to Administrator -> System Settings.
Click the System Config tab.
Click Add. The Add Config pane displays.
From the Config Type list box, select Flags.
From the Key list box, select Disable SSH Key Download.
From the Value list box, select true.
Click Submit.
Configuring the following system setting disables SSH access for read-only users. Once this setting is configured, only administrator-level users can access SSH.
From the DuploCloud Portal, navigate to Administrator -> Systems Settings.
Select the Settings tab, and click Add. The Update Config Flags pane displays.
From the Config Type list box, select Flags.
In the Key list box, select Admin Only SSH Key Download.
In the Value field list box, select true.
Click Submit. The setting is configured and SSH access is limited to administrators only.
Add a Host (virtual machine) in the DuploCloud Portal.
DuploCloud AWS supports EC2, ASG, and BYOH (Bring Your Own Host) types. Use BYOH for any VMs that are not EC2 or ASG.
Ensure you have selected the appropriate Tenant from the Tenant list box at the top of the DuploCloud Portal.
In the DuploCloud Portal, navigate to Cloud Services -> Hosts.
Select the tab corresponding to the type of Host you want to create (EC2, ASG, or BYOH).
Click Add. The Add Host page displays.
Complete the fields as required for your architecture.
Click Add. The Host that you added is displayed in the appropriate tab (EC2, ASG, or BYOH).
To connect to the Host using SSH, .
The EKS Image ID is the image published by AWS specifically for an EKS worker in the version of Kubernetes deployed at Infrastructure creation time.
From the DuploCloud Portal, navigate to Cloud Services -> Hosts.
Select the Host name from the list.
From the Actions list box, you can select Connect, Host Settings, or Host State to perform the following supported actions:
Autoscale your Host workloads in DuploCloud
DuploCloud supports various ways to scale Host workloads, depending on the underlying AWS services being used.
Control placement of EC2 instances on a physical server with a Dedicated Host
Use Dedicated Hosts to launch Amazon EC2 instances and provide additional visibility and control over how EC2 instances are placed on a physical server; enabling you to use the same physical server, if needed.
Configure the DuploCloud Portal to allow for the creation of Dedicated Hosts.
In the DuploCloud Portal, navigate to Administrator -> System Settings.
Click the System Config tab.
Click Add. The Add Config pane displays.
In the Config Type field, select Flags.
In the Key field, select Allow Dedicated Host Sharing.
In the Value field, select true.
Click Submit. The configuration is displayed in the System Config tab.
In the DuploCloud Portal, navigate to Cloud Services -> Hosts.
In the EC2 tab, click Add. The Add Host page displays.
After completing the required fields to configure your Host, select Advanced Options. The advanced options display.
In the Dedicated Host ID field, enter the ID of the Dedicated Host. The ID is used to launch a specific instance on a Dedicated Host. See the screenshot below for an example.
Click Add. The Dedicated Host is displayed in the EC2 tab.
After you create Dedicated Hosts, view them by doing the following:
In the DuploCloud Portal, navigate to Cloud Services -> Hosts.
In the EC2 tab, select the Host from the Name column. The Dedicated Host ID card on the Host page displays the ID of the Dedicated Host.
Create Autoscaling groups to scale EC2 instances to your workload
Configure Autoscaling Groups (ASG) to ensure the application load is scaled based on the number of EC2 instances configured. Autoscaling detects unhealthy instances and launches new EC2 instances. ASG is also cost-effective as EC2 Instances are dynamically created per the application requirement within minimum and maximum count limits.
For cluster autoscaling, in your Infrastructure before creating an ASG.
In the DuploCloud Portal, navigate to Cloud Services -> Hosts.
In the ASG tab, click Add. The Add ASG page is displayed.
In the Friendly Name field, enter the name of the ASG.
Select Availability Zone and Instance Type.
In the Instance Count field, enter the desired capacity for the Autoscaling group.
In the Minimum Instances field, enter the minimum number of instances. The Autoscaling group ensures that the total number of instances is always greater than or equal to the minimum number of instances.
In the Maximum Instances field, enter the maximum number of instances. The Autoscaling group ensures that the total number of instances is always less than or equal to the maximum number of instances.
Optionally, select Use for Cluster Autoscaling.
Select Advanced Options. The Advanced Options section displays.
Fill in additional fields as needed for your ASG.
Click Add. Your ASG is added and displayed in the ASG tab.
In the Friendly Name field, enter the name of the ASG.
Select Availability Zone and Instance Type.
In the Instance Count field, enter the desired capacity for the Autoscaling group.
In the Minimum Instances field, enter the minimum number of instances. The Autoscaling group ensures that the total number of instances is always greater than or equal to the minimum number of instances.
In the Maximum Instances field, enter the maximum number of instances. The Autoscaling group ensures that the total number of instances is always less than or equal to the maximum number of instances.
Optionally, select Use for Cluster Autoscaling.
Optionally select Advanced Options, and complete additional fields as needed.
Click Add. Your ASG is added and displayed in the ASG tab.
To view the hosts in an Autoscaling group, follow these steps:
In the DuploCloud Portal, navigate to Cloud Services -> Hosts.
Select the ASG tab.
In the NAME column, select the ASG for which you want to view Hosts.
Select the Hosts tab. A list of individual Hosts displays.
In the first column of the Security Group row, click the Options Menu Icon ( ) and select Delete.
If no Image ID is available with a prefix of EKS, copy the AMI ID for the desired EKS version by referring to this . Select Other from the Image ID list box and paste the copied AMI ID in the Other Image ID field. Contact the DuploCloud Support team via your Slack channel if you have questions or issues.
See .
If you add custom code for EC2 or ASG Hosts using the Base64 Data field, your custom code overrides the code needed to start the EC2 or ASG Hosts and the Hosts cannot connect to EKS. Instead, to add custom code directly in EKS.
Refer to AWS for detailed steps on creating Scaling policies for the Autoscaling Group.
SSH
Establish an SSH connection to work directly in the AWS Console.
Connection Details
View connection details (connection type, address, user name, visibility) and download the key.
Host Details
View Host details in the Host Details YAML screen.
Create AMI
Set the AMI.
Create Snapshot
Create a snapshot of the Host at a specific point.
Update User Data
Update the Host user data.
Change Instance Size
Resize a Host instance to accommodate the workload.
Update Auto Reboot Status Check
Enable or disable Auto Reboot. Set the number of minutes after the AWS Instance Status Check fails before automatically rebooting.
Start
Start the Host.
Reboot
Reboot the Host.
Stop
Stop the Host.
Hibernate
Hibernate (temporarily freeze) the Host.
Terminate Host
Terminate the Host.
ECS Autoscaling has the ability to scale the desired count of tasks for the ECS Service configured in your infrastructure. Average CPU/Memory metrics of your tasks are used to increase/decrease the desired count value.
Navigate to Cloud Services -> ECS. Select the ECS Task Definition where Autoscaling needs to be enabled > Add Scaling Target
Set the MinCapacity (minimum value 2) and MaxCapacity to complete the configuration.
Once Autoscaling for Targets is configured, Next we have to add Scaling Policy
Provide details below:
Policy Name - The name of the scaling policy.
Policy Dimension - The metric type tracked by the target tracking scaling policy.. Select from the dropdown
Target Value - The target value for the metric.
Scalein Cooldown - The amount of time, in seconds, after a scale in activity completes before another scale in activity can start.
ScaleOut Cooldown -The amount of time, in seconds, after a scale out activity completes before another scale out activity can start.
Disable ScaleIn - Disabling scale-in makes sure this target tracking scaling policy will never be used to scale in the Autoscaling group
This step creates the target tracking scaling policy and attaches it to the Autoscaling group
View the Scaling Target and Policy Details from the DuploCloud Portal. Update and Delete Operations are also supported from this view
Autoscale your DuploCloud Kubernetes deployment
Before autoscaling can be configured for your Kubernetes service, make sure that:
Autoscaling Group (ASG) is setup in the DuploCloud tenant
Cluster Autoscaler is enabled for your DuploCloud infrastructure
Horizontal Pod Autoscaler (HPA) automatically scales the Deployment and its ReplicaSet. HPA checks the metrics configured in regular intervals and then scales the replicas up or down accordingly.
You can configure HPA while creating a Deployment Service from the DuploCloud Portal.
In the DuploCloud Portal, navigate Kubernetes -> Services, displaying the Services page.
Create a new Service by clicking Add.
In Add Service - Basic Options, from the Replication Strategy list box, select Horizontal Pod Scheduler.
In the Horizontal Pod Autoscaler Config field, add a sample configuration, as shown below. Update the minimum/maximum Replica Count in the resource attributes, based on your requirements.
Click Next to navigate to Advanced Options.
In Advanced Options, in the Other Container Config field, ensure your resource attributes, such as Limits and Requests, are set to work with your HPA configuration, as in the example below.
At the bottom of the Advanced Options page, click Create.
For HPA Configures Services, Replica is set as Auto in the DuploCloud Portal
When your services are running, Replicas: Auto is displayed on the Service page.
If a Kubernetes Service is running with a Horizontal Pod AutoScaler (HPA), you cannot stop the Service by clicking Stop in the service's Actions menu in the DuploCloud Portal.
Instead, do the following to stop the service from running:
In the DuploCloud Portal, navigate to Kubernetes -> Containers and select the Service you want to stop.
From the Actions menu, select Edit.
From the Replication Strategy list box, select Static Count.
In the Replicas field, enter 0 (zero).
Click Next to navigate to the Advanced Options page.
Click Update to update the service.
When the Cluster Autoscaler flag is set and a Tenant has one or more ASGs, an unschedulable-pod alert will be delayed by five (5) minutes to allow for autoscaling. You can configure the Infrastructure settings to bypass the delay and send the alerts in real-time.
From the DuploCloud portal, navigate to Administrator -> Infrastructure.
Click on the Infrastructure you want to configure settings for in the Name list.
Select the Settings tab.
Click the Add button. The Infra - Set Custom Data pane displays.
In the Setting Name list box, select Enables faults prior to autoscaling Kubernetes nodes.
Set the Enable toggle switch to enable the setting.
Click Set. DuploCloud will now generate faults for unschedulable K8s nodes immediately (before autoscaling).
Managing Launch Template Versions for Autoscaling Groups (ASG) in DuploCloud
Launch templates define the configuration for instances in an Auto Scaling Group (ASG). They specify key settings such as the instance type, AMI, and other parameters that determine how new instances are launched. DuploCloud allows you to create multiple launch template versions, each with its own unique settings (e.g., instance type, AMI, etc.). You can easily switch between versions as your requirements evolve. One version can be set as the default, and updates to the launch template can be applied to both new and existing instances by using the Instance Refresh feature.
This feature is applicable to both Kubernetes Node ASGs and Docker Native ASGs.
Select the appropriate Tenant from the Tenant list box.
For Kubernetes-managed ASGs (Nodes), navigate to Kubernetes -> Nodes. For Docker Native ASGs (EC2 Instances Running Docker Directly), Navigate to Cloud Services -> Hosts.
Select the ASG tab.
In the NAME column, click on the ASG you wish to edit launch templates for.
Select the Launch Templates tab.
In the row of the version you wish to update, click the menu icon (), and select Edit (Create a new version). The Edit Launch Template (Create a new version) pane displays.
Configure the following launch template settings:
Template Version Description: Provide a description for the new version.
Instance Type: Select the type of EC2 instance to use for this version (e.g., t3.medium, m5.large, etc.).
Image ID: Specify the Amazon Machine Image (AMI) ID for the instances in this version. This defines the base image for launching new instances.
Set as Default: Optionally, set the newly created version as the default launch template for the ASG. The default version automatically applies to all newly launched instances in the ASG.
Click Submit. The updated launch template version is created.
In DuploCloud, you can manage multiple versions of a launch template for your Auto Scaling Group (ASG). You may want to change the default version to ensure that new instances are launched with the desired configuration.
To change the default launch template version:
Select the Tenant from the Tenant list box.
For Kubernetes-managed ASGs (Nodes), navigate to Kubernetes -> Nodes. For Docker Native ASGs (EC2 Instances Running Docker Directly), Navigate to Cloud Services -> Hosts.
Select the ASG tab and click the name of the appropriate ASG.
Click on the Launch Templates tab.
Select Set as Default.
The selected version will now be the default for any new instances launched in the ASG. Existing instances will remain unchanged. To update existing instances, use the Instance Refresh feature.
Create Autoscaling Groups (ASG) with Spot Instances in the DuploCloud platform
Spot Instances are spare capacity priced at a significant discount compared to On-Demand Instances. Users specify the maximum price (bid) they will pay per hour for a Spot Instance. The instance is launched if the current Spot price is below the user's bid. Since Spot Instances can be interrupted when spare capacity is unavailable, applications using Spot Instances must be fault-tolerant and able to handle interruptions.
Spot Instances are only supported for Auto-scaling Groups (ASG) with EKS
Follow the steps in the section Creating Autoscaling Groups (ASG). Before clicking Add, Click the box to access Advanced Options. Enable Use Spot Instances and enter your bid, in dollars, in the Maximum Spot Price field.
Follow the steps in Creating Services using Autoscaling Groups. In the Add Service page, Basic Options, Select Tolerate spot instances.
Tolerations will be entered by default in the Add Service page, Advanced Options, Other Container Config field.
Add and view AMIs in AWS
You can create Amazon Machine Images (AMIs) in the DuploCloud Portal. Unlike EC2 Hosts, which are fully dedicated physical servers for launching EC2 instances, AMIs are templates that contain the information required to launch an instance, such as an operating system, application software, and data. EC2 is used for creating a virtual server instance. AMI is the EC2 virtual machine image.
In the DuploCloud Portal, navigate to Cloud Services -> Hosts. The Hosts page displays.
Select the Host on which you want to base your AMI from the Name column.
Click the Actions menu and select Host Settings -> Create AMI. The Set AMI pane displays.
In the AMI Name field, enter the name of the AMI.
Click Create.
In the DuploCloud Portal, navigate to Cloud Services -> Hosts. The Hosts page displays.
Select the AMI tab. Your AMIs are displayed on the AMI page. Selecting an AMI from this page displays the Overview and Details tabs for more information.
You can disable host creation by non-administrators (Users) for custom AMIs by configuring the option in DuploCloud.
In the DuploCloud Portal, navigate to Administrator -> System Settings.
Click the System Config tab.
Click Add. The Add Config pane displays.
In the Config Type list box, select Flags.
In the Key list box, select Disable Host Creation with Custom AMI.
In the Value list box, select true.
Click Submit.
When this setting is configured, the Other option in the Image ID list box in the Add Host page, will be disabled, preventing hosts with custom AMIs from being created.
Initiate an Instance Refresh for an Auto Scaling Group (ASG) within the DuploCloud Portal.
Instance refresh allows you to apply configuration changes to existing instances in your Auto Scaling Group (ASG). While updates to the ASG automatically apply to newly launched instances, an instance refresh is required to apply these changes to instances that are already running. This ensures that all instances in your ASG are consistent with the latest settings.
In general, this feature works for:
ASGs with EC2 Instances: It applies to Auto Scaling Groups that are managing EC2 instances, which can be part of a Kubernetes cluster.
ASGs using Launch Templates or Configurations: The ASG must be configured to use a launch template or configuration to define how new instances should be created.
Select the appropriate Tenant from the Tenant list box.
For Kubernetes-managed ASGs (Nodes), navigate to Kubernetes -> Nodes. For Docker Native ASGs (EC2 Instances Running Docker Directly), Navigate to Cloud Services -> Hosts.
Select the ASG tab.
Select the name of the ASG you want to refresh from the NAME column.
Select the Launch Template tab.
Click on the Actions menu, and select Start Instance Refresh. The Start Instance Refresh pane displays.
Choose the Instance Replacement Method:
Launch before Termination: New instances are launched before the old ones are terminated, ensuring capacity is maintained throughout the refresh process and minimizing downtime.
Terminate and Launch: Old instances are terminated first, and new ones are launched afterward. This method may temporarily reduce capacity until the new instances are fully launched and healthy.
Custom Behavior: Define a custom instance replacement strategy to meet specific timing or instance replacement policies based on your needs.
Set the Min and Max Healthy Percentage:
Min Healthy Percentage: Specifies the minimum percentage of instances that must remain healthy during the refresh to avoid capacity issues.
Max Healthy Percentage: Limits the percentage of instances that can be healthy during the refresh to control how many instances are updated at once.
Define the Instance Warmup time, which is the duration to wait before considering a newly launched instance as healthy. This ensures the instance has time to fully initialize.
Optionally, select Update and Launch Template to apply any new configurations to the instances being replaced.
Version: If updating the launch template, choose the desired version of the launch template to apply to the instances being replaced.
Click Start to initiate the refresh process. The EC2 instances within the ASG will begin updating according to the selected replacement method.
Note: The instance refresh process can take some time to complete depending on the number of instances and the selected update method. Please allow adequate time for the instances to be updated and replaced.
Automatically reboot a host upon StatusCheck faults or Host disconnection
Configure hosts to be rebooted automatically if the following occurs:
EC2 Status Check - Applicable for Docker Native and EKS Nodes. The Host is rebooted in the specified interval when a StatusCheck fault is identified.
Kubernetes (K8s) Nodes are disconnected: Applicable for EKS Nodes only. The Host is rebooted in the specified interval when a Host Disconnected fault is identified.
You can configure host Auto Reboot features for a particular Tenant and for a Host.
When you configure an Auto Reboot feature for both Tenant and Host, the Host level configuration takes precedence over the configuration at the Tenant level.
Use the following procedures to configure Auto Reboot at the Tenant level.
Configure the Auto Reboot feature at the Tenant for Docker Native and EKS Node-based Hosts, to reboot when a StatusCheck fault is identified.
In the DuploCloud Portal, navigate to Administrator -> Tenant. The Tenant page displays.
Select a Tenant with access to the Host for which you want to configure Auto Reboot.
Click the Settings tab.
Click Add. The Add Tenant Feature pane displays.
From the Select Feature list box, select Enable Auto Reboot EC2 status check.
In the field below the Select Feature list box, enter the time interval in minutes after which the host automatically reboots after a StatusCheck fault is identified. Enter zero (0) to disable this configuration.
Click Add. The configuration is displayed in the Settings tab.
Configure the Auto Reboot feature at the Tenant for EKS node-based Hosts, to reboot when a Host Disconnected fault is identified.
In the DuploCloud Portal, navigate to Administrator -> Tenant. The Tenant page displays.
Select a Tenant with access to the Host for which you want to configure Auto Reboot.
Click the Settings tab.
Click Add. The Add Tenant Feature pane displays.
From the Select Feature list box, select Enable Auto Reboot K8s Nodes if disconnected.
In the field below the Select Feature list box, enter the time interval in minutes after which the host automatically reboots when a Host Disconnected fault is identified. Enter zero (0) to disable this configuration.
Click Add. The configuration is displayed in the Settings tab.
Use the following procedures to configure Auto Reboot at the Host level.
Configure the Auto Reboot feature on the Host level for Docker Native and EKS Node-based Hosts, to reboot when a StatusCheck fault is identified.
In the DuploCloud Portal, navigate to Cloud Services -> Hosts. The Hosts page displays.
Click the appropriate tab for your Host type and select the Host for which you want to configure Auto Reboot.
Click the Actions menu and select Host Settings -> Update Auto Reboot Status Check. The Set Auto Reboot Status Check Time pane displays.
In the Auto Reboot Status Check field, enter the time interval in minutes after which the host automatically reboots after a StatusCheck fault is identified. Enter zero (0) to disable this configuration.
Click Set.
Configure the Auto Reboot feature on the Host level for EKS node-based Hosts, to reboot when a Host Disconnected fault is identified.
In the DuploCloud Portal, navigate to Cloud Services -> Hosts. The Hosts page displays.
Click the appropriate tab for your Host type and select the Host for which you want to configure Auto Reboot.
Click the Actions menu and select Host Settings -> Update Auto Reboot Disconnected. The Set Auto Reboot Status Check Time pane displays.
In the Auto Reboot Time field, enter the time interval in minutes after which the host automatically reboots when a Host Disconnected fault is identified. Enter zero (0) to disable this configuration.
Click Set.
Logging for AWS in the DuploCloud Platform
The DuploCloud Platform performs centralized logging for -based applications. For the native and container orchestrations, this is implemented using and with as the log collector. For ECS Fargate, AWS Lambda, and AWS SageMaker Jobs, the platform integrates with CloudWatch, automatically setting up Log Groups and making them viewable from the DuploCloud Portal.
No setup is required to enable logging for ECS Fargate, Lambda, or AWS SageMaker Jobs. DuploCloud automatically sets up CloudWatch log groups and provides a menu next to each resource.
To maintain optimal performance and cost-efficiency, it's crucial to manage logging resources effectively. If you find yourself with unnecessary monitoring hosts or logging instances, specific steps should be taken to clean them up without affecting essential services.
To terminate unnecessary monitoring hosts in DuploCloud, it's recommended that a designated user, referred to as Person 0, performs the termination. This approach ensures that essential services, such as Prometheus, are not inadvertently removed, which could lead to loss of data or configurations.
Cleaning up a logging instance involves several steps, starting with remote access into DuploMaster. From there, navigate to the appropriate directories to edit and delete specific files related to the unintended tenant. This includes removing entries from the logging_config.json and deleting tenant-specific JSON files. Additionally, tenant services related to OpenSearch, Kibana, and Elastic Filebeat need to be deleted, followed by the termination of the oc-diagnostics host. It's also necessary to remove specific entries from the DuploCloud portal related to reverse proxy settings and platform services.
When a host or a Load Balancer (LB) is no longer required, consider stopping or deleting them as part of cost optimization measures. Before taking such actions, ensure they do not contain or support essential services that could impact your infrastructure's operation.
By following these guidelines, you can ensure that your logging resources in DuploCloud are managed efficiently, contributing to both operational effectiveness and cost savings.
Manage taints for EKS nodes in the DuploCloud Portal
Taints influence Kubernetes workload scheduling by marking nodes with specific conditions that certain Pods must tolerate to be scheduled on those nodes. Taints ensure that only compatible workloads run on a node, which can be useful for restricting access to certain resources, isolating environments, or managing resource usage.
Kubernetes can automatically add taints to nodes, for example, when a node becomes unreachable or has health issues, Kubernetes may apply a taint to prevent new workloads from being scheduled there. Certain workloads might require a specific configuration, so taints help ensure only compatible resources are used.
In addition to these automatic taints, you can control workload distribution by manually adding taints to EKS nodes or agent pools in the DuploCloud Portal.
When in the DuploCloud Portal, click the Add Taint button at the bottom right of the Advanced Options section. The Add Taint pane displays.
Complete the following fields:
Key: Identifies the taint condition, e.g., dedicated, or testing.
Value: Additional context for the key, such as dev, staging, or prod.
Effect: Specifies the action taken if a Pod does not tolerate the taint:
No Schedule: Prevents the Pod from being scheduled on the node unless it tolerates the taint.
Prefer No Schedule: Kubernetes will try to avoid scheduling the Pod on this node, but it may still schedule it if necessary.
No Execute: Immediately evicts existing Pods that don’t tolerate the taint and prevents new ones from being scheduled there.
Click Add Taint. The taint is added to the node.
In the DuploCloud Portal, navigate to Cloud Services -> Hosts.
Navigate to the EC2 or ASG tab, and check for Hosts with a status of Stopped and Tainted. The connection to the underlying node is lost if these statuses are present.
Click on the Tainted status to display the taints.
Scale to or from zero when creating Autoscaling Groups in DuploCloud
DuploCloud allows you to scale to or from zero in Amazon EKS clusters by enabling the Scale from Zero option within the Advanced Options when creating an . This feature intelligently adjusts the number of instances in your cluster, dynamically scaling up when demand increases and down to zero when resources are not in use. Reducing resource allocation during idle periods leads to significant cost savings.
Autoscaling to zero is ideal for Kubernetes workloads that don’t always require 100% availability such as:
Non-Critical Workloads: Batch processing jobs, data analysis tasks, and other non-customer-facing services that can be scaled down to zero during off-peak hours (e.g., nights or weekends).
Dev/Test Environments: Development and testing environments that can be scaled up when developers need them and scaled down when not in use.
Background Jobs: Workloads with background jobs running in Kubernetes that are only needed intermittently, such as those triggered by specific events or scheduled at certain times.
Autoscaling to zero is not suitable for all workloads. Avoid using this feature for:
Customer-Facing Applications: Frontend web applications that must always be available should not use autoscaling to zero, as it can cause downtime and negatively impact user experience.
Workloads Outside Kubernetes: If background jobs or other processes are not running in Kubernetes, autoscaling to zero will not apply. Different scaling strategies are required for these environments.
Scaling to or from zero with AWS Autoscaling Groups (ASG) offers several advantages depending on the context and requirements of your application:
Cost Savings: By scaling down to zero instances during periods of low demand, you minimize costs associated with running and maintaining instances. This pay-as-you-go model ensures you only pay for resources when they are actively being used.
Resource Efficiency: Scaling to zero ensures that resources are not wasted during periods of low demand. By terminating instances when they are not needed, you optimize resource utilization and prevent over-provisioning, leading to improved efficiency and reduced infrastructure costs.
Flexibility: Scaling to zero provides the flexibility to dynamically adjust your infrastructure in response to changes in workload. It allows you to efficiently allocate resources based on demand, ensuring that your application can scale up or down seamlessly to meet varying levels of traffic.
Simplified Management: With automatic scaling to zero, you can streamline management tasks associated with provisioning and de-provisioning instances. The ASG handles scaling operations automatically, reducing the need for manual intervention and simplifying infrastructure management.
Rapid Response to Increased Demand: Scaling from zero allows your infrastructure to quickly respond to spikes in traffic or sudden increases in workload. By automatically launching instances as needed, you ensure that your application can handle surges in demand without experiencing performance degradation or downtime.
Improved Availability: Scaling from zero helps maintain optimal availability and performance for your application by ensuring that sufficient resources are available to handle incoming requests. This proactive approach to scaling helps prevent resource constraints and ensures a consistent user experience even during peak usage periods.
Enhanced Scalability: Scaling from zero enables your infrastructure to scale out horizontally, adding additional instances as demand grows. This horizontal scalability allows you to seamlessly handle increases in workload and accommodate a growing user base without experiencing bottlenecks or performance issues.
Elasticity: Scaling from zero provides elasticity to your infrastructure, allowing it to expand and contract based on demand. This elasticity ensures that you can efficiently allocate resources to match changing workload patterns, resulting in optimal resource utilization and cost efficiency.
Save resources by hibernating EC2 hosts while maintaining persistence
When you hibernate an instance, Amazon EC2 signals the operating system to perform hibernation (suspend-to-disk). Hibernation saves the contents from the instance memory (RAM) to your Amazon Elastic Block Store (Amazon EBS) root volume. Amazon EC2 persists the instance's EBS root volume and any attached EBS data volumes.
For more information on Hibernation, see the .
Before you can hibernate an EC2 Host in DuploCloud, you must configure the EC2 host at launch to use the Hibernation feature in AWS.
Follow the steps in the before attempting Hibernation of EC2 Host instances with DuploCloud.
After you configure your EC2 hosts for Hibernation in AWS:
In the DuploCloud Portal, navigate to Cloud Services -> Hosts.
In the EC2 tab, select the Host you want to Hibernate.
Click the Actions menu, and select Hibernate Host. A confirmation message displays.
Click Confirm. On the EC2 tab, the host's status displays as hibernated.
Enable log collection for non-Default DuploCloud Tenants
Enable logging to deploy AWS Log Collector to collect logs for selected Tenant(s). Once logging is enabled for Tenant(s), you can configure log collection, tailoring your log data to display only relevant information.
Before configuring logging per Tenant, for the Default Tenant.
Configure AWS Log Collector to collect logs for non-Default Tenants.
From the DuploCloud Portal, navigate to Administrator -> Observability -> Basic -> Settings.
Select the Logging tab, and click Add. The Enable Logging pane displays.
In the Select Tenant list box, select the Tenant for which you want to enable log collection.
In the Cert ARN list box, select the correct ARN.
In the Log retention in Index(Days) field, enter the number of days logs should be retained.
Backup your hosts (VMs)
Create Virtual Machine (VM) snapshots in the DuploCloud Portal.
In the DuploCloud Portal, navigate to Cloud Services -> Hosts. The Hosts page displays.
From the Name column, select the Host you want to backup.
Click Actions and select Snapshot.
Disable CloudFormation's SourceDestCheck in EC2 Host metadata
The AWS Cloudformation template contains a that ensures that an EC2 Host instance is either the source or the destination of any traffic the instance receives. In the DuploCloud Portal, this parameter is specified as true, by default, enabling source and destination checks.
There are times when you may want to override this default behavior, such as when an EC2 instance runs services such as network address translation, routing, or firewalls. To override the default behavior and set the SourceDestCheck parameter to false, use this procedure.
SourceDestCheck in the DuploCloud PortalSet AWS CloudFormation SourceDestCheck to false for an EC2 Host:
In the DuploCloud Portal, navigate to Cloud Services -> Hosts.
In the EC2 tab, select the Host for which you want to disable SourceDestCheck.
Click the Metadata tab.
Click Add. The Add Metadata pane displays.
In the Key field, enter SourceDestCheck.
In the Value field, enter False.
Click Create. The Key/Value pair is displayed in the Metadata tab.
Click the menu icon () on the version you want to set as the default.
To remove or edit an Auto Reboot Tenant-level configuration, click the () icon and select Edit Setting or Remove Setting.
See the for commands, flags, and examples to resolve taints.
Click Submit. Log collection for the selected Tenant deploys based on the .
Once logging is enabled, you can .
Once you take a VM Snapshot, the snapshot displays as an available Image ID when you .
DuploCloud platform comes with an option of centralized metrics for Docker containers, Virtual machines as well as various cloud services like ELB, RDS, ECache, ECS, Kafka etc. These metrics are displayed through Grafana which is embedded into the DuploCloud UI. Just like central logging these are not turned on by default but can be setup with a single click.
Fix faults automatically to maintain system health
You can configure Hosts to auto-reboot and heal faults automatically, either at the Tenant level, or the Host level. See the Configure Auto Reboot topic for more information.
Display logs for the DuploCloud Portal, components, services, and containers
The central logging dashboard displays detailed logs for Service and Tenant. The dashboard uses Kibana and preset filters that you can modify.
In the DuploCloud Portal, navigate to Observability -> Logging.
Select the Tenant from the Tenant list box at the top of the DuploCloud Portal.
Select the Service from the Select Service list box.
Modify the DQL to customize Tenant selection, if needed.
Adjust the date range by clicking Show dates.
Add filters, if needed.
DuploCloud pre-filters logs per Tenant. All DuploCloud logs are stored in a single index. You can see any Tenant or combination of Tenants (using the DQL option) but the central logging control plane is shared, with no per-Tenant access.
Confirm that your Hosts and Services are running or runnable to view relevant log data.
See Kubernetes Containers for information on displaying logs per container.
Configure log collection per Tenant in the DuploCloud Portal
Tailor your logging data to your specific needs by configuring log collection per Tenant.
Before configuring logging for each Tenant, enable logging for the Default Tenant and enable logging for non-Default Tenants, if needed.
If a Tenant is not included in the Enable/Disable logs collection for tenants area, ensure that you have completed the listed prerequisites.
From the DuploCloud Portal, navigate to Administrator -> Observability -> Basic -> Settings, and select the Logging tab.
In the Enable/Disable logs collection for tenants area, select the Tenants for which you want to enable log collection.
Click Update. Elastic Filebeat Service begins log collection for the selected Tenants.
When you enable logging for a Tenant, an Elastic Filebeat Service starts and begins log collection. The Elastic Filebeat Service must be running for log collection to occur.
To view the Filebeat Service, navigate to Kubernetes -> Services.
Monitoring Kubernetes status with the K8s Admin dashboard
Use the K8s Admin dashboard to monitor various statistics and statuses for Kubernetes, including the number and availability of StatefulSets defined for a service.
In the DuploCloud Portal, select Administrator -> Observability -> Metrics.
Click the k8s tab. The K8s Admin dashboard displays.
Under Observability -> Metrics we have the various metrics per Tenant.
While there are 8-10 out-of-box dashboard for various services, one can add their own dashboards and make them appear in Duplo Dashboard through a configuration
Metrics setup comprises of two parts
Control Plane: This comprises of a Grafana service for dashboard and a Prometheus container for fetching VM and container metrics. Cloud service metrics are directly pulled by Grafana from AWS without requiring Prometheus.
To enable Metrics go under Administrator -> Observability -> Settings. Select the Monitoring tab and click on "Enable Monitoring"
Metrics Collector: Once Metrics control plane is ready i.e. Grafana and Prometheus service has been deployed and are active, you can enable Metrics on a per tenant basis. Navigate to Administrator -> Observability -> Settings. Select the Monitoring tab, and using the toggle buttons to enable monitoring for individual Tenants. This triggers the deployment of Node Exporter and CAdvvisor container in each Host in the tenant similar to how Log Collectors like File beat were deployed for fetching central logs and sending to Open Search.
Set up features for auditing and view auditing reports and logs
The DuploCloud Portal provides a comprehensive audit trail, including reports and logs, for security and compliance purposes. Using the Show Audit Records for list box, you can display real-time audit data for:
Auth (Authentications)
Admin (Administrators)
Tenants (DuploCloud Tenants)
Compliance (such as HIPAA, SOC 2, and HIGHTRUST, among others)
Kat-Kit (DuploCloud's CI/CD Tool)
In the DuploCloud Portal, navigate to Administrator -> Observability -> Settings, and select the Audit tab. The Audit page displays.
Click the Enable Audit link.
To view complete auditing reports and logs, navigate to the Observability -> Audit page in the DuploCloud Portal.
You can create an S3 bucket for auditing in another account, other than the DuploCloud Master Account.
Verify that the S3 bucket exists in another account, and note the bucket name. In this example, we assume a BUCKET_REGION of us-west-2 and a BUCKET name of audit-s2-bucket-another-account.
Ensure that your S3 bucket has Duplo Master permission to access the S3:PutObject. Refer to the code snippet below for an example.
In the DuploCloud Portal, navigate to Administrator -> System Settings.
Click the System Config tab.
Continuing the example above, configure the S3BUCKET_REGION.
Click Add. The Add Config pane displays.
From the Config Type list box, select AppConfig.
in the Key list box, enter DUPLO_AUDIT_S3BUCKET_REGION.
In the Value field, enter us-west-2.
Click Submit.
Continuing the example above, configure the S3BUCKET name.
Click Add. The Add Config pane displays.
From the Config Type list box, select AppConfig.
in the Key list box, enter DUPLO_AUDIT_S3BUCKET.
In the Value field, enter audit-s2-bucket-another-account.
Click Submit.
Your S3 bucket region and name configurations are displayed in the System Config tab. View details on the Audit page in the DuploCloud Portal.
Contact your DuploCloud Support team if you have additional questions or issues.
Change configuration for the Control Plane, customize Platform Services
There are several use cases for customized log collection. The central logging stack is deployed within your environment, as with any other application, streamlining the customization process.
The version of OpenSearch, the EC2 host size, and the control plane configuration are all deployed based on the configuration you define in the Service Description. Use this procedure to customize the Service Description according to your requirements.
You must make Service Description changes before you enable central logging. If central logging is enabled, you cannot edit the description using the Service Description window.
In the DuploCloud Portal, navigate to Administrator -> System Settings.
In the Service Description tab, in the Name column, select duplo_svd_logging_opensearch. The Service Description window displays.
Edit the YAML in the Service Description window as needed.
Click Update when the configuration is complete to close the window and save your changes.
You can update the Control Plane configuration by editing the Service Description. If the control plane is already deployed using the Service Description specification, then updating the description is similar to making a change to any application.
Note that Control Plane Components are deployed in the DuploCloud Default Tenant. Using the Default Tenant, you can change instance size, Docker images, and more.
You can update the log retention period using the OpenSearch native dashboard by completing the following steps.
From the DuploCloud portal, navigate to Administrator -> Observability -> Logging.
Click Open New Tab to access the OpenSearch dashboard.
Navigate to Pancake -> Index management -> State management policies.
Edit the FileBeat YAML file and update the retention period.
For more information see the OpenSearch documentation.
The new retention period settings will only apply to logs generated after the retention period was updated. Older logs will still be deleted according to the previous retention period settings.
You can modify Elastic Filebeat logging configurations, including mounting folders other than /var/lib/docker for writing logs to folders other than stdout.
You need to customize the log collection before enabling logging for a Tenant.
If logging is enabled, you can update the Filebeat configuration for each tenant by editing the Filebeat Service Description (see the procedure in Defining Control Plane Configuration).
Alternately, delete the Filebeat collector from the Tenant and the platform automatically redeploys based on the newest configuration.
In the DuploCloud Portal, navigate to Administrator -> System Settings.
Select the Platform Services tab.
Click the Edit Platform Services button. The Platform Services window displays. Select the appropriate Filebeat service. For native container management, select filebeat; for Kubernetes container management, select filebeat-k8s.
Edit the YAML in the Platform Services window as needed.
Click Update to close the window and save your changes.
With DuploCloud, you have the choice to deploy third-party tools such as Datadog, Sumo Logic, and so on. To do this, deploy Docker containers that act as collectors and agents for these tools. Deploy and use these third-party app containers as you would any other container in DuploCloud.
Faults that happen in the system, be it Infrastructure creation, container deployments, Application health checks, or any Triggered Alarms can be tracked in the DuploCloud portal under Faults Menu.
You can look at Tenant-specific faults under Observability -> Faults or all the faults in the system under Administrator -> Faults.
You can set the AWS Alerts for individual metrics.
From the DuploCloud portal, navigate to Observability -> Alerts and click Add. The Create Alert pane displays.
Enter the Resource Type and select the resource from the Resource type list box. Click Next.
Fill in the necessary information and click Create. The Alert is created.
View general alerts from the DuploCloud Portal in the Observability -> Alerts.
Select the Alerts tab for alerts pertaining to a specific resource, such as Hosts.
Access specific resources in the AWS Console using the DuploCloud Portal
Use Just-In-Time (JIT) to launch the AWS console and work with a specific Tenant configuration, or to obtain Administrator privileges.
DuploCloud users have AWS Console access for advanced configurations of S3 Buckets, Dynamo databases, SQS, SNS Topic, Kinesis stream, and API Gateway resources that are created in DuploCloud. ELB and EC2 areas of the console are not supported.
Using the DuploCloud Portal, click on the Console link in the title bar of the AWS resource you created in DuploCloud, as in the example for S3 Bucket, below.
Clicking the Console link launches the AWS console and gives you access to the resource, with permissions scoped to the current Tenant.
Using the Console link, you don't need to set up permissions to create new resources in the AWS Console. You can perform any operations on resources that are created with DuploCloud.
For example, you can create an S3 bucket from the DuploCloud UI, and then launch the AWS Console with the Console link, removing files, setting up static web hosting, and so on. Similarly, you can create a DynamoDB in DuploCloud and use the AWS console to add and remove entries in a database table.
Enable and view alert notifications in the DuploCloud Portal
DuploCloud supports viewing of Faults in the portal and sending notifications and emails to the following systems:
Sentry
PagerDuty
NewRelic
OpsGenie
You will need to generate an keys from each of these vendor systems, and then provide that key to DuploCloud to enable integration.
In the Sentry website, navigate to Projects -> Create a New Project.
Click Settings -> Projects -> project-name -> Client keys. The Client Keys page displays.
Complete the DSN fields on the screen.
Click Generate New Key.
In the DuploCloud Portal, navigate to Observability -> Faults.
Click Update Notifications Config. The Set Alert Notifications Config pane displays.
In the Sentry - DSN field, enter the key you received from Sentry.
In the Alerts Frequency (Seconds) field, enter a time interval in seconds when you want alerts to be displayed.
Click Update.
In the PagerDuty website home page, select the Services tab and navigate to the service that receives Events. If a Service does not exist, click New Service. When prompted, enter a friendly Name (for example, your DuploCloud Tenant name) and click Next.
Assign an Escalation policy, or use an existing policy.
Click Integration.
Click Events API V2. Your generated Integration Key is displayed as the second item on the right side of the page. This is the Routing Key you will supply to DuploCloud.
Copy the Integration Key to your Clipboard.
In the DuploCloud Portal, navigate to Observability -> Faults.
Click Update Notifications Config. The Set Alert Notifications Config pane displays.
In the Pager Duty - Routing Key field, enter the key you generated from PagerDuty.
In the Alerts Frequency (Seconds) field, enter a time interval in seconds when you want alerts to be displayed.
Click Update.
In the DuploCloud Portal, navigate to Observability -> Faults.
Click Update Notifications Config. The Set Alert Notifications Config pane displays.
In the NewRelic - API Key field, enter the key you generated from NewRelic.
In the Alerts Frequency (Seconds) field, enter a time interval in seconds when you want alerts to be displayed.
Click Update.
In the OpsGenie website, generate an API Key to integrate DuploCloud faults with OpsGenie.
In the DuploCloud Portal, navigate to Observability -> Faults.
Click Update Notifications Config. The Set Alert Notifications Config pane displays.
In the OpsGenie - API Key field, enter the key you generated from OpsGenie.
In the Alerts Frequency (Seconds) field, enter a time interval in seconds when you want alerts to be displayed.
Click Update.
DuploCloud makes access to AWS extraordinarily simple with just-in-time (JIT) access to both the AWS console and the AWS CLI, both with least-priviledged IAM permissions and short-lived access.
DuploCloud-JIT (Just-In-Time) offers temporary access to the AWS Console to quickly and easily interact with your AWS resources. With DuploCloud-JIT, you can perform necessary tasks without relying on long-lived credentials, simplifying access while maintaining strict security controls.
Use DuploCloud-JIT for tasks that require short-term access to AWS resources, such as:
One-Time JIT Tasks: Accessing AWS resources like S3 Buckets or DynamoDB for one-time tasks.
Automated Scripts with Short-Lived Access: Running scripts or CI/CD pipeline tasks that need limited-time access, such as deploying applications or running tests.
Ad-Hoc Troubleshooting: Troubleshooting issues or urgent maintenance that require immediate authentication.
Dynamic Access for Temporary Services: Securely authenticating and interacting with services that are needed for a limited time.
Interactive Sessions: Providing users access to AWS Console for specific tasks without the complexity of permanent credentials.
You can obtain DuploCloud JIT access to AWS Console through the DuploCloud UI, or using command-line tools and duplo-jit or duplo-ctl.
Access AWS Console using the Console link from your user profile page, or a specific resource page. To access the AWS Console from a specific resource page, see the .
To access the AWS Console from your user profile page, follow these steps:
In the DuploCloud Portal, navigate to Administrator -> Users.
Click the username in the upper right corner, and select Profile.
Click the JIT AWS Console button. A browser opens, giving you access to AWS Console.
From the JIT AWS Console list box, you can also select Copy AWS Console URL, Temporary AWS Credentials, or AWS access from my Workstation.
duplo-jit or duplo-ctlDuploCloud-JIT CLI access is based on user permissions configured in the DuploCloud Portal. For instance, if you have Administrator permissions in DuploCloud, you can gain admin-level JIT access. If you are a User, your JIT access will be restricted to the resources and functionalities your DuploCloud permissions permit.
duplo-jitInstall duplo-jit with Homebrew, or from GitHub releases:
duplo-jit with HomebrewRun the following command:
duplo-jit from GitHub ReleasesExtract the archive listed in the table below based on the operating system and processor you are running.
Add the path to duplo-jit to your $PATH environment variable.
Obtain credentials using an API token, or interactively:
Edit the ~/.aws/config file, and add the following profile, as shown in the code snippet below:
To obtain credentials interactively, rather than with a token, replace --token <DUPLO_TOKEN> in the argument above with --interactive.
When you make the first AWS call, you are prompted to grant authorization through the DuploCloud portal, as shown below.
Upon successful authorization, A JIT token is provided. This token is valid for one (1) hour. When the token expires, you are prompted to re-authorize the request.
Ensure that the AWS CLI is configured with the profile name that matches the one you used when obtaining credentials. This can be done in the ~/.aws/config file.
Use the following command, replacing <ENV_NAME> with your actual environment name:
This command will list your EC2 instances in the specified environment.
Run one of the following commands to copy an AWS Console URL link to your clipboard. You can use the link in any browser.
All of these examples assume Administrator access. If you are obtaining JIT access for a User role, replace the --admin flag in the commands with --tenant <YOUR_TENANT>. For example, if your tenant's name is dev01, you would use --tenant dev01. Tenants are lower-case at the CLI.
zsh shellAdd the following to your .zshrc file:
usage is jitnow <ENV_NAME>
If you are receiving errors when attempting to retrieve credentials, try running the command with the --no-cache argument.
From the DuploCloud Portal, navigate to Administrator -> System Settings.
Select the System Config tab, and click Add. The Add Config pane displays.
From the Config Type list box, select Flags.
From the Key list box, select Disable Non-Admin AWS JIT Access On UI.
In the Value list box, select True. JIT AWS access for non-admin users is disabled.
By default, JIT sessions expire after one (1) hour. You can modify the session timeout setting for a specific Tenant in the DuploCloud Portal.
In the DuploCloud Portal, navigate to Administrator -> Tenant.
Select the Tenant name from the NAME column.
Select the Settings tab, and click Add. The Add Tenant Feature pane displays.
Select AWS Access Token Validity from the Select Feature list box.
In the Value field, enter the length of time JIT access should remain active in seconds.
Click Update. The new setting is displayed on the Tenant details page under the Settings tab.
By default, AWS IAM roles have a maximum session duration of one (1) hour. You can modify the maximum session duration for both the AWS Master IAM role (admin-level) and all Tenant-specific IAM roles in the DuploCloud Portal.
This configuration applies to the AWS Master IAM role and specifies the session duration for administrators who manage AWS resources in the platform. The JIT access duration determines how long an administrator’s session remains active before expiration.
From the DuploCloud Portal, navigate to Administrator -> Systems Settings.
Select the System Config tab, and click Add. The Add Config pane displays.
From the Config Type list box, select Other.
In the Other Config Type field, enter AppConfig.
In the Key field, enter AdminJitSessionDuration.
In the Value field, enter the length of time JIT access should remain active in seconds.
Click Submit. The Admin-JIT session duration is configured.
This configuration applies to all Tenant-specific IAM roles within the platform. It sets the session duration for all Tenant users or roles, ensuring a consistent JIT session timeout across all Tenants.
Navigate to Administrator -> Systems Settings.
Select the System Config tab, and click Add. The Add Config pane displays.
From the Config Type list box, select AppConfig.
In the Key list box, select AWS Role Max Session Duration.
In the Value field, select the desired duration for how long JIT access should remain active, or choose Custom and specify a Custom Duration.
Click Submit. The Tenant JIT session duration is configured.
Displaying Service and Tenant billing data.
From the DuploCloud portal, administrators can by month, week, and Tenant. Non-administrator users can they have user access to.
View the billing details for your company's AWS account.
Log in as an administrator, and navigate to Administrator -> Billing.
You can view usage by:
Time
Select the Spend by Month tab and click More Details to display monthly and weekly spending options.
Tenant
Select the Spend by Tenant tab.
You must first enable the billing feature to view or manage usage costs in the DuploCloud Portal.
View billing details for a selected Tenant. This option is accessible to non-administrator users with user access to the selected Tenant.
Select the Tenant name from the Tenant list box.
Navigate to Cloud Services -> Billing. The Billing page displays.
The Spend by Month tab lists the five services with the highest spending for each month for the selected Tenant. Click More Details on any month's card to display more details about that month's spending.
Activating cost allocation tags in DuploCloud AWS
The duplo-project cost allocation tag must be activated after you enable IAM access to billing data. Use the same AWS user and account that you used to enable IAM access to activate cost allocation tags.
To apply and activate cost allocation tags, follow the steps in .
After you activate the tag successfully, you should see this screen:
DuploCloud allows automatic generation of alerts for resources within a Tenant. This makes sure that the defined baseline of monitoring is applied to all current and new resources based on a set of rules.
As an Administrator:
From the DuploCloud Portal, navigate to Administrator -> Tenants.
Click the name of your Tenant from the list and select the Alerting tab.
Click Enable Alerting. An alerts template displays. The alerts template contains rules for each AWS namespace and metric to be monitored.
Review the alerts template, and adjust the thresholds
Click Update
Set billing alerts based on the previous month's spending or define a custom threshold. Receive email notifications if the current month's expenses exceed a specified percentage of the threshold.
From the DuploCloud Portal, navigate to Administrator -> Billing, and select the Billing Alerts tab.
Click Add or Edit.
Enable Billing Alerts.
Select a threshold and trigger for the alert and enter the email of the administrator user who will receive the email notifications.
Click Submit. The alert details show on the Billing Alerts tab.
Grant AIM permissions to view billing data in AWS
IAM access permissions must be obtained to view the billing data in AWS.
Follow the steps in this to obtain access.
In order to perform the steps in , you must be logged in asrootfrom the AWS instance that manages cost and billing for the AWS organization.
Make changes to fault settings by adding Flags under Systems Settings in the DuploCloud portal
If there is a Target Group with no instances/targets, DuploCloud generates a fault. You can configure DuploCloud's Systems Settings to ignore Target Groups with no instances.
From the DuploCloud portal, navigate to Administrator -> Systems Settings.
Select the System Config tab.
Click Add. The Add Config pane displays.
For ConfigType, select Other.
In the Other Config Type field, type Flags.
In the Key field, enter IgnoreTargetGroupWithNoInstances.
In the Value field, enter True.
Click Submit. The Flag is set and DuploCloud will not generate faults for Target Groups without instances.
Manage costs for resources
The DuploCloud Portal allows you to view and manage resource usage costs. As an administrator, you can view your company's billing data by month, week, or Tenant. You can configure billing alerts, explore historical resource costs, and view DuploCloud license usage information. Non-administrator users can view billing data for Tenants they can access by viewing billing data for a selected Tenant.
To enable the billing feature, you must:
Enable access to billing data in AWS by following the steps in this .
so that DuploCloud can retrieve billing data.
Enable setting of SNS Topic Alerts for specific Tenants
SNS Topic Alerts provide a flexible and scalable means of sending notifications and alerts across different AWS services and external endpoints, allowing you to stay informed about important events and incidents happening in your AWS environment.
SNS is a fully managed service that enables you to publish messages to topics. The messages can be delivered to subscribers or endpoints, such as email, SMS, mobile push notifications, or even HTTP endpoints.
SNS Alerts can only be configured for the specific resources included under Observability -> Alerts in the DuploCloud Portal. Integrating external monitoring programs (e.g., Sentry) allows you to view all of the faults for a particular Tenant under Observability -> Faults.
Configuring this setting will attach the SNS Topic to the alerts in the OK and Alarm state.
In the DuploCloud Portal, navigate to Administrator -> Tenants. The Tenants page displays.
Select the Tenant for which you want to set SNS Topic Alerts from the NAME column.
Click the Settings tab.
Click Add. The Add Tenant Feature pane displays.
From the Select Feature list box, select Set SNS Topic Alerts.
In the field below the Select Feature list box, enter a valid SNS Topic ARN.
Click Add. The configuration is displayed in the Settings tab.
Displaying Node Usage for billing
DuploCloud calculates license usage by Node for the following categories:
Elastic Compute Cloud
Elastic Container Services
AWS Lambda Functions
Managed Workflows for Apache Airflow
In the DuploCloud portal, navigate to Administrator -> Billing. The Billing page displays.
Click the DuploCloud License Usage tab.
Click More Details in any License Usage card for additional breakdown of Node Usage statistics per Tenant.
Click the DuploCloud license documentation link to download a copy of the license document.
An Administrator can define Quotas for resource allocation in a DuploCloud Plan. Resource allocation can be restricted via providing Instance Family and Size. An administrator can restrict the total number of allowed resources by setting Cumulative Count value per Resource type.
Once the Quota is defined, DuploCloud users are restricted to create new resources when the corresponding quota configured in Plan is reached.
The quotas are controlled at the Instance Family level, such as, if you define a quota for t4g.large, it will be enforced including all lower instance types in the t4g family as well. So a quota with a count of 100 for t4g.large will mean instances up to that instance type cannot exceed 100.
To gain JIT AWS Console access through a CLI, install duplo-jit and , obtain credentials, and access the AWS Console.
Download the latest .zip archive from for your operating system.
Obtain an. While you can create a temporary or permanent API token, a permanent token is recommended.
If you increase the JIT session timeout beyond the AWS default of one (1) hour, you must also assigned to your DuploCloud Tenant.
Intel macOS
darwin_amd64.zip
M1 macOS
darwin_arm64.zip
Windows
windows_amd64.zip
Using containers and DuploCloud Services with AWS EKS and ECS
Containers and Services are critical elements of deploying AWS applications in the DuploCloud platform. Containers refer to Docker containers: lightweight, standalone packages that contain everything needed to run an application including the code, runtime, system tools, libraries, and settings. Services in DuploCloud are microservices defined by a name, Docker image, and a number of replicas. They can be configured with various optional parameters and are mapped to Kubernetes deployment sets or StatefulSets, depending on whether they have stateful volumes.
DuploCloud supports three container orchestration technologies to deploy containerized applications in AWS: Amazon Elastic Container Service (ECS), Amazon Elastic Kubernetes Service (EKS), and Native Docker containers in virtual machines (VMs). Each option provides benefits and challenges depending on your needs and requirements.
Amazon Elastic Container Service (ECS) is a fully managed service that uses its own orchestration engine to manage and deploy Docker containers. It is quite easy to use, integrates well with other AWS services, and is optimized for running containers in the AWS ecosystem. The tradeoff for this simplicity is that ECS is not as flexible or versatile as EKS and is less portable outside the AWS ecosystem.
Amazon Elastic Kubernetes Service (EKS) is a managed service that uses the open-source container orchestration platform Kubernetes. The learning curve is steeper for EKS than ECS, as users must navigate the complexities of Kubernetes. However, EKS users benefit from the excellent flexibility that Kubernetes’ wide range of tools, features, solutions, and portability provides.
Docker is the foundational containerization technology. It is not managed, so the user manually controls the containers and orchestration. Although Docker requires considerably more user input than ECS or EKS, it offers greater control over the VM infrastructure, strong isolation between applications, and supreme portability.
Adding a Service in the DuploCloud Platform is not the same as adding a Kubernetes service. When you deploy DuploCloud Services, the platform implicitly converts your DuploCloud Service into either a deployment set or a StatefulSet. The service is mapped to a deployment set if there are no volume mappings. Otherwise, it is mapped to a StatefulSet, which you can force creation of if needed. Most configuration values are self-explanatory, such as Images, Replicas, and Environmental Variables.
Kubernetes clusters are created during Infrastructure setup using the Administrator -> Infrastructure option in the DuploCloud Portal. The cluster is created in the same Virtual Private Cloud (VPC) as the Infrastructure. Building an Infrastructure with an EKS/ECS cluster may take some time.
Next, you deploy an application within a Tenant in Kubernetes. The application contains a set of VMs, a Deployment set (Pods), and an application load balancer. Pods can be deployed either through the DuploCloud Portal or through kubectl,using HelmCharts.
When you create a service, refer to the registry configuration in Docker -> Services | Kubernetes -> Services | Cloud Services -> ECS -> Services. Select the Service from the NAME column and select the Configuration tab. Note the values in the Environment Variables and Other Docker Config fields.
For example:
{"DOCKER_REGISTRY_CREDENTIALS_NAME":"registry1"}
Managing AWS services and related components
Applications are written involving many AWS Services like S3 for Object Store, RDS for RDBS (SQL), Redis, Kafka, SQS, SNS, Elastic Search, and so on. While each of their configurations needs a few application-centric inputs, there are scores of lower-level nuances around access control, security, and compliance among others.
Using DuploCloud you can pretty much create any service within the Tenant using basic app-centric inputs while the platform will make sure the lower-level nuances are programmed to best practices for security and compliance.
Every service within the Tenant will automatically be reachable to any application running within that tenant. If you need to expose some service from one Tenant to another, see Allow Cross-tenant Access.
DuploCloud adds new AWS services to the platform on almost a weekly basis, if a certain service is not documented here please contact the DuploCloud Team. Even if the feature is currently available, the DuploCloud team will enable the feature in a matter of days.
Supported Services are listed in alphabetical order, following the core services: Containers, Load Balancers, and Storage.
Configuration and Secret management in AWS
There are many ways to pass configurations to containers at run-time. Although simple to set up, using Environmental Variables can become complex if there are too many configurations, especially files and certificates.
In Kubernetes, you also have the option to populate environment variables from Config Maps or Secrets.
You can use an S3 Bucket to store and pass configuration to the containers:
Create an S3 bucket in the Tenant and add the needed configurations in an S3 Bucket as a file.
Set the S3 Bucket name as an Environmental Variable.
Create a start-up script that defines the entry point of the container to download the file from the S3 bucket into the container, referenced by the Environmental Variable. Do this by:
Similar to using an S3 bucket, you can create values in an SSM parameter store (navigate to Cloud Services -> App Integration, and select the SSM Parameters tab) and set the Name of the parameter in the Environmental Variable. You then use a startup script in the AWS CLI to pull values from SSM and set them for the application in the container, either as an Environmental Variable or as a file.
Use the AWS Secrets Manager to set configs and secrets in Environmental Variables. Use a container startup script in the AWS CLI to copy secrets and set them in the appropriate format in the container.
Use the ECS Task Definition Secrets fields to set the configuration. For example::
Where X_SERVICE_TOKEN is the Secret defined in the JSON and VALUE_FROM is the AWS secret ARN.
See the Kubernetes Configs and Secrets section.
Use case:
Collection of data from using various methods/sources
Web scraping: Selenium using headless chrome/firefox.
Web crawling: status website sing crawling
API to Data collection: It could be REST or GraphQL API
Private internal customer data collected over various transactions
Private external customer data collected over secured SFTP
The data purchased from 3rd party
The data from various social networks
Correlate data from various sources
Clean up and Process data and apply various statistical methods, create
Correlate terabytes of data from various sources and make sense from the data.
Detect anomalies, summarize, bucketize, and various aggregations
Attach meta-data to enrich data.
Create data for NLP and ML models for predictions of future events.
AI/ML pipelines and life-cycle management
Make data available to data science team
Train models and do continuous improvement trials, reinforcement learning.
Create anomalies, bucketize data, summarize and do various aggregations.
Train NLP and ML models for predictions of future events based on history
Create history for models/hyper parameters and data at various stages.
Deploying Apache Spark™ cluster
In this tutorial we will create a Spark cluster with a Jupyter notebook. A typical use case is ETL jobs, for example reading parquet files from S3, processing and pushing reports to databases. The aim is to process GBs of data in faster and cost-effective way.
The high-level steps are:
Create 3 VMs one for each Spark master, Spark worker and Jupyter notebook.
Deploy Docker images for each of these on these VMs.
From the DuploCloud portal, navigate to Cloud Services -> Hosts -> EC2. Click +Add and check the Advanced Options box. Change the value of instance type to ‘m4.xlarge‘ and add an allocation tag ‘sparkmaster‘.
Create another host for the worker. Change the value of instance type to ‘m4.4xlarge‘ and add an allocation tag ‘sparkworker‘. Click Submit. The number of workers depends on how much load you want to process. You should add one host for each worker. They should all have the same allocation tag ‘sparkworker‘. You can add and remove workers and scale up or down the Spark worker service as many times as you want. We will see in the following steps.
Create one more host for Jupyter notebook. Choose the value of instance type to ‘m4.4xlarge‘ and add the allocation tag as ‘jupyter‘.
Navigate to Docker -> Services and click Add. In the Service Name field, enter ‘sparkmaster‘ and in the Docker Image field, enter ‘duplocloud/anyservice:spark_v6', add the allocation tag ‘sparkmaster‘. From the Docker Networks list box, select Host Network. By setting this in Docker Host config you are making the container networking the same as the VM i.e., container IP is same as VM.
First we need the IP address of Spark master. Click on Spark master service and on the right expand the container details and copy the host IP. Create another service, under name choose ‘jupyter‘, image ‘duplocloud/anyservice:spark_notebook_pyspark_scala_v4‘, add the allocation jupyter and select Host network for Docker Host Config, Add volume mapping “/home/ubuntu/jupyter:/home/jovyan/work“, Also provide the environment variables
Replace the brackets <> with the IP you just got. See figure 5.
Create another service named ‘sparkworker1`, image ‘duplocloud/anyservice:spark_v7‘, add the allocation tag ‘sparkworker‘ and select Host Network for Docker Network. Also provide the environment variables
{"node": "worker", "masterip": "<>"}
Replace the brackets <> with the IP you just got. See Figure 5.
Depending on how many worker hosts you have created, use the same number under replicas and that is the way you can scale up and down. At any time, you can add new hosts, set the allocation tag ‘sparkworker‘ and then under services, edit the sparkworker service and update the replicas.
Add or update shell access by clicking on >_ icon. This gives you easy access into the container shell. You will need to wait for 5 minutes for the shell to be ready. Make sure you are connected to VPN if you choose to launch the shell as internal only
Select Jupyter service and expand the container. Copy the hostip and then click on >_ icon.
Once you are inside the shell. Run command ‘> jupyter notebook list‘ to get the URL along with auth token. Replace the IP with Jupyter IP you copied previously. See Figure 5.
In your browser, navigate to the Jupyter URL and you should be able to see the UI.
Now you can use Jupyter to connect to data sources and destinations and do ETL jobs. Sources and destinations can include various SQL and NoSQL databases, S3 and various reporting tools including big data and GPU-based Deep learning.
In this following we will create a Jupyter notebook and show some basic web scraping, using Spark for preprocessing, exporting into schema, do ETLs, join multiple dataframes (parquets), and export reports into MySQL.
Connect to a website and parse html (using jsoup)
Extract the downloaded zip. This particular file is 8 GB in size and has 9 million records in csv
Upload the data to AWS S3
Also Configure session with required settings to read and write from AWS S3
Load data in Spark cluster
Define the Spark schema
Do data processing
Setup Spark SQL
Spark SQL joins 20 GB of data from multiple sources
Export reports to RDS for UI consumption Generate various charts and graphs
Creating Load Balancers for single and multiple DuploCloud Services
DuploCloud provides the ability to configure Load Balancers with the type of Application Load Balancer, Network Load Balancer, and Classic Load Balancer.
DuploCloud provides the ability to configure Load Balancers with the following types:
Application Load Balancer - An ALB provides outbound connections to cluster nodes inside the EKS virtual network, translating the private IP address to a public IP address as part of its Outbound Pool.
Network Load Balancer - An NLB distributes traffic across several servers by using the TCP/IP networking protocol. By combining two or more computers that are running applications into a single virtual cluster, NLB provides reliability and performance for web servers and other mission-critical servers.
Classic Load Balancer - The legacy AWS Load Balancer (which was retired from AWS support, as of August 2022).
Load Balancers can be configured for Docker Native, EKS-Enabled, and ECS Services from the DuploCloud Portal. Using the Portal, you can configure:
Service Load Balancers - Application Load Balancers specific to one service. (Navigate to Docker -> Services or Kubernetes -> Services, select a Service from the list, and click the Load Balancer tab).
Shared and Global load balancers - Application or Network Load Balancers that can be used as a shared Load Balancer between Services and for Global Server Load Balancing (GSLB). (Navigate to Cloud Services -> Networking and select the Load Balancers tab).
DuploCloud allows one Load Balancer per DuploCloud Service. To share a load balancer between multiple Services, create a Service Load Balancer of type Target Group Only.
See the following pages for specific information on adding Load Balancer Listeners for:
To specify a custom classless inter-domain routing (CIDR) value for an NLB Load Balancer, edit the Load Balancer Listener configuration in the DuploCloud Portal.
Before completing this task, you must add a Load Balancer Listener of Type Network LB.
In the DuploCloud Portal, navigate Docker -> Services or Kubernetes -> Services.
Select the Service name from the NAME column.
Click the Load Balancers tab.
Click Add in the Custom CIDR field of the Edit Load Balancer Listener pane.
Add the Custom CIDR(s) and press ENTER. In the example below 10.180.12.0/22 and 10.180.8.0/22 are added. After the CIDRs are added, you add Security Groups for Custom CIDR(s).
Repeat this procedure for each custom CIDR that you want to add.
Navigate to Administrator -> Infrastructure. The Infrastructure page displays.
From the Name column, select the appropriate Infrastructure.
Click the Security Group Rules tab.
Click Add to add a Security Group. The Add Tenant Security pane displays.
From the Source Type list box, select Ip Address.
From the IP CIDR list box, select Custom. A field labeled CIDR notation of allowed hosts displays.
In the CIDR Notation of allowed hosts field enter a custom CIDR and complete the other required fields.
Click Add to add the Security Group containing the custom CIDR.
Repeat this procedure to add additional CIDRs.
In the DuploCloud Portal, navigate to Cloud Services -> Networking.
Click the Load Balancer tab.
Click Add. The Create a Load Balancer pane displays.
In the Name field, enter a name for the Load Balancer.
From the Type list box, select a Load Balancer type.
From the Visibility list box, select Public or Internal.
Click Create.
Instead of creating a unique Load Balancer for each Service you create, you can share a single Load Balancer between multiple Services. This is helpful when your applications run distributed microservices where the requests use multiple services and route traffic based on application URLs, which you can define with Load Balancer Listener Rules.
To accomplish this, you:
Create a Service Load Balancer with the type Target Group Only. This step creates a Service Load Balancer that includes a Target Group with a pre-defined name.
Create a Shared Load Balancer with the Target Group that was defined.
Create routing rules for the Shared Load Balancer and the Target Group it defines.
In the DuploCloud Portal, navigate Docker -> Services or Kubernetes -> Services.
On the Services page, select the Service name in the Name column.
Click the Load Balancers tab.
If no Load Balancers exist, click the Configure Load Balancer link. If other Load Balancers exist, click Add in the LB listeners card. The Add Load Balancer Listener pane displays.
From the Select Type list box, select Target Group Only.
You can create a Load Balancer Listener with a type of Target Group Only for Docker or EKS and ECS Services based on your application requirement. Complete the other required fields and click Add.
The Target Group Only Service Load Balancer is displayed in the LB Listeners area in the Load Balancers tab on the Services page.
Add a Shared Load Balancer before performing this procedure.
In the Load Balancer tab of the Cloud Services -> Networking page, select the Shared Load Balancer you created. The Load Balancer page with the Listeners tab displays.
In the Listeners tab, click Add. The Load Balancer Listener pane displays.
Complete all fields, specifying the Target Group that was created when you added a Load Balancer with the Type Target Group Only in the previous step.
Click Save. The Shared Load Balancer for the Target Group displays in the Listeners tab.
Create a Shared Load Balancer for the Target Group before performing this procedure.
Rules are not supported for Network Load Balancers (NLBs).
Click Add. The Add LB Listener rule page displays.
Create routing rules for the Target Group by setting appropriate Conditions. Add Routing Rules by specifying Rule Type, Values, and Forward Target Group. Forward Target Group lists all the Target Groups created for Docker Native, K8s, and ECS Services. Specify Priority for multiple rules. Use the X button to delete specific Values.
Click Submit.
View the rules you defined for any Shared Load Balancer.
In the DuploCloud portal, navigate to Cloud Services -> Networking.
Select the Load Balancer tab.
From the Name column, select the Load Balancer whose rules you want to view.
Update attributes for your defined Target Group.
In the DuploCloud portal, navigate to Cloud Services -> Networking.
Select the Load Balancer tab.
From the Name column, select the Load Balancer whose defined Target Group attributes you want to modify.
You can use the Other Settings card in the DuploCloud Portal to set the following features:
WAF Web ACL
Enable HTTP to HTTPS redirects
Enable Access Logging
Set Idle Timeout
Drop invalid headers
In the DuploCloud Portal, navigate to Docker -> Services or Kubernetes -> Service. The Services page displays.
Select the Service to which your Load Balancer is attached from the Name column.
Click the Load Balancers tab.
In the Other Settings card, click Edit. The Other Load Balancer Settings pane displays.
In the Other Load Balancer Settings pane, select any or all options.
Click Save.
Restrict open access to your public Load Balancers by enforcing controlled access policies.
From the DuploCloud Portal, navigate to Administrator -> System Settings.
Select the System Config tab, and click Add. The Add Config pane displays.
From the Config Type list box, select Flags.
From the Key list box, select Deny Open Access To Public LB.
In the Value list box, select True.
Click Submit. Open access to public Load Balancers is restricted.
Set Docker registry credentials
To authenticate with private Docker registries, DuploCloud utilizes Kubernetes secrets of type kubernetes.io/dockerconfigjson. This process involves specifying the registry URL and credentials in a .dockerconfigjson format, which can be done in two ways:
Base64 Encoded Username and Password: Encode the username and password in Base64 and include it in the .dockerconfigjson secret.
Raw Username and Password: Directly use the username and password in the secret without Base64 encoding. This method is supported and simplifies the process by not requiring the auth field to be Base64 encoded.
In the DuploCloud Portal, navigate to Docker -> Services.
From the Docker list box, select Docker Credentials. The Set Docker registry Creds pane displays.
Supply the credentials in the required format and click Submit.
Enable the Docker Shell Service by selecting Enable Docker Shell from the Docker list box.
If you encounter errors such as pull access denied or fail to resolve references due to authorization issues, ensure the secret is correctly configured and referenced in your service configuration. For non-default repositories, explicitly code the imagePullSecrets with the name of the Docker authentication secret to resolve image-pulling issues, as in the example below:
You can pull images from multiple Docker registries by adding multiple Docker Registry Credentials.
In the DuploCloud Portal, click Administrator-> Plan. The Plans page displays.
Select the Plan in the Name column.
Click the Config tab.
Click Add. The Add Config pane displays.
Docker Credentials can be passed using the Environment Variables config field in the Add Service Basic Options page. This method is particularly useful for dynamically supplying credentials without hardcoding them into your service configurations. Refer to the Kubernetes Configs and Secrets section for more details on using environment variables to pass secrets.
Ensure all required secrets, like imagePullSecrets for Docker authentication, are correctly added and referenced in the service configuration to avoid invalid config issues with a service. Reviewing the service configuration for any missing or incorrectly specified parameters is crucial for smooth operation.
Managing Containers and Service with EKS and Native Docker Services
For an end-to-end example of creating an EKS Service, see this tutorial.
For a Native Docker Services example, see this tutorial.
In the DuploCloud Portal, navigate to Kubernetes -> Services.
Click Add. The Basic Options section of the Add Service page displays.
In the Service Name field, give the Service a name (without spaces).
From the Cloud list box, select AWS.
From the Platform list box, select EKS Linux.
In the Docker Image field, enter the Docker image.
Optionally, enter any allocation tags in the Allocation Tag field.
From the Replica Strategy list box, select a replication strategy. Refer to the informational ToolTip ( ) for more information.
Specify the number of replicas in the Replicas field (for Static replica strategy). The number of replicas you define must be less than or equal to the number of Hosts in the fleet.
In the Replica Placement list box (for Static or Horizontal Pod Autoscaler replication strategies) select First Available, Place on Different Hosts, Spread Across Zones, or Different Hosts and Spread Across Zones. Refer to the informational ToolTip ( ) for more information.
Optionally, enter variables in the Environmental Variables field.
In the Force StatefulSets list box, select Yes or No (for Static or Horizontal Pod Autoscaler replication strategies).
Optionally, select Tolerate spot instances (for Static or Horizontal Pod Autoscaler replication strategies)
Click Next. The Add Service, Advanced Options page displays.
Configure advanced options as needed. For example, you can implement Kubernetes Lifecycle Hooks in the Other Container Config field (optional).
Click Create. The Service is created.
From the DuploCloud Portal, navigate to Kubernetes -> Services. Select the Service from the NAME column. The Service details page displays.
Using the Services page, you can start, stop, and restart multiple services simultaneously.
In the DuploCloud Portal, navigate to Kubernetes -> Services.
Use the checkbox column to select multiple services you want to start or stop at once.
From the Service Actions menu, select Start Service, Stop Service, or Restart Service.
Your selected services are started, stopped, or restarted as you specified.
Using the Import Kubernetes Deployment pane, you can add a Service to an existing Kubernetes namespace using Kubernetes YAML.
In the DuploCloud Portal, select Kubernetes -> Services from the navigation pane.
Click Add. The Add Service page displays.
Click the Import Kubernetes Deployment button in the upper right. The Import Kubernetes Deployment pane displays.
Paste the deployment YAML code, as in the example below, into the Import Kubernetes Deployment pane.
Click Import.
In the Add Service page, click Next.
Click Create. Your Native Kubernetes Service is created.
You can supply advanced configuration options with EKS in the DuploCloud Portal in several ways, including the advanced use cases in this section.
In the DuploCloud Portal, navigate to Administrator -> System Settings.
Click the System Config tab.
Click Add. The Add Config pane displays.
From the Config Type list box, select, Flags.
From the Key list box, select Block Master VPC CIDR Allow in EKS SG.
From the Value list box, select True.
Click Submit. The setting is displayed as BlockMasterVpcCidrAllowInEksSg in the System Config tab.
You can display and manage the Containers you have defined in the DuploCloud portal. Navigate to Kubernetes -> Containers.
Logs
Displays container logs. When you select this option, the Container Logs window displays. Use the Follow Logs option (enabled by default) to monitor logging in real-time for a running container. See the graphic below for an example of the Container Logs window.
State
Displays container state configuration, in YAML code, in a separate window.
Container Shell
Host Shell
Accesses the Host Shell.
Delete
Deletes the container.
DuploCloud provides you with a Just-In-Time (JIT) security token, for fifteen minutes, to access the kubectl cluster.
In the DuploCloud Portal, select Administrator -> Infrastructure from the navigation pane.
Select the Infrastructure in the Name column.
Click the EKS tab.
Copy the temporary Token and the Server Endpoint (Kubernetes URL) Values from the Infrastructure that you created. You can also download the complete configuration by clicking the Download Kube Config button.
Run the following commands, in a local Bash shell instance:
You have now configured kubectl to point and access the Kubernetes cluster. You can apply deployment templates by running the following command:
If you need security tokens of a longer duration, create them on your own. Secure them outside of the DuploCloud environment.
See this section in the Duplocloud Kubernetes documentation.
See this section in the DuploCloud Kubernetes documentation.
See this section in the DuploCloud documentation.
See Kubernetes Pod Toleration for examples of specifying K8s YAML for Pod Toleration.
Pin a container to a set of hosts using allocation tagging
In DuploCloud, allocation tags give you control over where containers and Services are deployed within a Kubernetes cluster. By default, DuploCloud spreads container replicas across available Hosts to balance resource usage. Allocation tags allow you to label Hosts and Services with specific characteristics, capabilities, or preferences, and to "pin" Services to certain Hosts to meet your operational and resource needs. Allocation tags are useful for deployment requirements like using Hosts with specialized resources, meeting compliance standards, or isolating workloads.
For a Service to run on a specific Host, the Host and the Service must have matching allocation tags. Services without allocation tags are deployed on any available Host in the Kubernetes cluster.
Assign a tag describing the Host's characteristics or capabilities, such as resource capacity, geographic location, or compliance needs.
In the DuploCloud Portal, navigate to Cloud Services -> Hosts. The Hosts page displays.
Select the Host from the NAME column. If the Host is part of an Auto-Scaling Group (ASG), select the ASG tab and select the correct ASG.
Click the Allocation Tag Edit Icon ( ). The Set Allocation Tag pane displays.
In the Allocation Tag field, enter a tag name. Use only alphanumeric characters. Hyphens ( - ) are supported as special characters if needed. For example, highmemory-highcpu is a valid tag name.
Click Set. The allocation tag you set displays in the heading banner for the Host or ASG.
In the DuploCloud Portal, navigate to the Add Service or Edit Service page, and enter a tag name in the Allocation Tag field. When the Service runs, DuploCloud will attempt to select a Host with a matching allocation tag. To pin the Service to run on a specific Host, apply matching allocation tags to the Host and Service.
On the Host or ASG page, select the Metadata tab, and edit or delete the existing allocation tag.
Add custom tags to AWS resources
An Administrator can provide a list of custom tag names that can be applied to AWS resources for any Tenant in a DuploCloud environment.
In the DuploCloud portal, navigate to Administrator -> System Settings -> System Config.
Click Add. The Add Config pane displays.
In the Config Type list box, select App Config.
In the Key list box, select Duplo Managed Tag Keys.
In the Value field, enter the name of the custom tag, for example, cost-center.
Click Submit. In the System Configs area of the System Config tab, your custom tag name is displayed with Type AppConfig and a Key value of DUPLO_CUSTOM_TAGS, as in the example below.
Once the custom tag is added, navigate to Administrator -> Tenants.
Select a Tenant from the Name column.
Click Add.
Click the Tags tab.
In the Key field, enter the name of the custom tag (cost-center in the example) that you added to System Config.
In the Value field, enter an appropriate value. In the Tags tab, the tag Key and Value that you set are displayed, as in the example below.
Working with Load Balancers using AWS ECS
Before you create an ECS Service and Load Balancer, you must create a Task Definition to run the Service. You can define multiple containers in your Task Definition.
For an end-to-end example of deploying an application using an ECS Service, see the AWS Quick Start Tutorial and choose the Creating an ECS Service option.
Tasks run until an error occurs or a user terminates the Task in the ECS Cluster.
Navigate to Cloud Services -> ECS.
In the Task Definitions tab, select the Task Definition Family Name. This is the Task Definition Name that you created prepended by a unique DuploCloud identifier.
In the Service Details tab, click the Configure ECS Service link. The Add ECS Service page displays.
In the Name field, enter the Service name.
In the LB Listeners area, click Add. The Add Load Balancer Listener pane displays.
From the Select Type list box, select Application LB.
In the Container Port field, enter a container port number.
In the External Port field, enter an external port number.
From the Visibility list box, select an option.
In the Heath Check field, enter a path (such as /) to specify the location of Kubernetes Health Check logs.
From the Backend Protocol list box, select HTTP.
From the Protocol Policy list box, select HTTP1.
Select other options as needed and click Add.
On the Add ECS Service page, click Submit.
In the Service Details tab, information about the Service and Load Balancer you created is displayed.
Verify that the Service and Load Balancer configuration details in the Service Details tab are correct.
Roll back a container image for Kubernetes or Docker Services
Container rollback in DuploCloud allows users to quickly revert a Kubernetes or Docker Service's container image to a previous, stable version. This is especially useful in scenarios where a newly deployed container image introduces issues, errors, or failures in the application. With this feature, users can ensure minimal downtime and maintain the stability of their Services by rolling back to a known good state. Container rollback is support for:
Kubernetes (on EKS, AKS, GKE, and DuploCloud Kubernetes)
Docker Services (on ECS)
To roll back a container image in DuploCloud for your EKS Service, first configure system settings to enable container history tracking, and then roll back the container image:
Navigate to Admin -> System Settings.
Select the System Config tab and click Add to create a new configuration.
For Config Type, select Flags.
In the Flag Name field, choose Enable Container Image History Tracking.
Set the Value to True and click Submit.
Select the appropriate Tenant from the Tenant list box.
Navigate to Kubernetes -> Services or Docker -> Services.
In the NAME column, select the service you want to roll back.
From the Actions menu, select Rollback. The Rollback Container Image pane will appear.
In the Image list box, select the version of the container image you want to roll back to.
Click Rollback to revert the service to the selected image.
Managing Containers and Service with ECS
For an end-to-end example of creating an ECS Task Definition, Service, and Load Balancer, see this tutorial.
Using the Services tab in the DuploCloud Portal (navigate to Cloud Services -> ECS and select the Services tab), you can display and manage the Services you have defined.
For ECS Services, select the Service Name and click the Actions menu to Edit or Delete Services, in addition to performing other actions, as shown below.
You can display and manage the Containers you have defined in the DuploCloud portal. Navigate to Kubernetes -> Containers.
Logs
Displays container logs.
State
Displays container state configuration, in YAML code, in a separate window.
Container Shell
Host Shell
Accesses the Host Shell.
Delete
Deletes the container.
You can create up to five (5) containers for ECS services by defining a Task Definition.
To designate a container as Essential, see Defining an Essential Container.
In the DuploCloud Portal, navigate to Cloud Services -> ECS.
In the Task Definitions tab, click Add. The Add Task Definition page displays.
Specify a unique Name for the Task Definition.
From the vCPUs list box, select the number of CPUs to be consumed by the task and change other defaults, if needed.
In the Container - 1 area, specify the Container Name of the first container you want to create.
In the Image field, specify the container Image name, as in the example above.
Specify Port Mappings, and Add New mappings or Delete them, if needed.
Click Submit. Your Task Definition for multiple ECS Service containers is created.
To edit the created Task Definition in order to add or delete multiple containers, select the Task Definition in the Task Definitions tab, and from the Actions menu, select Edit Task Definition.
In AWS ECS, an essential container is a key component of a task definition. An essential container is one that must successfully complete for the task to be considered healthy. If an essential container fails or stops for any reason, the entire task is marked as failed. Essential containers are commonly used to run the main application or service within the task.
By designating containers as essential or non-essential, you define the dependencies and relationships between the containers in your task definition. This allows ECS to properly manage and monitor the overall health and lifecycle of the task, ensuring that the essential containers are always running and healthy.
To designate a container as Essential, follow the Creating multiple containers for ECS Services using a Task Definition procedure to create your containers, but before creating the container you want to designate as Essential, in the Container definition, select the Essential Container option, as in the example below.
Fargate is a technology that you can use with ECS to run containers without having to manage servers or clusters of EC2 instances.
For information about Fargate, contact the DuploCloud support team.
Follow this procedure to create the ECS Service from your Task Definition and define an associated Load Balancer to expose your application on the network.
Working with Load Balancers using AWS EKS
If you need to create an Ingress Load Balancer, refer to the page in the DuploCloud Kubernetes User Guide.
For an end-to-end example of deploying an application using an EKS Service, see the and choose the option.
In the DuploCloud Portal, navigate Kubernetes -> Services.
On the Services page, select the Service name in the Name column.
Click the Load Balancers tab.
If no Load Balancers exist, click the Configure Load Balancer link. If other Load Balancers exist, click Add in the LB listeners card. The Add Load Balancer Listener pane displays.
From the Select Type list box, select a Load Balancer Listener type based on your Load Balancer.
Complete other fields as required and click Add to add the Load Balancer Listener.
To specify a custom classless inter-domain routing (CIDR) value for an NLB Load Balancer, edit the Load Balancer Listener configuration in the DuploCloud Portal.
In the DuploCloud Portal, navigate to Kubernetes -> Services.
On the Services page, select the Service name in the Name column.
Click the Load Balancers tab.
Click Add in the Custom CIDR field of the Edit Load Balancer Listener pane.
Repeat this procedure for each custom CIDR that you want to add.
Navigate to Administrator -> Infrastructure. The Infrastructure page displays.
From the Name column, select the appropriate Infrastructure.
Click the Security Group Rules tab.
Click Add to add a Security Group. The Add Tenant Security pane displays.
From the Source Type list box, select Ip Address.
From the IP CIDR list box, select Custom. A field labeled CIDR notation of allowed hosts displays.
In the CIDR Notation of allowed hosts field enter a custom CIDR and complete the other required fields.
Click Add to add the Security Group containing the custom CIDR.
Repeat this procedure to add additional CIDRs.
In the DuploCloud Portal, navigate to Cloud Services -> Networking.
Click the Load Balancer tab.
Click Add. The Create a Load Balancer pane displays.
In the Name field, enter a name for the Load Balancer.
From the Type list box, select a Load Balancer type.
From the Visibility list box, select Public or Internal.
Click Create.
Instead of creating a unique Load Balancer for each Service you create, you can share a single Load Balancer between multiple Services. This is helpful when your applications run distributed microservices where the requests use multiple services and route traffic based on application URLs, which you can define with Load Balancer Listener Rules.
To accomplish this, you:
Create a Service Load Balancer with the type Target Group Only. This step creates a Service Load Balancer that includes a Target Group with a pre-defined name.
Create a Shared Load Balancer with the Target Group that was defined.
Create routing rules for the Shared Load Balancer and the Target Group it defines.
In the DuploCloud Portal, navigate Kubernetes -> Services.
On the Services page, select the Service name in the Name column.
Click the Load Balancers tab.
If no Load Balancers exist, click the Configure Load Balancer link. If other Load Balancers exist, click Add in the LB listeners card. The Add Load Balancer Listener pane displays.
From the Select Type list box, select Target Group Only.
You can create a Load Balancer Listener with a type of Target Group Only for Docker Mode or Native EKS and ECS Services based on your application requirement. Complete the other required fields and click Add.
The Target Group Only Service Load Balancer is displayed in the LB Listeners area in the Load Balancers tab on the Services page.
In the Load Balancer tab of the Cloud Services -> Networking page, select the Shared Load Balancer you created. The Load Balancer page with the Listeners tab displays.
In the Listeners tab, click Add. The Load Balancer Listener pane displays.
Click Save. The Shared Load Balancer for the Target Group displays in the Listeners tab.
Rules are not supported for Network Load Balancers (NLBs).
Click Add. The Add LB Listener rule page displays.
Create routing rules for the Target Group by setting appropriate Conditions. Add Routing Rules by specifying Rule Type, Values, and Forward Target Group. Forward Target Group lists all the Target Groups created for Docker Native, K8s, and ECS Services. Specify Priority for multiple rules. Use the X button to delete specific Values.
Click Submit.
View the rules you defined for any Shared Load Balancer.
In the DuploCloud portal, navigate to Cloud Services -> Networking.
Select the Load Balancer tab.
From the Name column, select the Load Balancer whose rules you want to view.
Update attributes for your defined Target Group.
In the DuploCloud portal, navigate to Cloud Services -> Networking.
Select the Load Balancer tab.
From the Name column, select the Load Balancer whose defined Target Group attributes you want to modify.
The Update Target Group Attributes pane displays.
Find the attribute you want to update in the Attribute column and update the associated value in the Value column.
Click Update to save the changes.
You can use the Other Settings card in the DuploCloud Portal to set the following features:
WAF Web ACL
Enable HTTP to HTTPS redirects
Enable Access Logging
Set Idle Timeout
Drop invalid headers
In the DuploCloud Portal, navigate to Kubernetes -> Services. The Services page displays.
Select the Service to which your Load Balancer is attached from the Name column.
Click the Load Balancers tab.
In the Other Settings card, click Edit. The Other Load Balancer Settings pane displays.
In the Other Load Balancer Settings pane, select any or all options.
Click Save.
In the LB Listeners area, select the Edit Icon () for the NLB Load Balancer you want to edit. The Edit Load Balancer Listener pane displays.
Note the name of the created Target Group by clicking the Info Icon ( ) for the Load Balancer in the LB Listener card and searching for the string TgName. You will select the Target Group when you create a Shared Load Balancer for the Target Group.
In the Listeners tab, in the Target Group row, click the Actions menu ( ) and select Manage Rules. You can also select Update attributes from the Actions menu, as well, to dynamically update Target Group attributes. The Listener Rules page displays.
In the Listeners tab, in the appropriate Target Group row, click the Actions menu ( ) and select Manage Rules.
In the Listeners tab, in the appropriate Target Group row, click the Actions menu ( ) and select Update attributes.
Use the Options Menu ( ) in each Container row to display Logs, State, Container Shell, Host Shell, and Delete options.
Accesses the Container Shell. To access the Container Shell option, you must first set up .
Use the Options Menu ( ) in each Container row to display Logs, State, Container Shell, Host Shell, and Delete options.
Accesses the Container Shell. To access the Container Shell option, you must first set up .
Click the Plus Icon ( ) to the left of the Primary label, which designates that the first container you are defining is the primary container. The Container - 2 area displays.
Use the and icons to collapse and expand the Container areas as needed. Specify Container Name and Image name for each container that you add. Add more containers by clicking the Add Icon ( ) to create up to five (5) containers, in each container area. Delete containers by clicking the Delete ( X ) Icon in each container area.
Before completing this task, you must .
In the LB Listeners area, select the Edit Icon () for the NLB Load Balancer you want to edit. The Edit Load Balancer Listener pane displays.
Add the Custom CIDR(s) and press ENTER. In the example below 10.180.12.0/22 and 10.180.8.0/22 are added. After the CIDRs are added, you .
Note the name of the created Target Group by clicking the Info Icon ( ) for the Load Balancer in the LB Listener card and searching for the string TgName. You will select the Target Group when you .
before performing this procedure.
Complete all fields, specifying the Target Group that was created when you .
before performing this procedure.
In the Listeners tab, in the Target Group row, click the Actions menu ( ) and select Manage Rules. You can also select Update attributes from the Actions menu, as well, to dynamically update Target Group attributes. The Listener Rules page displays.
In the Listeners tab, in the appropriate Target Group row, click the Actions menu ( ) and select Manage Rules.
In the Listeners tab, in the appropriate Target Group row, click the Actions menu ( ) and select Update Target Group attributes.
To enable stickiness, complete steps 1-5 for above. On the Update Target Group Attributes pane, in the Value field for stickiness.enabled, enter true. Update additional stickiness attributes, if needed. Click Update to save the changes.